
One of the disappointments of the Tetris Tournament (which ruled) was that both Dig Dug and Make Trax were out of commission. I was trying to get the cleaned-up wiring harness and switching power supply installed, and I did, but the monitor was not getting power. Turns out the 3A 125V fuse on the G07 chassis was not inserted cleanly. What’s more, anything I did to get it to stay proved futile, so I had to park the game for a bit until I could remove the chassis and take a closer look.

G07 monitor chassis from Make Trax with bad fuse
Dig Dug was having the same issue with a dead chassis, which was a surprise given I recently cleaned up the Molex connectors for the monitor power. I swapped out the Molex connectors with plastic wire connectors to see if that helped, but still nothing. I could confirm the chassis was getting 120VAC, so I was flummoxed. At this point the event was just an hour or so away, so there was no more time to troubleshoot and I had to put the game on ice.

Dig Dug looking good when the monitor actually turned on
So, feeling energized by the event, I returned in earnest to getting Make Trax up and running (it had been offline for over a year at this point for wiring clean-up), figuring out why Dig Dug‘s monitor had gone black, and even testing out the cleaned-up power board and power brick for Robotron. So a few things to deal with in this update.
Make Trax Monitor Swap
Make Trax was the first to get addressed, and the issue here was pretty simple: just a fuse that needed to be either soldered in with a pigtail fuse or have the clips replaced. That said, I have a lot of G07 chassis and monitors in my fleet of games, and one in particular, Condor, arguably has the best monitor and chassis of the lot (it used to be in Robotron). So, rather than simply fixing the fuse, I decided to swap out the monitor and chassis from Condor to Make Trax. Given both games have vertically oriented monitors, I assumed I wouldn’t have to change the metal mounting bracket—I was wrong. The Condor bracket didn’t clear the back door, so I ultimately had to remove it and swap the metal mounting brackets for the two monitors, which was pretty simple in the end but added a bunch of time.
Once that was done, however, Make Trax looks absolutely gorgeous. The painted maze with the fluorescent green and pink really looks amazing, not to mention the earthy brown color that shows up in level 3. That monitor pops now, and the swap made sense because Condor sits in my basement, whereas Make Trax is at the bava.studio and can showcase an oddball early ’80s game like this one in all of its CRT glory.

That lime green paint in Make Trax/Crush Roller popping with new CRT
The only thing left with Make Trax, if I want to go down the completist path, is to find the original power supply board and test it with one of the two Make Trax power bricks on hand. I’m reluctant to make this a permanent solution given how often Williams games have issues with power boards, but I still like the idea of having it there and in working order, even if I use the switching power supply. Also worth mentioning is that there is no shortage of extra boards for this game: two Make Trax boards and a Crush Roller board. A hack that would be fun is having the ability to switch between the Make Trax and Crush Roller boards. It’s totally superfluous given the gameplay is identical save for the name on the splash page, but I’ve seen other folks do it and I think it would be a cool “little” project.
The Dig Dug Power Gremlins
The Sunday after the Tetris tournament (a week ago), I went into the studio to take a closer look at Dig Dug. I took it out of the arcade and brought it to the front of the space where I do most of the diagnostics on these bad boys. I plugged it into the US power converter and it worked on the first go. It looked gorgeous and I was pretty sure I was being gaslit by the ghosts of Atari. I let it run for a while and no issues.

Later that afternoon I plugged it into a two-socket US step-down power converter simultaneously with Robotron and the monitor did not power on. So odd. The game played blind, the marquee lit up, the sound worked, but nothing on the screen. I unplugged Robotron and it worked as soon as I turned it back on, so it might be related to sharing a step-down transformer with another game? I don’t know. Gremlins. But it might be worth converting this one from 120V to 220V to see if that helps at all. This is something I need to do anyway, so I think that’ll be the next step for this one—otherwise it is solid.
Robotron‘s Power Board, Heatsink, and Brick
Along with the wiring for Make Trax, I gave Roberto the power board, heat sink, and transformer brick for Robotron to clean up some of the very ugly wiring. There were wires soldered directly to the board and it was pretty much a nightmare.

Wires from transformer soldered directly to power supply board on Robotron
I finally got those all back after almost a year and figured I would try them out. The reason I wasn’t in too much of a rush is because the extra power brick I had for Joust, along with a switching power supply with a Williams adapter, allowed me to keep running this game without issue, unlike Make Trax. Given I was in arcade work mode again, I dove in and re-mounted the power board and heat sink. I also swapped out the transformer brick and was about to plug it all in, but decided to test the voltages coming off the transformer brick to make sure they were right—they weren’t. The readings were off: 27 VAC where there should have been 6 and several 10 VAC where there should have been 20. Completely inconsistent, and that’s potentially the issue that led to all the wire hacks and burnt Molex connectors that were just cleaned up. The problem was my ignorance, not the transformer. Turns out it’s giving out decent voltages; I was just grounding them incorrectly to the switching power supply. You have to measure pins 1 and 3 together, 8 and 9, etc. It’s like I forgot how AC power measurements work. Google AI mode is a boss.
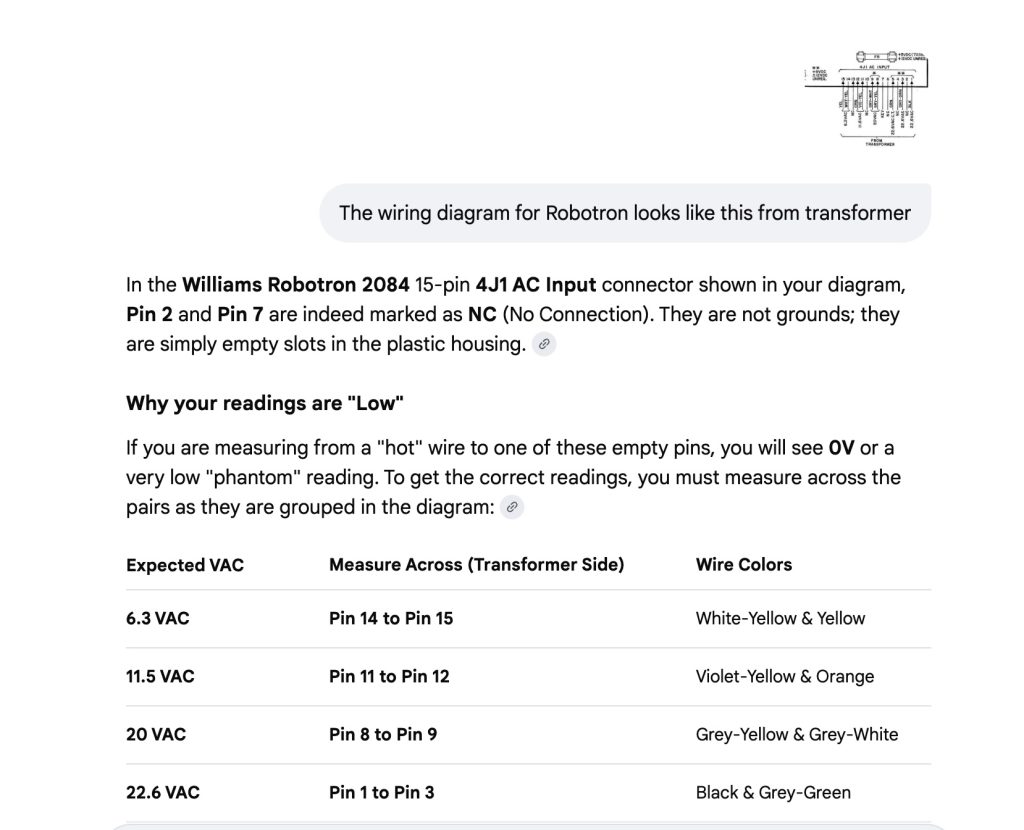
Williams transformer readings into a Robotron power board
I confirmed that this afternoon, and I got the power board working with the FPGA board to run the game, so we could avoid the switching power supply altogether, even though LED 2 for 12V on this power board was not working. This led me down a bit of a testing rabbit hole, because this game has a full board set that I had tested with Mike and was A-OK. When I brought it back and connected it, no dice. I assumed it was a power issue, but the switching power supply should have solved that—no go. So I unplugged all the Molex connectors from the FPGA board to see if the original power supply worked with the board, and still no luck. So I’ve yet to figure out why the Robotron boards are not working in this cabinet. FPGA with the switching power supply it remains, but I at least have a working transformer, power supply, and heat sink.
The other thing on this game is that I found quarters from 1982 and 1985 while cleaning out the bottom, and the ’85 coin was oxidized all to hell. I thought maybe there was some water damage, so I ultimately had Alberto take a look, but he said it’s solid—so no structural work, which is a relief. The only thing to do is swap out the cheap wheels it was put on and make it a bit more solid.

Robotron due for some wheel work and the original boards not running still has me confounded
