
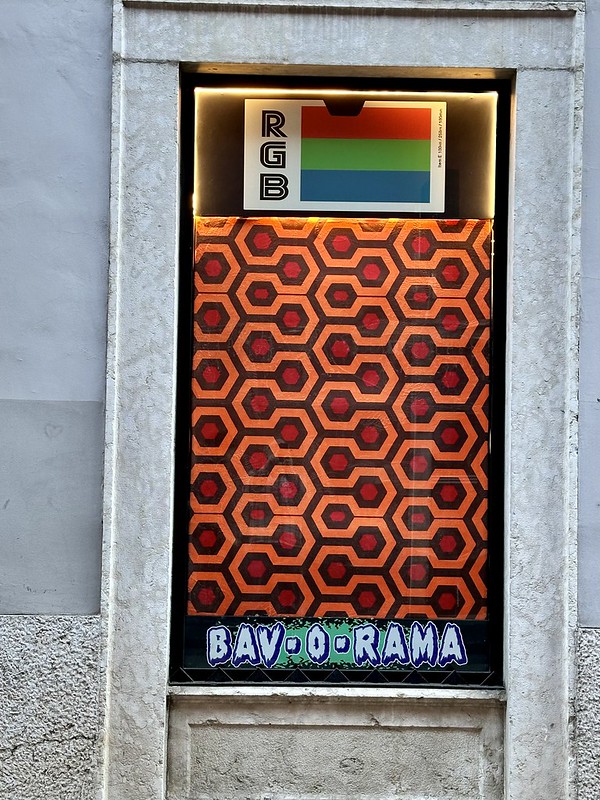
I had the concept for featuring the “Come and Play with Us” scene from The Shining in the Bav-O-Rama before it was even built out. Originally I wanted to include Danny on the “big wheel” (it’s not actually a big wheel) as well as rig a camera so that folks could have their picture taken with the Grady sisters, something that made absolutely no sense. As it happens, part of learning how to create a decent diorama is figuring out what to abandon and/or leave out. For this scene that meant cutting out Danny all together and just having his POV assumed. The other piece was to eliminate any photo/video technology, but more on that later.
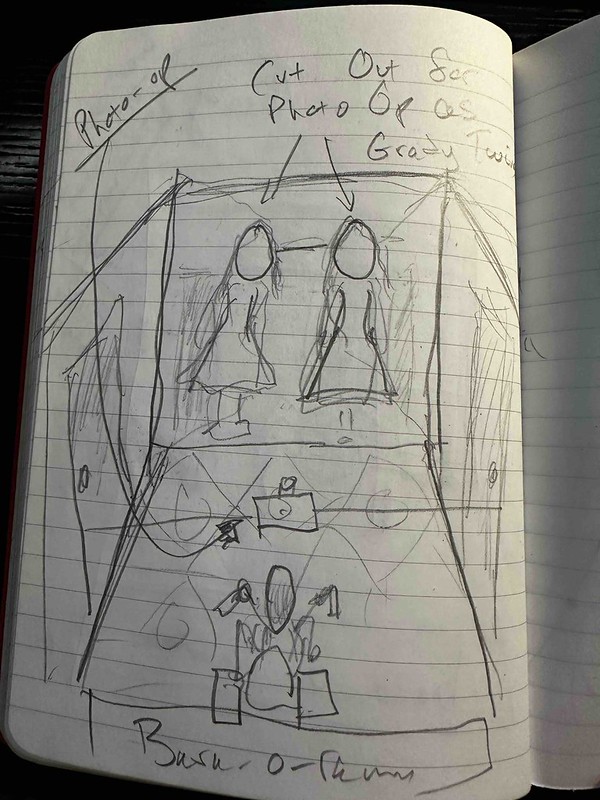
Original sketch for The Shining diorama
MBS gave me the inspiration for trying to dial-in a sense of perspective for this diorama, something the Creepshow installation lacked a bit of. He also floated the idea of having the Grady sisters projected on plexiglass, but that meant more serious overhead, i.e. buying a projector that can deal with the intense light the space gets throughout the day, I wasn’t convinced a more affordable projector would be bright enough.
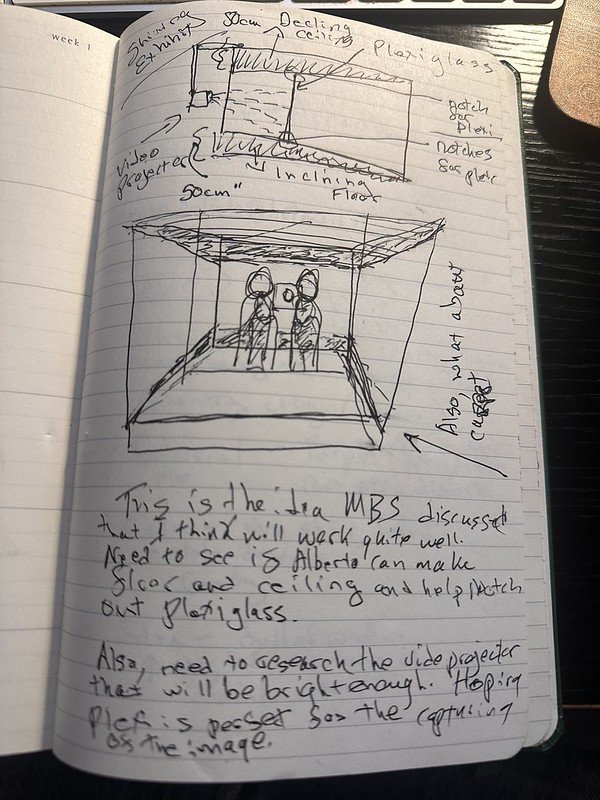
Sketch idea for video projecting the Grady sisters
I wanted to do this one on a stricter budget, so I ultimately kyboshed the projector and focused on the lofi fundamentals, and I’m glad I did.* These sketches came before Miles and I dismantled the Creepshow diorama in mid-January with the expectation The Shining diorama would be up within a few weeks at most (wishful thinking). I thought we needed to take apart the the previous diorama to begin calculating angles and measurements for the hallway perspective, but if I knew how long it would take I would have let “Something to Tide You Over” run longer.
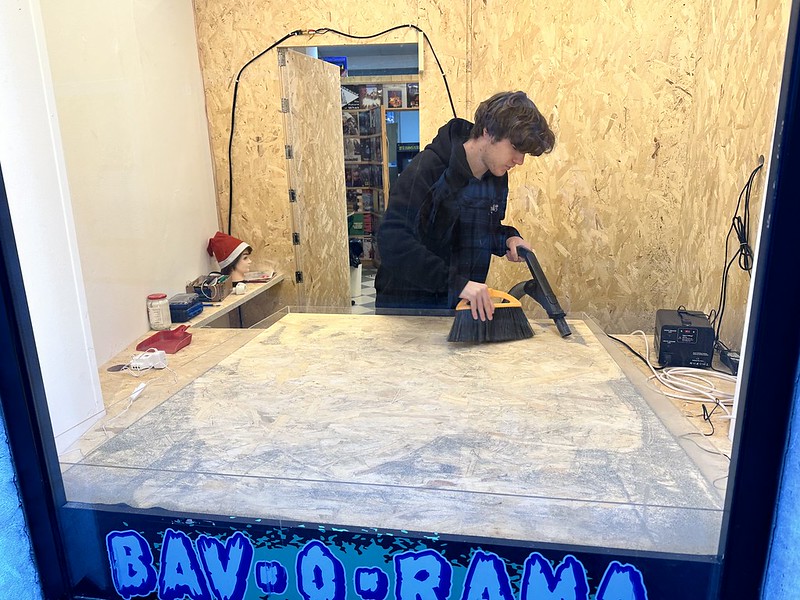
Miles Making Way in the Bav-O-Rama
Early on I bought a Big Wheel from the US along with a cheap carpet with the classic pattern everyone connects with The Shining, but as I started studying this particular scene I realized neither of these elements would work. There was not enough room in the diorama for the Big Wheel (not to mention Danny rides a Hedstrom Trail Cycle) and this carpet pattern was not in the hallway scene when the sisters ask Danny to come and play with them forever and ever. So if either were to be included it would be deviating from the film. That was something I toyed with for effect, but opted to remain true to the original. What’s more, it made accounting for perspective with that rug pattern much, much easier.
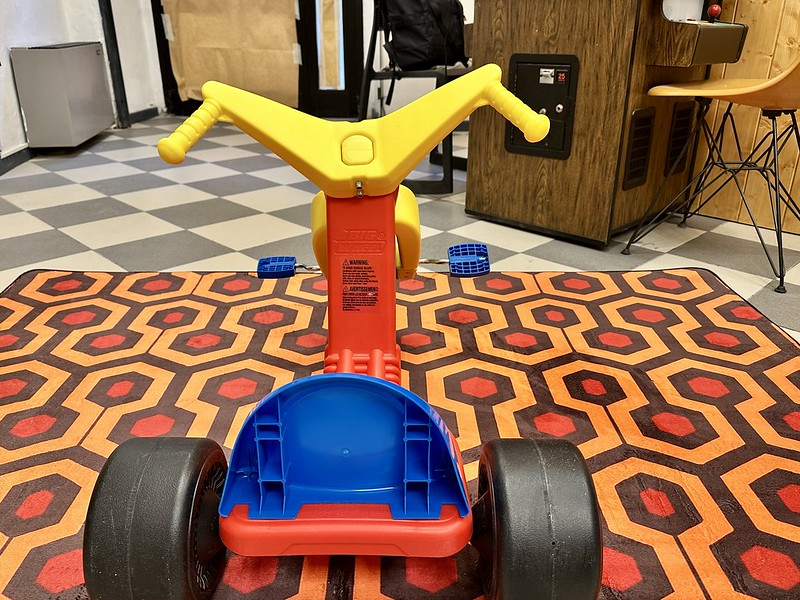
Big Wheel and carpet left on cutting room floor
After dismantling the Creepshow diorama I hung the geometrically patterned carpet as a not-so-subtle “coming soon” sign. But what I was hoping would hang for a few short weeks became months.
The Shining Diorama: Coming Soon
When trying to start The Shining diorama I got hung up on a number of things, in particular what would be the correct angles for the ceiling and floor to capture the illusion of space. On top of that my dad got sick and passed away, so the end of January and all of February was lost.
Tommaso and I came up with 1:4 scale model
In March Tommaso and I created a scaled version of the hallway, and when I turned it on its side it was pretty damn accurate, but the project still lingered because I was not entirely confident. On top of that my day job was taking over my time, not to mention a malfunctioning Cheyenne video game that will not be spoken of lest I lose my mind.
The Shining Diorama: a Visit from the Professionals
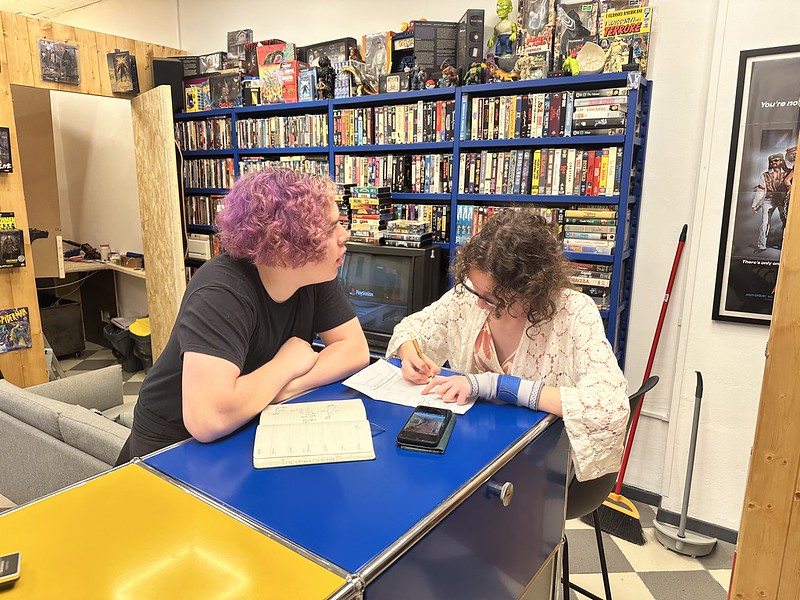
As I wrote about already, it was not until mid-May when bavastudio hosted two theatre production students from Canada, Wren and Kamille, that real progress was made.
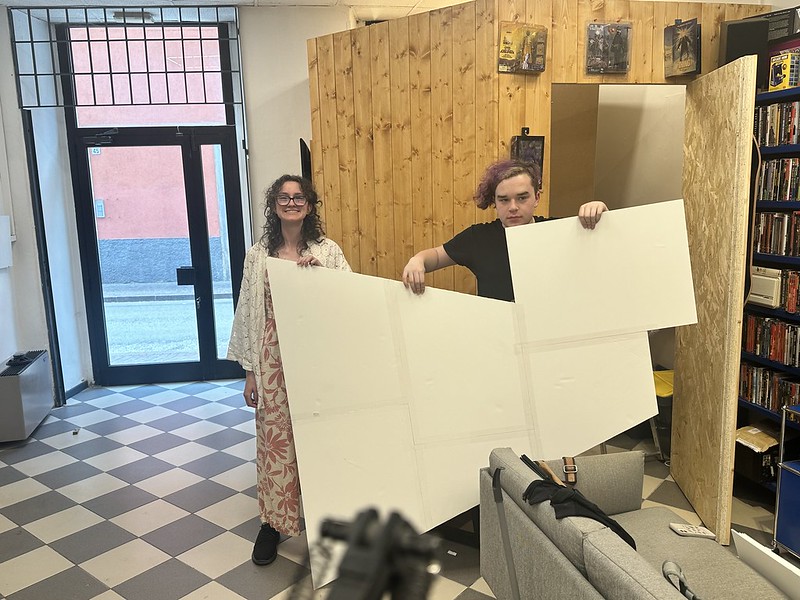
No Ceiling on Inspiration
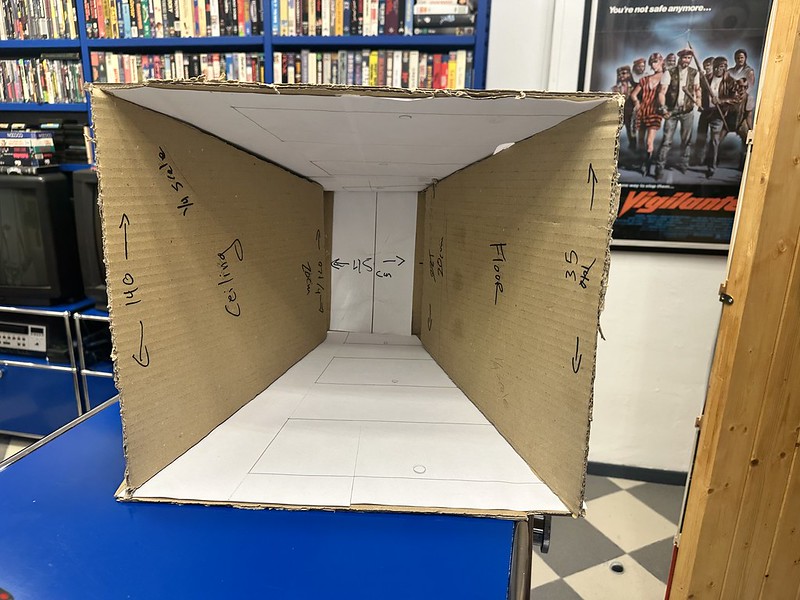
Wren and Kamille built out the ceiling of the diorama using foamcore and that was just the spark I needed to get back in the game and knock the diorama out. They figured out the ceiling works best at an angle of 20° incline, and having a specific angle made everything easier (an important lesson).

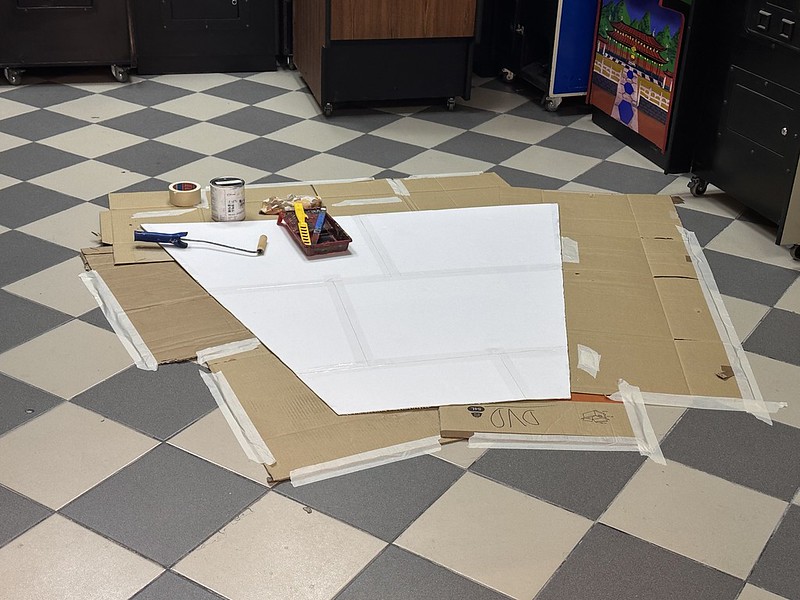
Using foamcore to cobble together the hallway floor
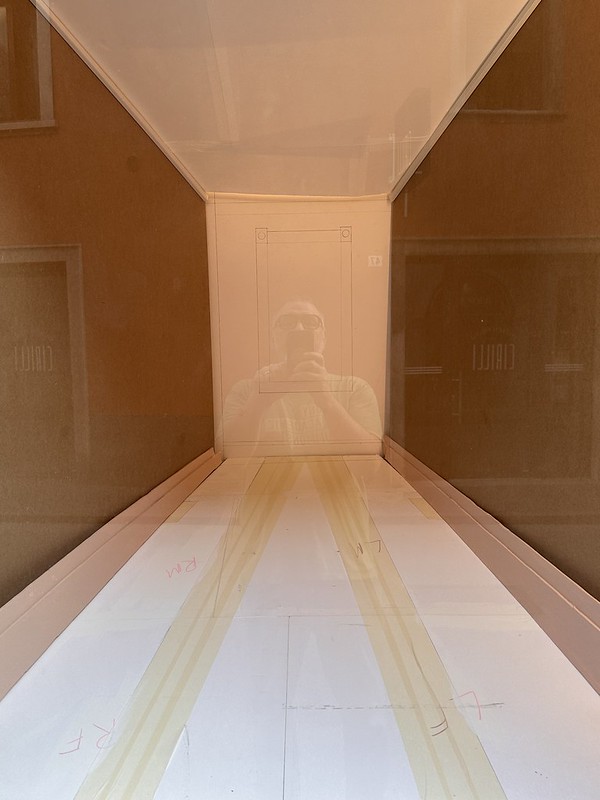
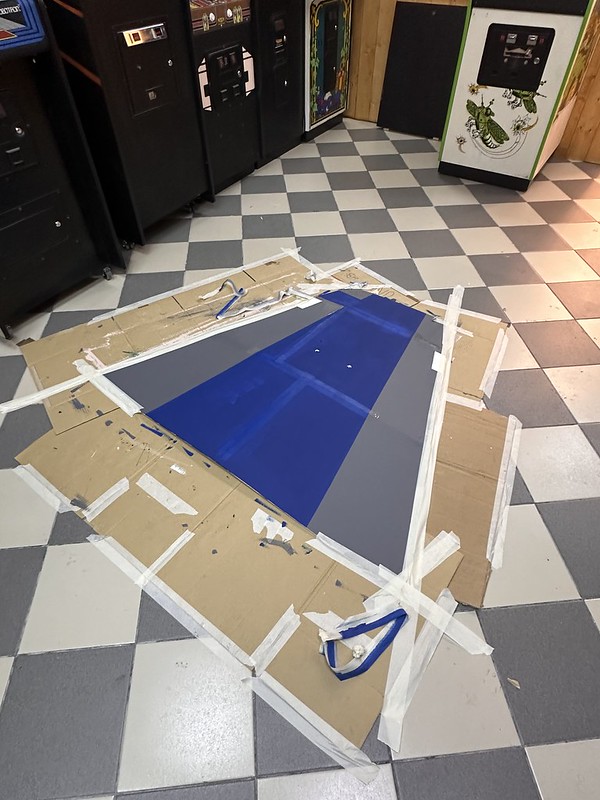
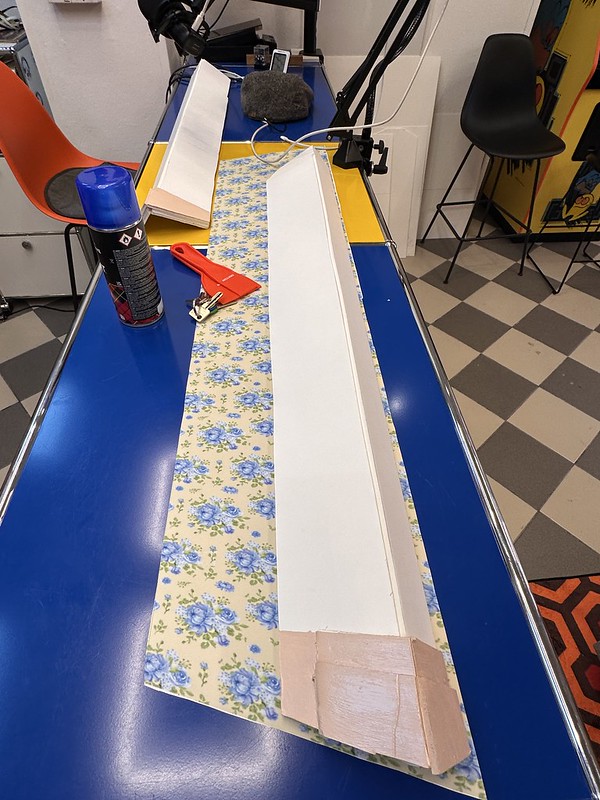
Soon after Wren and Kamille left, I had renewed inspiration and confidence to try creating the floor of the hallway. The floor was at a roughly 18 degree angle, and given it was going to be painted blue and gray, I used a red Sharpee to designate the locations of the panels I cut out, but admittedly I should’ve used pencil.
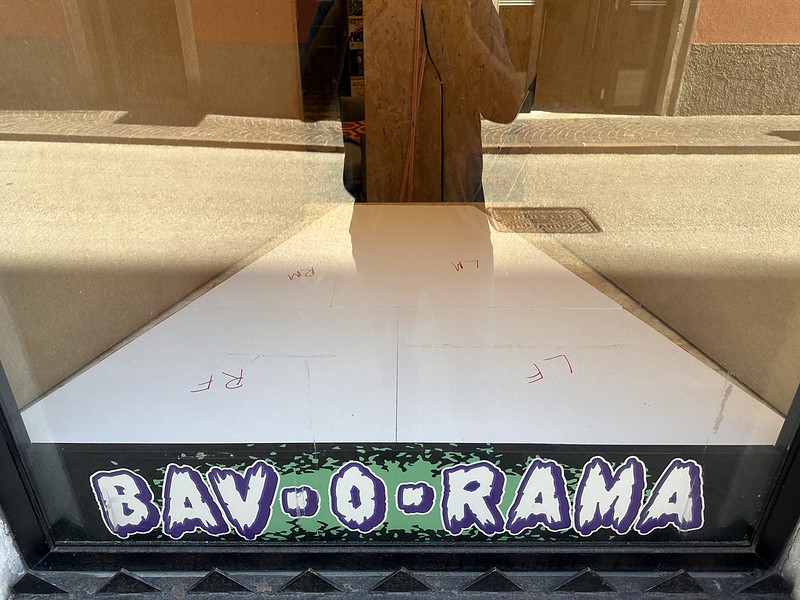
The Shining Diorama: Hallway Floor Installed
With both the ceiling and floor installed and the side-walls angled accordingly you get a pretty good sense of how the hallway perspective might actually work, and that was a very exciting moment. I started to glimpse the project as a achievable reality.
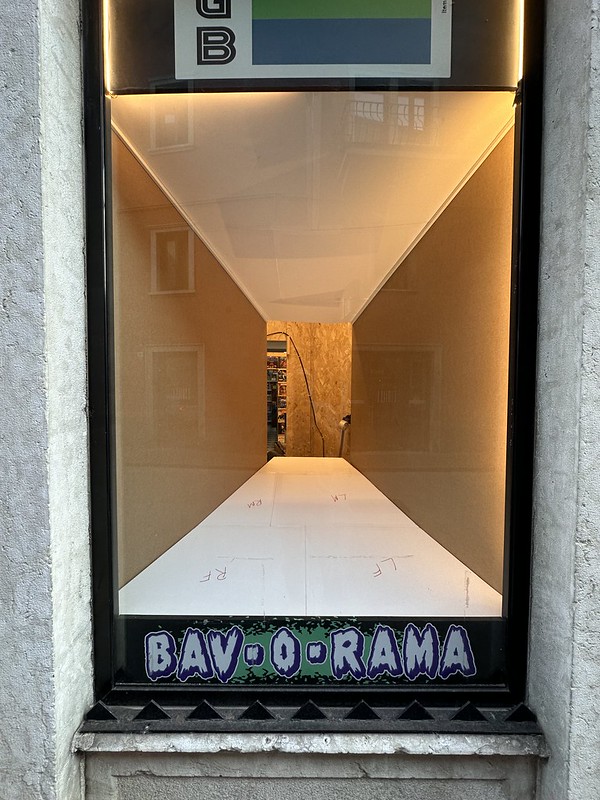
The hallway perspective becomes visible
Putting the hallway at 1:4 scale inside the actual hallway was probably not as impressive as I thought it waswhen I took the picture, but it does highlight that Tommaso and I winged it pretty well that first time.

The Diorama within the Diorama
To get the floor to sit at an 18° angle (a bit less than the ceiling) we used stacks of VHS tapes, one of which is [Stephen] King on Screen—a VHS phantom thread.
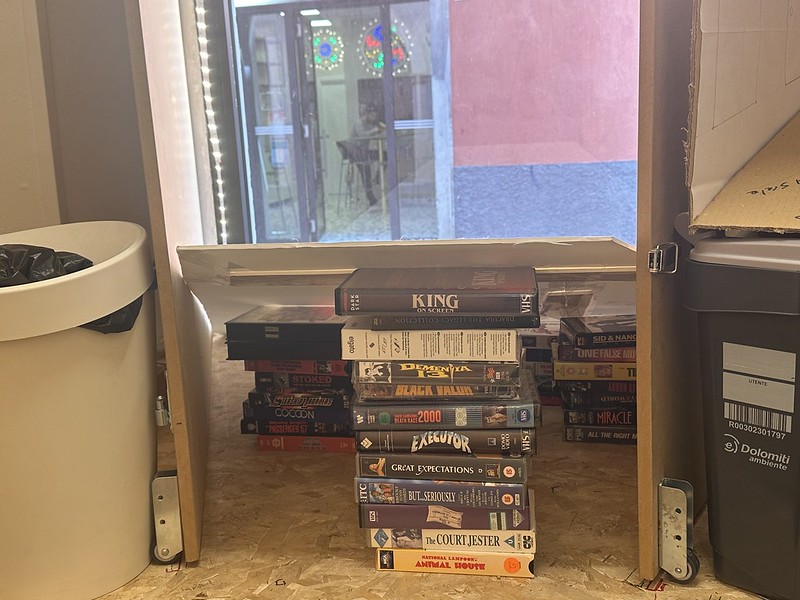
The Shining Diorama: VHS Floor Reinforcements
I took a photo of the hallway with the iconic carpet for fun, but I had already decided it was not going to be on the floor. That said, I have alternative plans for that rug pattern that I’m still working on.
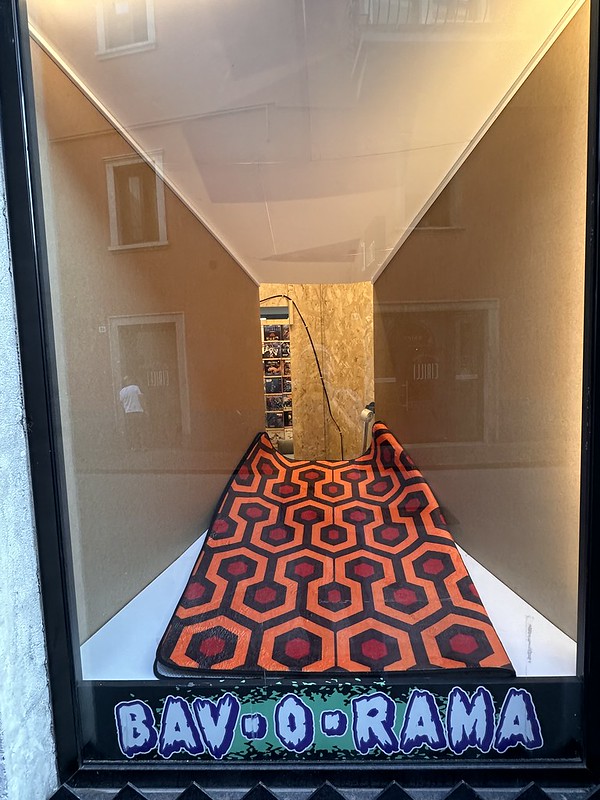
The Shining Diorama: The Wrong Carpet
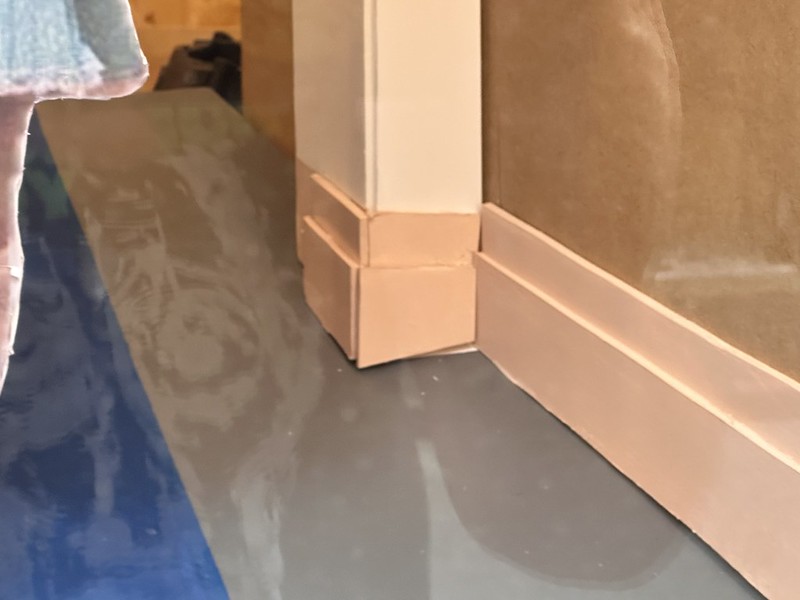
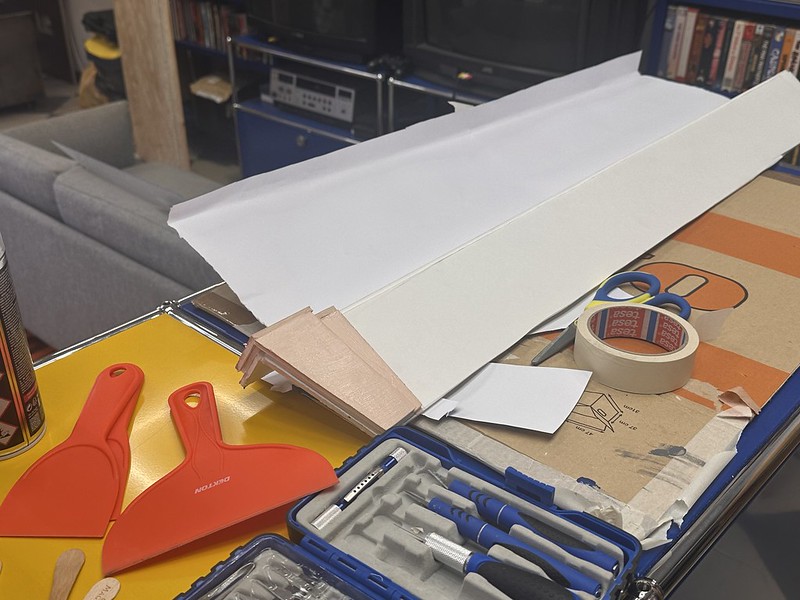
Once the floor and ceiling were installed, the next piece I turned to was the baseboard. For the floor trim I used the 18° angle to make the strips out of foamcore, and that worked fairly well. Also, turns out that glueing two pieces of foamcore cut at different heights provides a more convincing base board effect, although not as ornate as the original. I painted the baseboard with the peach-ish color left over from the Elevator Action stencil job from a couple of years ago. That color worked out really well in the end. In the image below you can also see the masking tape in preparation for painting the floor to resemble the blue and gray carpet.
The Shining Diorama: Baseboard
One of the crazy things about this diorama is the Grady sisters print-out was done on my cheap Epson 220 printer using a screenshot I took from a Youtube video clip. I could have (and probably should have) gotten a higher quality image to work from, but I wanted to get this thing done, and trying to to figure out how to rip a 4K disc would have killed my TCB vibe. Pro tip: I used the Rasterbator site to break the image up into 8 different 8″ x 11″ pages for printing.
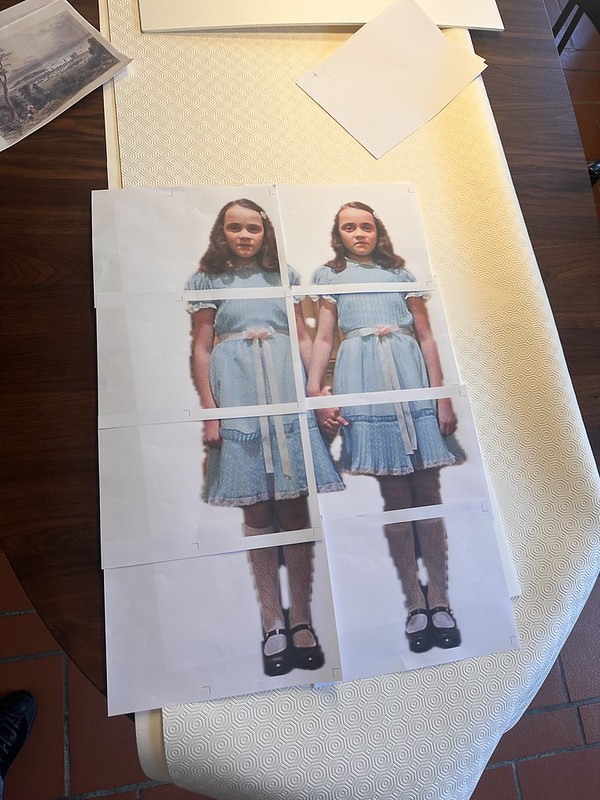
The Shining Diorama: Grady Sisters print-out
As demonstrated in the image below, once the 8 separate sheets were printed you could cut and glue them together on a 5 mm foamcore board. The Rasterbator site leaves a couple of centimaters of white at the bottom and the right side to makes attaching the sheets easier.

Grady Sisters print-Out assembled
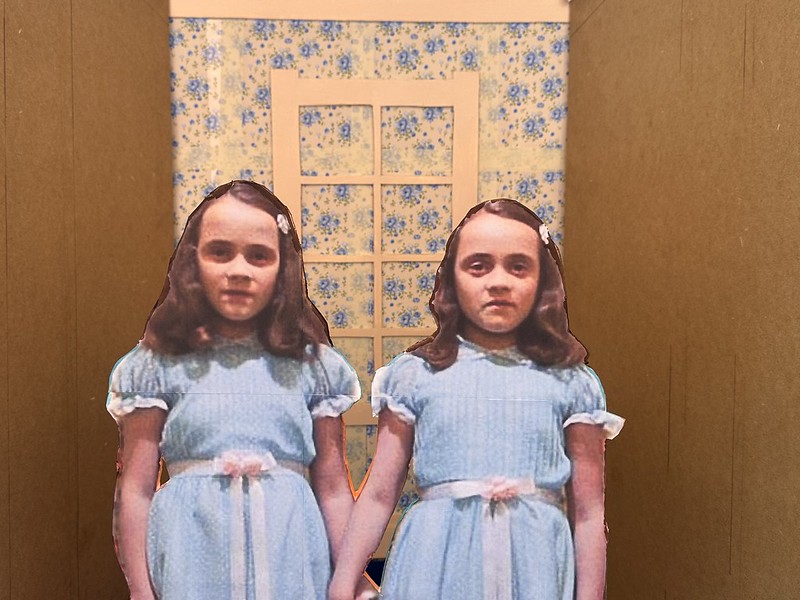
One assembled, the effect is pretty good from a certain distance. I could’ve gotten more hifi, as I already said, but perfection is the enemy of good enough and done.
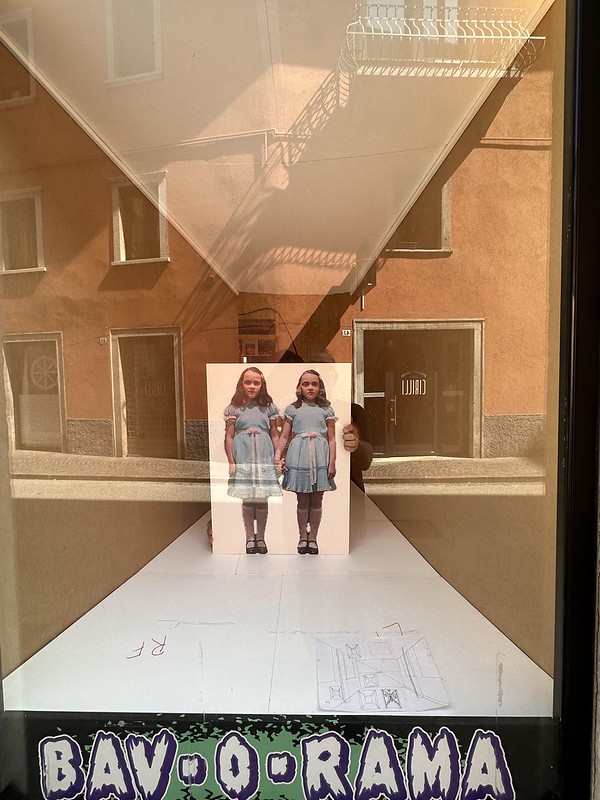
The Shining Diorama: Positioning the Grady Sisters
Tommaso helped me position the Grady sisters in the hallway to get a sense of where they should be placed to make the overall effect work. We finally ended on about 57.5 cm from the back of the hallway as the ideal spot. We then cut the Grady sisters out of the foamcore to get the desired effect.
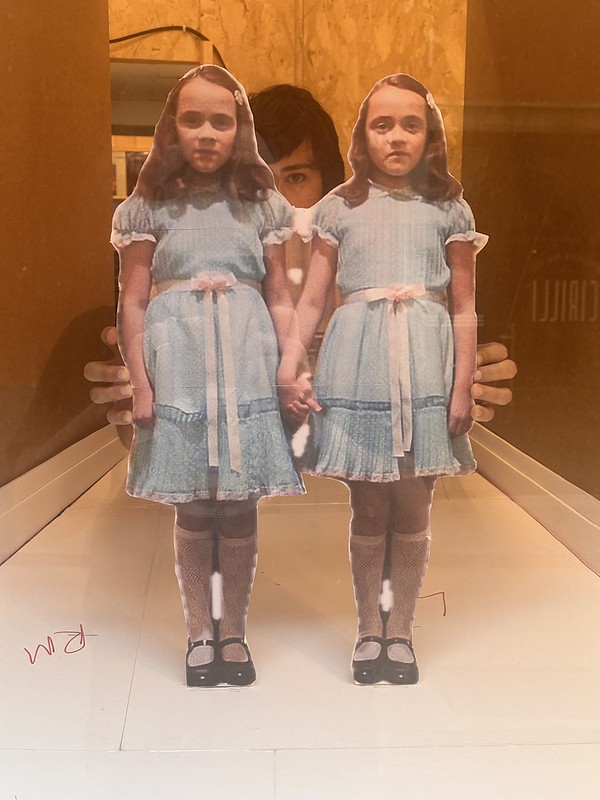
The Grady sisters appear
Tommaso also helped me carve out the frame for the H.W, Bartlett painting that hangs in the hallway. This came in handy to further lock-in where to place the twins for a sense of their height and, again, to capture the ideal sense of depth in the hallway.
The Shining Diorama; Sisters and Painting
Would I paint the foamcore floor with water-based paint again? Not sure, it definitely warped the floor, but interestingly enough that helped with the effect. That said, I think I would probably do spray paint to see the difference, I just think water-based acrylic paint provides a bit more texture and is not as smooth. If given the choice and I had the time I would just source the blue and gray carpets and cut them in. It would not have been hard at all.
The Shining Diorama: Painting the Floor
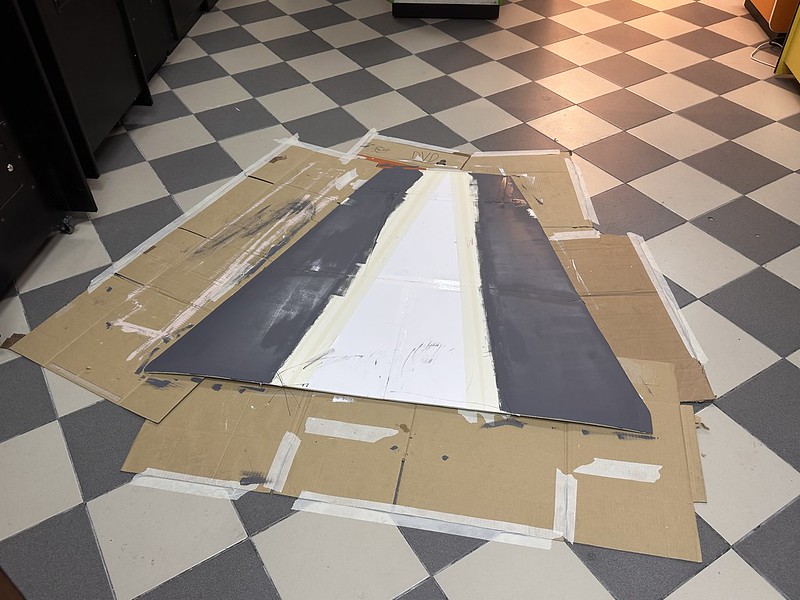
The Shining Diorama: Gray Carpet
One of the hacks Antonella and I figured out to make the sisters stand-up straight without a perceivable trace was to use two long screws (6-8″) encased in hose-like tubing. The tubing worked well to support long, lightweight aluminum piping that held up the Grady sisters quite inconspicuously.
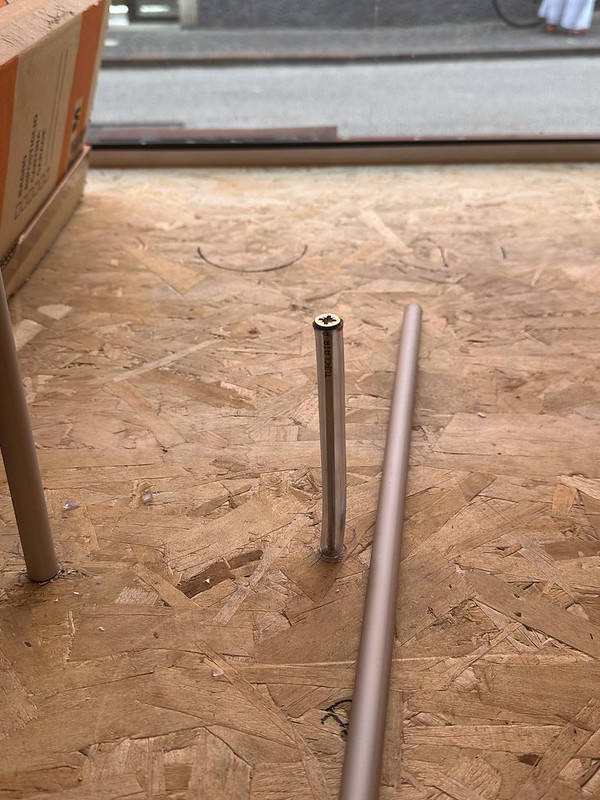
The Shining Diorama: Long Screws with Tubing
These two pipes were placed over the screws with the see-through tubing, and they fit quite snuggly.
The Shining Diorama: Aluminum Piping
Once the two aluminum pipes were inserted over the screws they ran through holes in the foamcore floor. After that, makeshift duct tape holders on the back of the cut-out held the sisters up cleanly with no trace of the support system—allowing them to freely haunt the hallway.
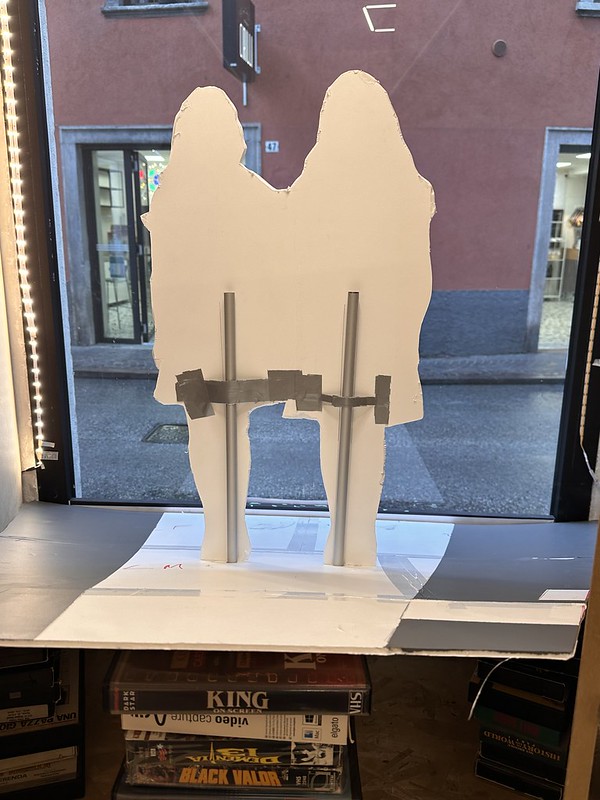
The Shining Diorama: Supporting the Grady Sisters
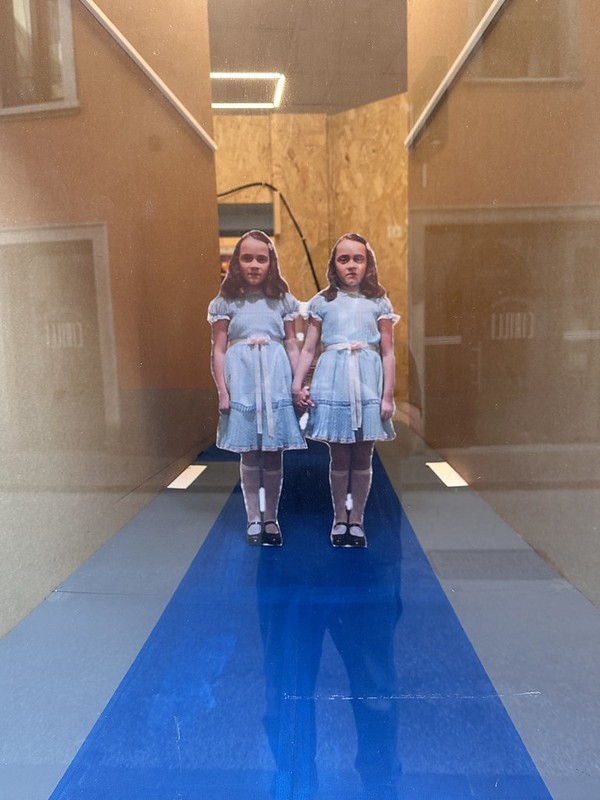
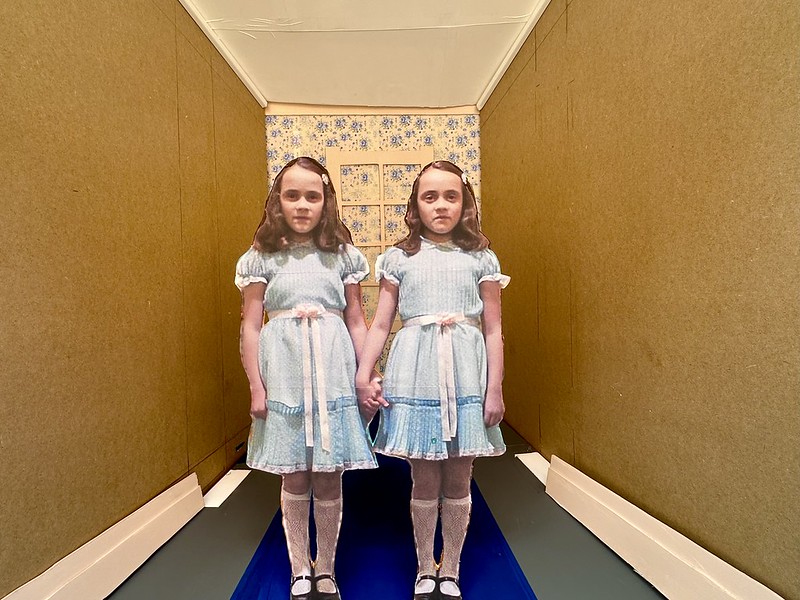
I was really happy with how well the screw/tubing hack worked to keep the Grady sisters standing on their own four feet.
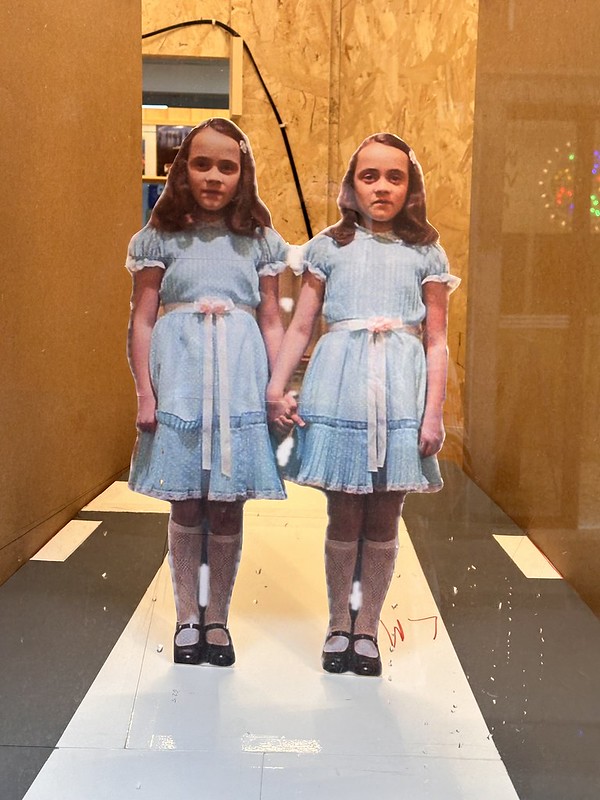
The Shining Diorama: The Grady Sisters in the Hallway
Initially I was using the cord hiding strips along the ceiling line of the diorama to ensure the incline of the ceiling is consistent given its removed constantly while working. But once it was added and the work continued I realized how well the strips could double as the top part of the hallway’s crown molding.
The Shining Diorama: Cord Hiders/Holders
I struggled a bit with the blue patch of carpet because the crappy Italian DIY home repair box store Obi would only mix satinato (or semi-gloss) blue, which didn’t work given how reflective it was. So I needed to go to a good paint store, in this case Frisanco, to get a matte dark blue mix that actually worked. The issue this created was I must have put on four coats of blue to hide the satinato that started to warp the foamcore considerably.
The Shining Diorama: True Blue?
With the gray and blue carpet painted, it was now time to think through how to build out the columns on either side of the diorama. They’ll be placed (roughly) where the white trapezoids are on each side wall.
The Shining Diorama: A finished floor
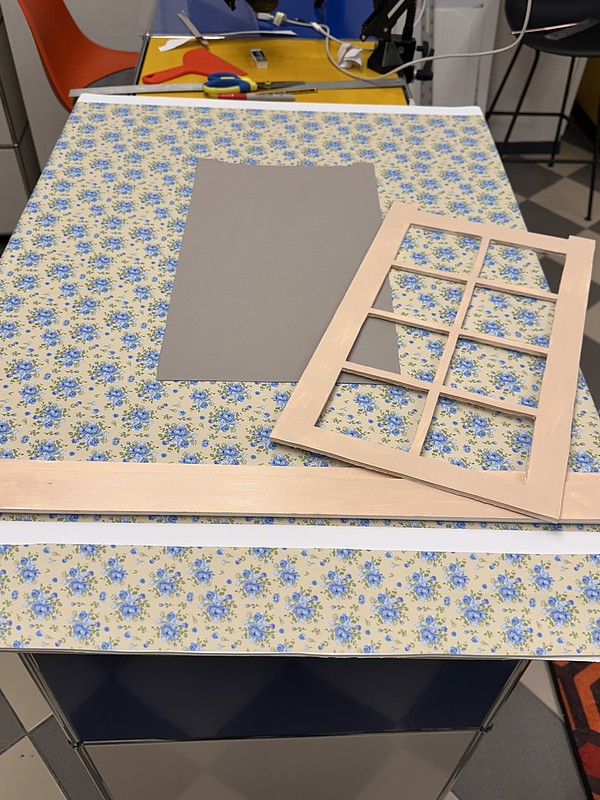
I also started figuring out the back wall using a piece of 5mm foamcore and by lightly tracing the window.
The Shining Diorama: Testing the Back Wall
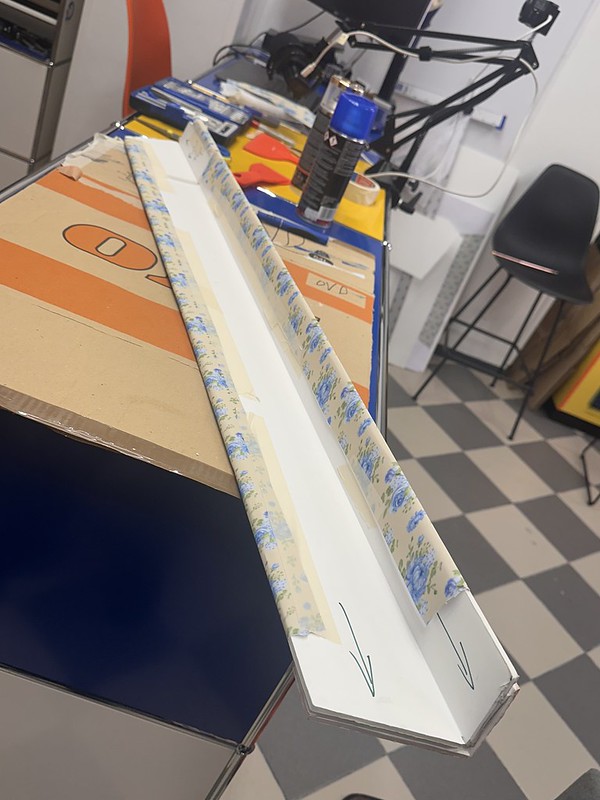
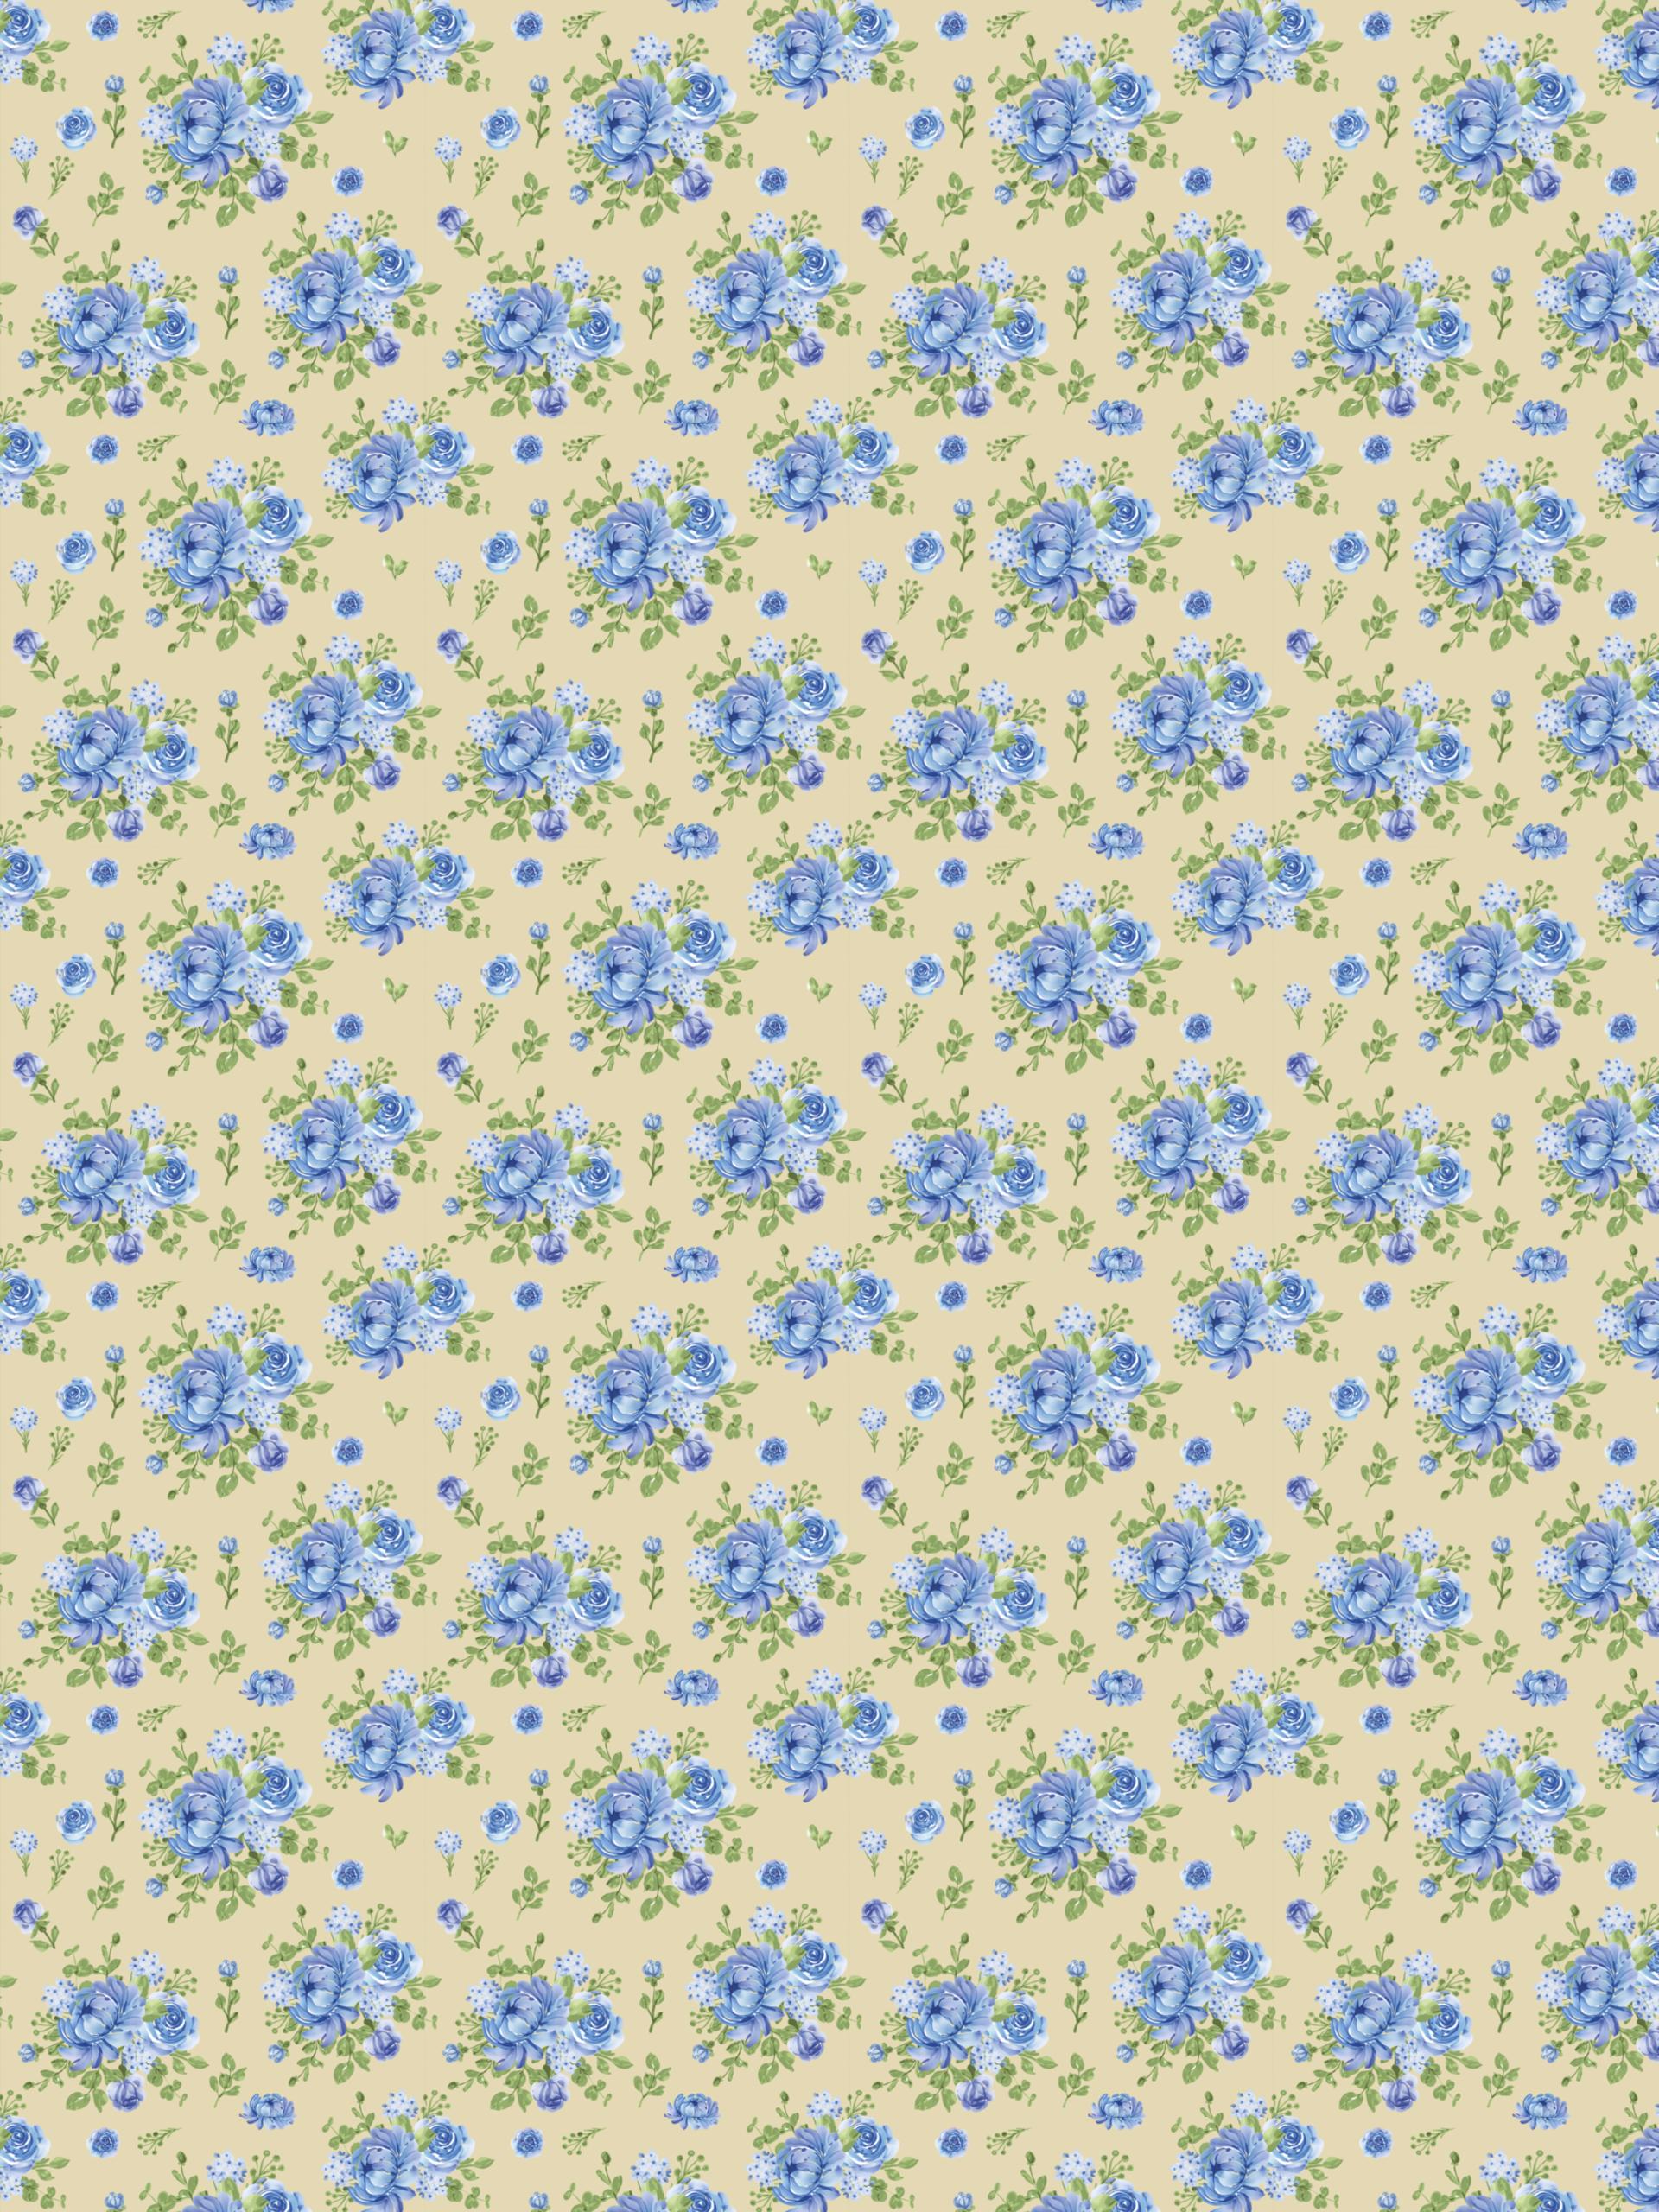
For the back wall, I was surprised how easy it was to find a good sample of the wallpaper pattern and just tile that in Gimp to create the desired effect for the back wall. I tried printing the the wall paper pattern for the back wall using the Rasterbator site again, but this pattern was much trickier to glue together.
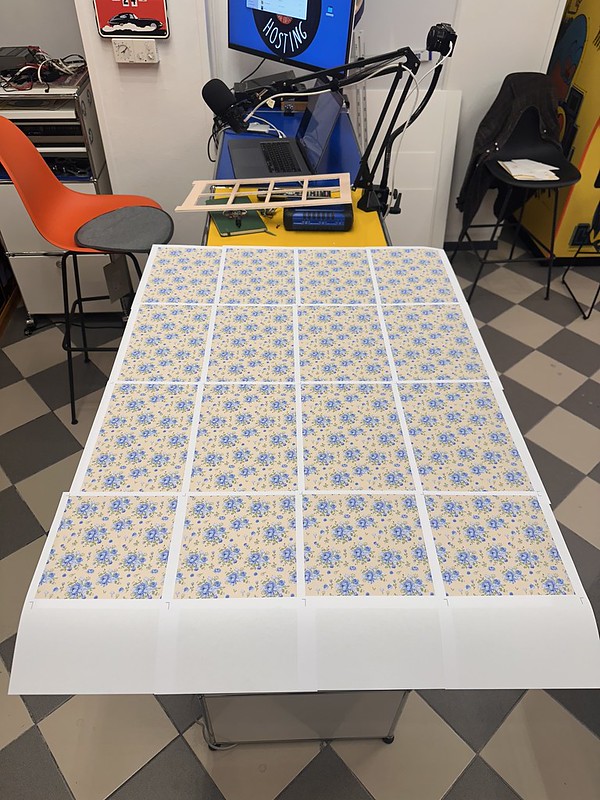
The Shining Diorama: Wall paper for back wall
Rather than trying to glue things I decided to simply tape together the various sheets of paper with masking tape. Despite the tape lines, this helped me get a sense of how big the window and trim should be.
The Shining Diorama: Back wall paper, trim and window
It was at the point I got the floor painted, wallpaper on the back wall, and the baseboard working that I got a glimpse of what could be. And from here on out it just keeps getting better and better.
The Shining Diorama: Starting to Come Together
Tommy used some of his new Oahu alcohol markers to color a brown, wood-like frame on the W.H. Bartlett painting.
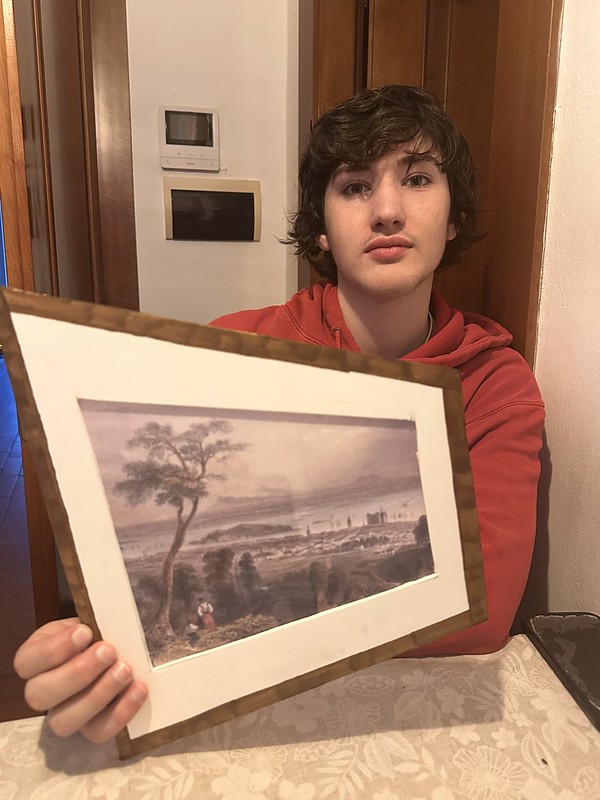
The Shining Diorama: Coloring the Frame
The columns behind the Grady sisters further dialed-in the sense of depth and perspective. And seeing the first of two columns in place was yet another satisfying moment.
The Shining Diorama: Framed Picture and Column
At this point I also started working on another element that was crucial for a sense of depth, the hanging ceiling light. Placed just a few centimeters in front of the sisters, it provides a crucial elements that really makes the window come out in three dimensions. In the movie the light has a brass fixture with an articulated glass shade. I didn’t want to buy a full blown fixture given scale issues, so I found a cheap $2 white plastic fixture and spray painted it metallic gold.
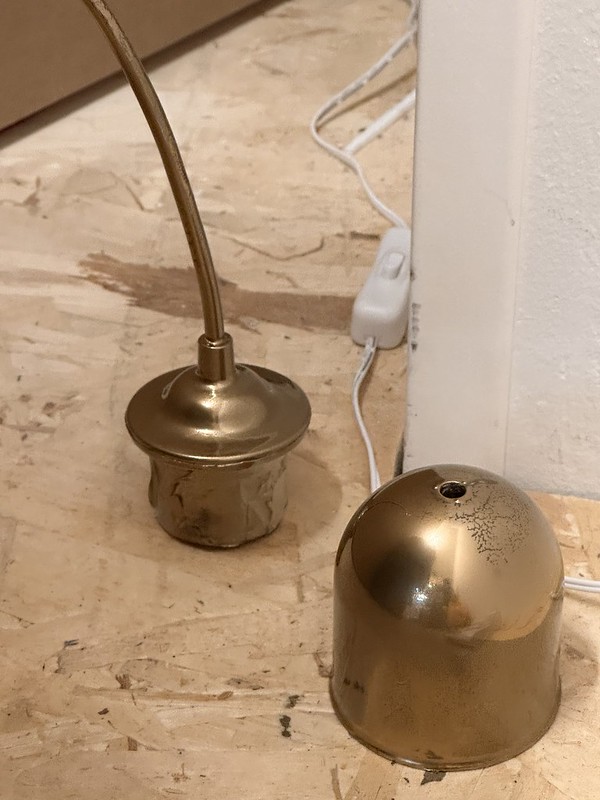
The Shining Diorama: Hanging Light
Turns out the actual fixture was not working with the glass shade I bought, so I needed to swap. But the gold painted canopy that comes out of the ceiling worked well.
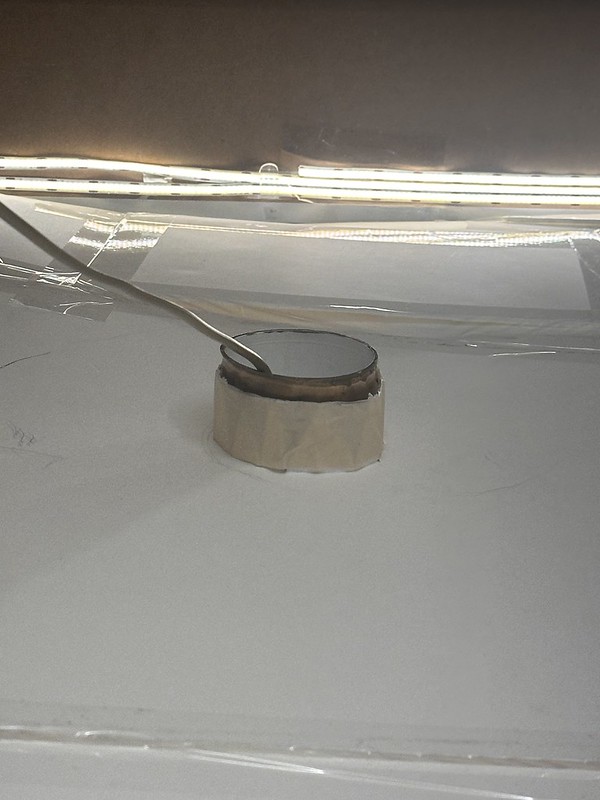
The Shining Diorama: Light Canopy
Probably the trickiest part of the whole diorama was getting the baseboard and crown moulding around the columns right. I don’t think I did a great job, but I did enough with the foamcore pieces to fool the casual observer.
The Shining Diorama: Baseboard
Preparing the side walls with the wallpaper was something I was putting off because I was afraid my Gimp skills were not up to the task. But in the end the perspective and measure tools in Gimp take most of the pain out of the process. Here’s the trapezoid representation of the side walls with all the measurements (which are more or less the same for both walls).
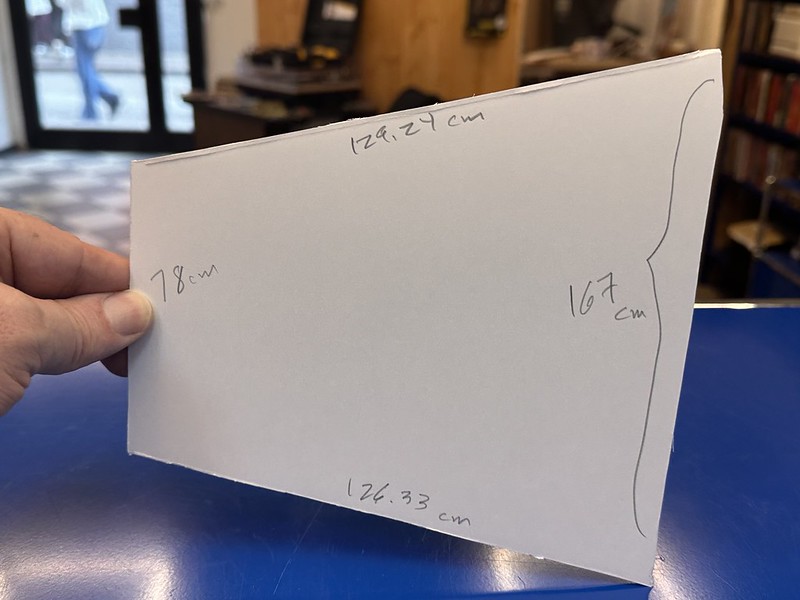
The Shining Diorama: Measuring the Side Walls
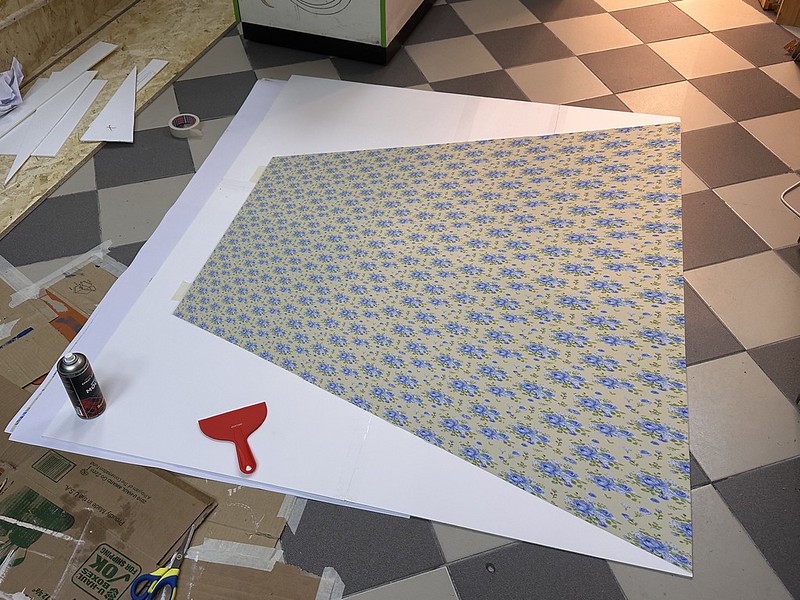
Possibly the most important piece of the entire diorama was the wallpaper on the side walls. I was hesitant to jump into this, but I finally mustered up the will and used the wall angles and respective measurements to get a test print for the left wall (left and right are always relative to the back of the diorama, never looking in from the window). My test was pretty decent, and seeing the paper on the sidewall was yet another moment (there were a lot of moments).
The Shining Diorama: Wallpaper on sidewalls
You also get a good shot of the light fixture in this shot. I bought a glass frosted shade for $14 online and spent about as much on the power cable, light socket, and 60W lightbulb. There’s also a little gold chain along the insulated wire for effect. Once the wallpaper test made sense, it was time to commit and print both walls.
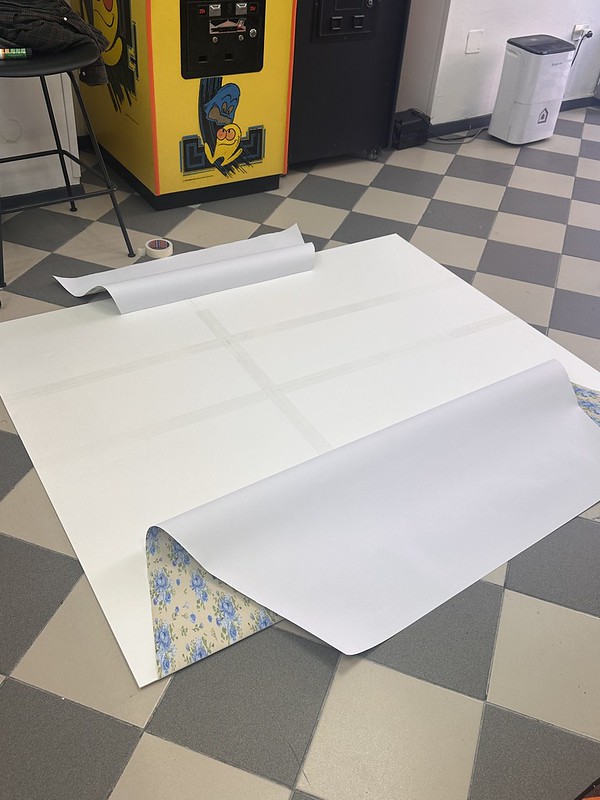
The Shining Diorama: Mounting the side-wall wallpaper on foamcore
The local printer could only print 90 cm x 70 cm, and given the side-walls are 120 cm x 167 cm (at its widest and tallest) we had to break the print up across two sheets. The print included overlapping pieces that could then be cut and used to paper the columns. The columns come at about 90 cm from the street window, so the measurements were just about perfect. If I’d known better, I might have placed the columns at 85 cm from the window to hide any possible wallpaper seams behind the columns.
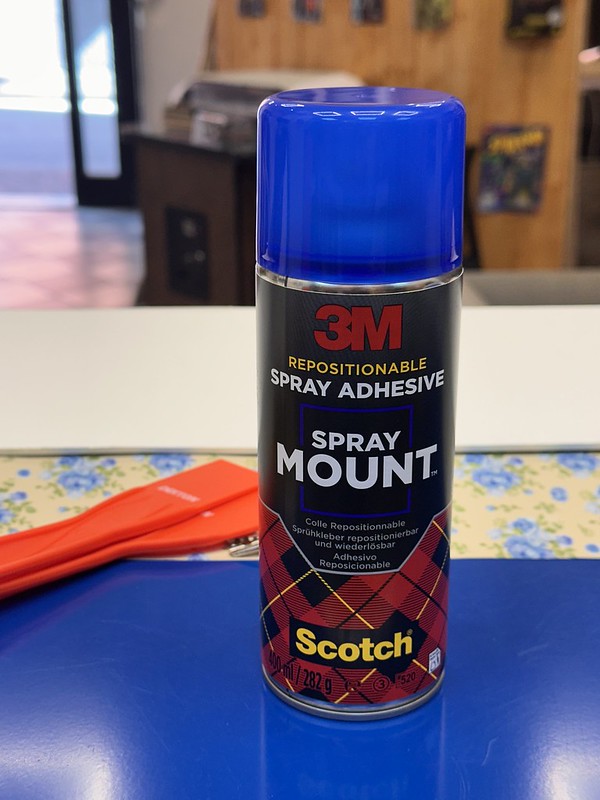
The Shining Diorama: 3M Mounting Glue
The more forgiving, repositionable mounting glue was crucial for getting the wallpaper right. It allows you to gently nudge the paper to make sure you can salvage any mistakes—and there are always mistakes.
The Shining Diorama: Wallpaper Mounted
Above you can see the wallpaper for one of the side-walls mounted on a piece of 3 mm foamcore. After that it’s just a matter of cutting it out and applying it to the wall.
The Shining Diorama: Papering the Columns
With the wallpaper applied to both walls, it was time to paper and install the columns.
The Shining Diorama: Applying Wallpaper to the Columns
Taping the wallpaper to the backside of the column and then pulling it around the visible side was crucial to making it seamless. I learned this after the second try 🙁
The Shining Diorama: Taped Column
Above is a good look at taping one part of the wallpaper to the inside of the column. The second part gets taped down after the paper is affixed to the outside of the column with glue.
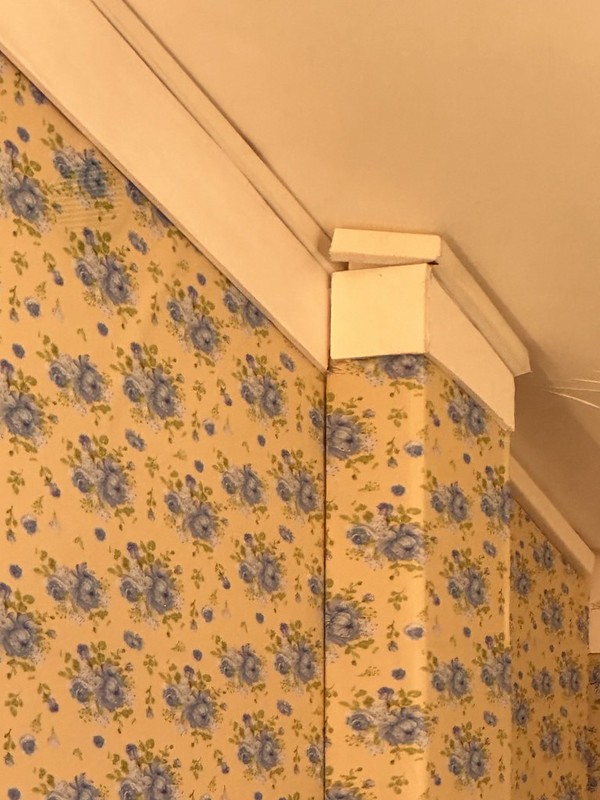
The Shining Diorama: Crown Moulding
The crown molding was a combination of the cord covering strip on top and 5mm foamcore cut to perspective underneath. As mentioned before, the cord covering strip was initially used to preserve the angle of the ceiling, turns out it doubles beautifully as the upper part of the trim, despite its size remains consistent throughout.
The Shining Diorama: Wallpaper and Columns Installed
It’s really pretty awesome how much everything came together once the wallpaper and columns were finished.
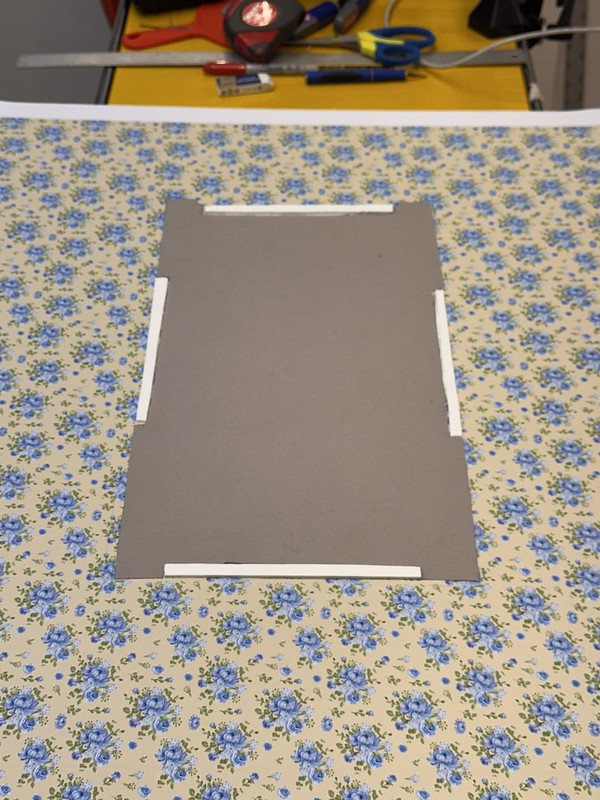
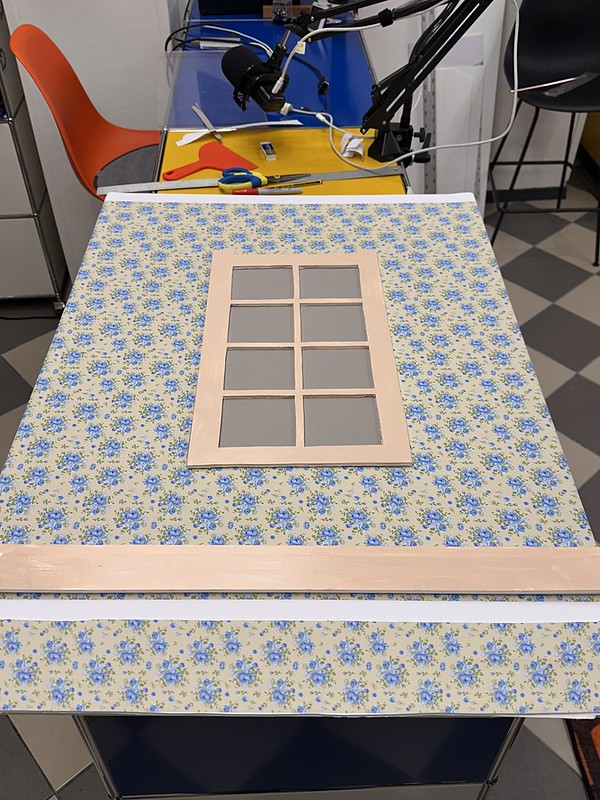
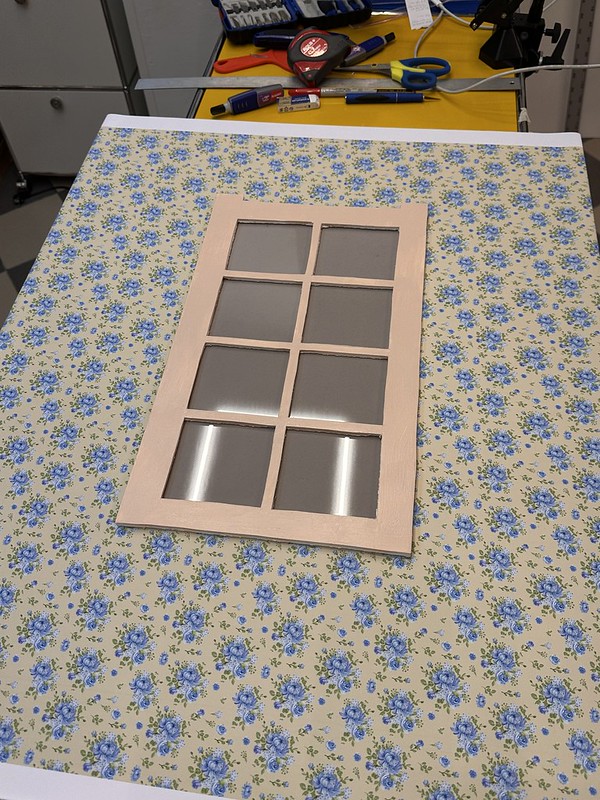
The Shining Diorama: Back Wall Window Frame
Now it was time to finish off the back wall window. The gray construction paper serves as the base of the window on the back wall. I used the window cut out to make sure you can’t see any of the gray, essentially hiding the wallpaper and offering a neutral color so no undue attention is drawn to the window.
The Shining Diorama: Securing the Back Wall Window
Another cool hack was getting some light gray construction paper and laying that down as the base of the window. Once positioned correctly, I cut four elongated pieces of 3 mm foamcore and attached them directly to the foamcore with super glue (Super Attak in Italy), which means cutting away the construction paper and wall paper and gluing directly to foamcore. There was no need to super glue the construction paper to the wallpaper, I simply used regular strength glue. I did, however, use super glue on the strips of foamcore board because they will be the basis of a loose frame that secures the plexiglass.
The Shining Diorama: Window Installed
You can’t see it here, but the plexiglass is now underneath the window frame. After gluing the frame to the foamcore strips and you have a solid window with plexiglass doubling as a glass window.
The Shining Diorama: Plexiglass reflection
The cool thing here is that the window will now reflect light from the fixture in the hallway, which adds a nice effect.
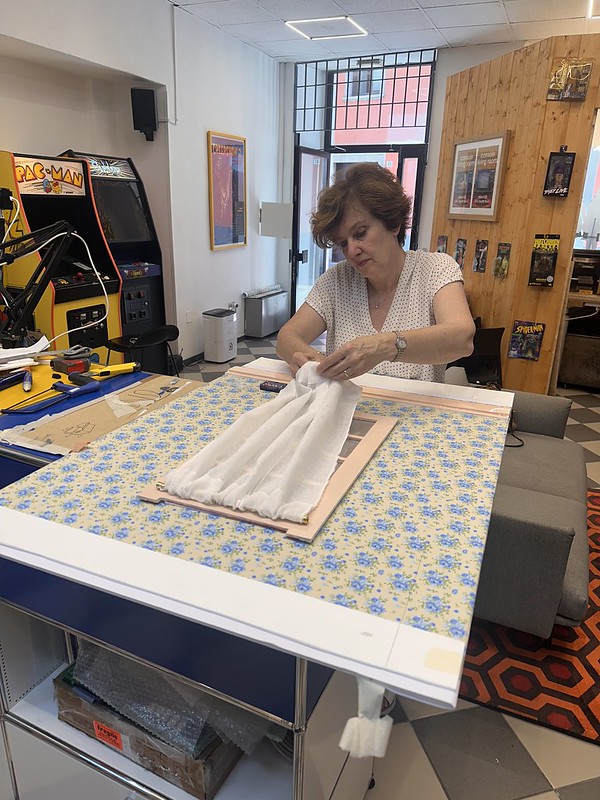
The Shining Diorama: Window Curtains
One of the last pieces was dressing the window with curtains and a curtain rod. I had a cheap small curtain rod hanging around I could cut down and Antonella picked up some fabric at the local market and made custom curtains, and they look amazing.

The Shining Diorama: Curtains in action
While the above picture is not great, it does give you a sense of the back wall installed and the curtains in action.
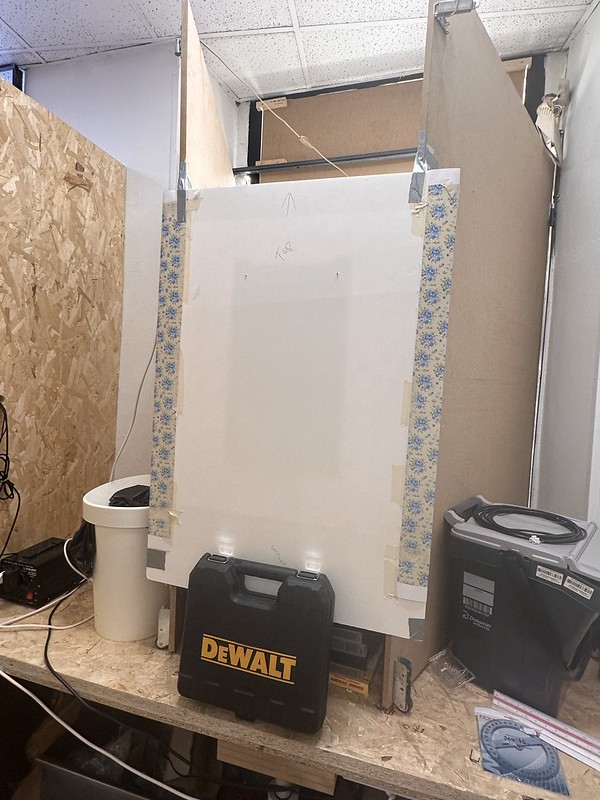
The Shining Diorama: Behind the Scenes of the Bav-O-Rama
Here is a rare look behind the scenes at the back wall of the diorama, as you can see it is presently held together with duct tape, a Dewalt screw gun box, and a dream.

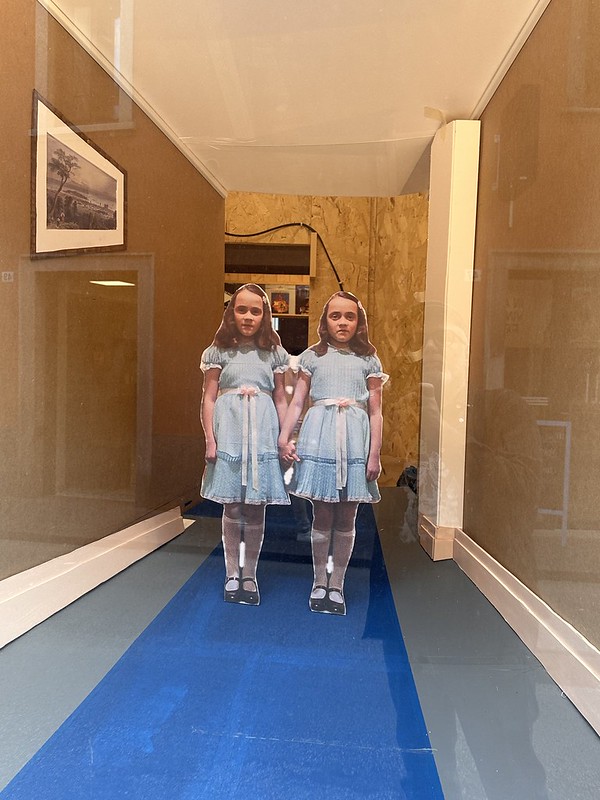
The Shining Diorama: Up Close and personal
If you get too close you can see the cracks in the system, like the low-res print of the Grady sisters, but sometimes lofi can be just as good.

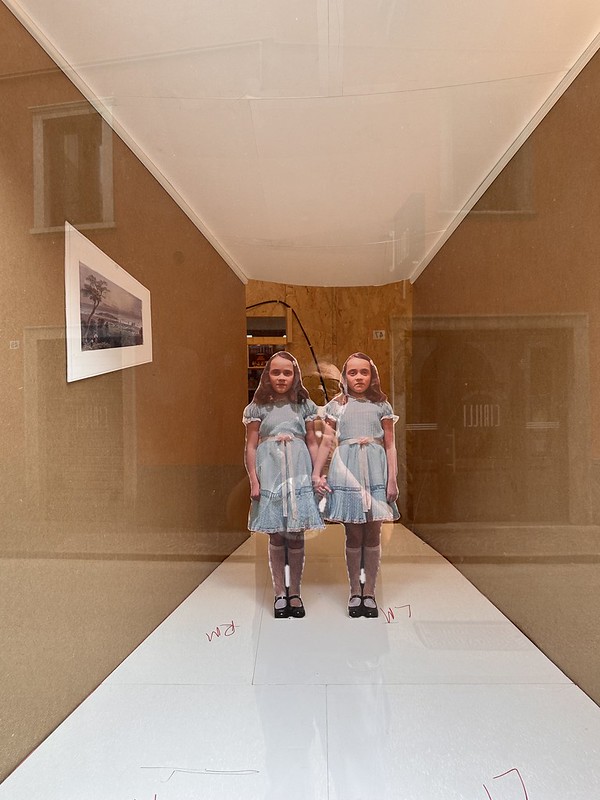
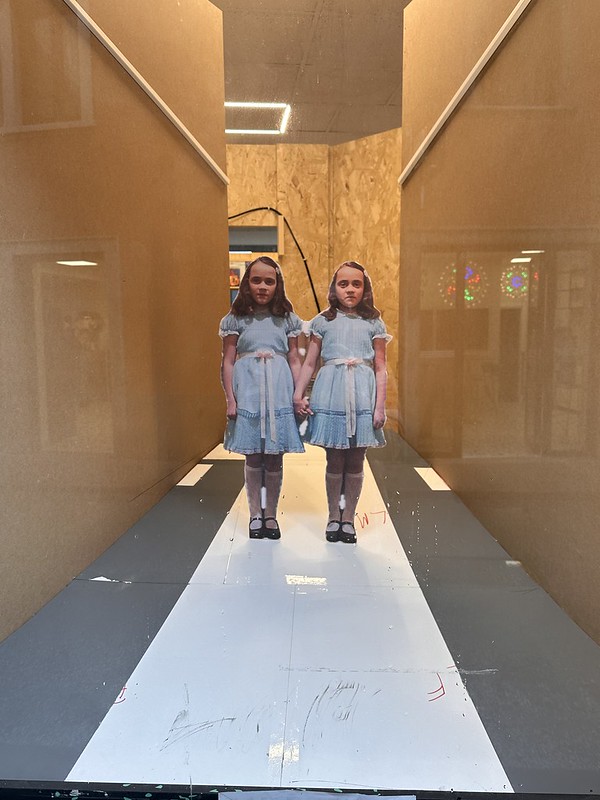
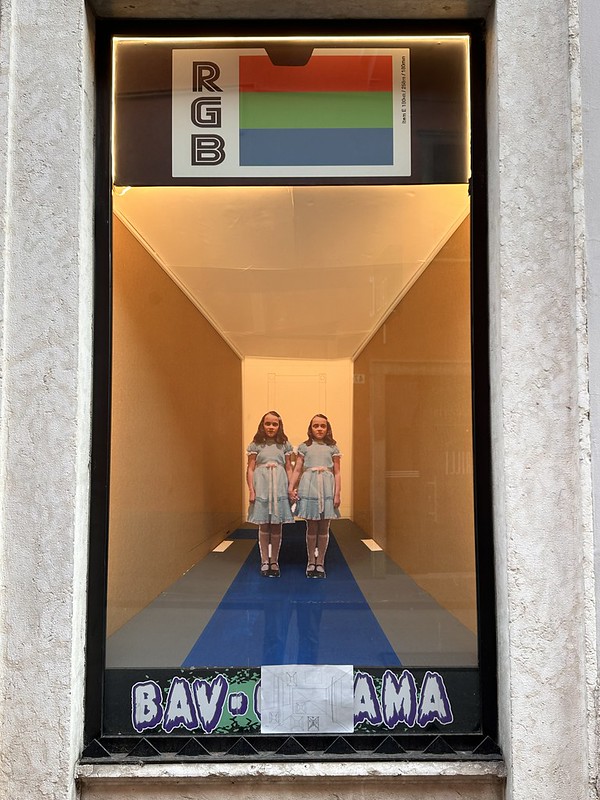
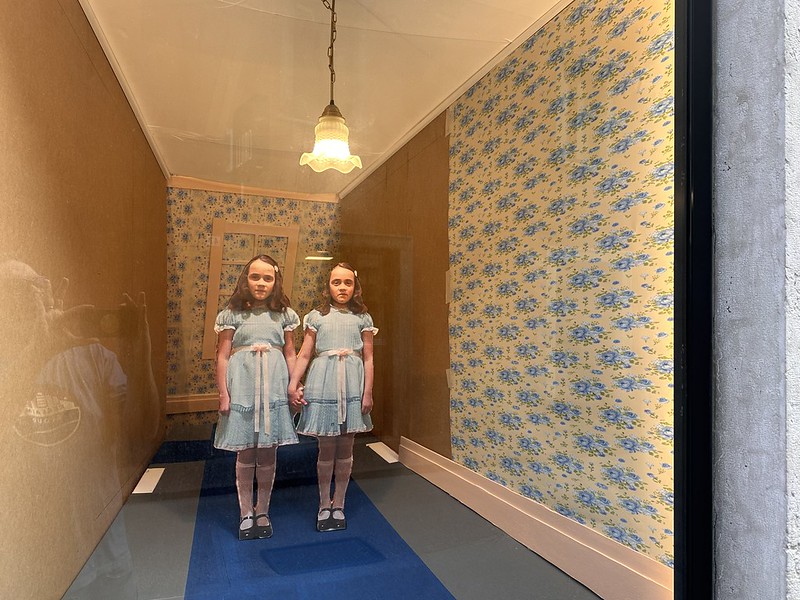
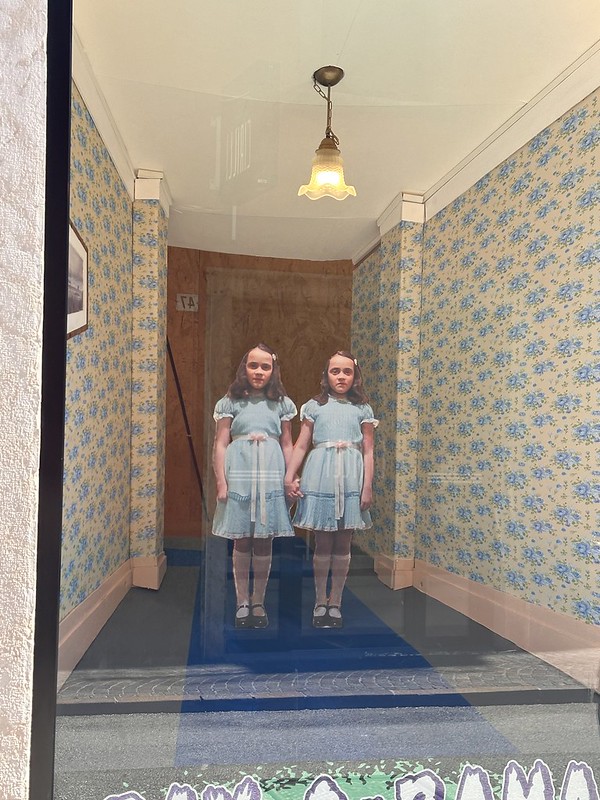
The Shining Diorama: the Finished Product
The final product is quite a thrill. It’s really cool to have something in your head become a reality like this, even if it’s a copy of an amalgam of other peoples’ visions—thank you Stephen King, Stanley Kubrick, and untold folks on the set of the 1980 film!
There are still a couple of things I need to do, like finish the fire extinguisher alcove and create the hallway in the rear that disappears into the left side of the scene, but for now I will just enjoy good enough.
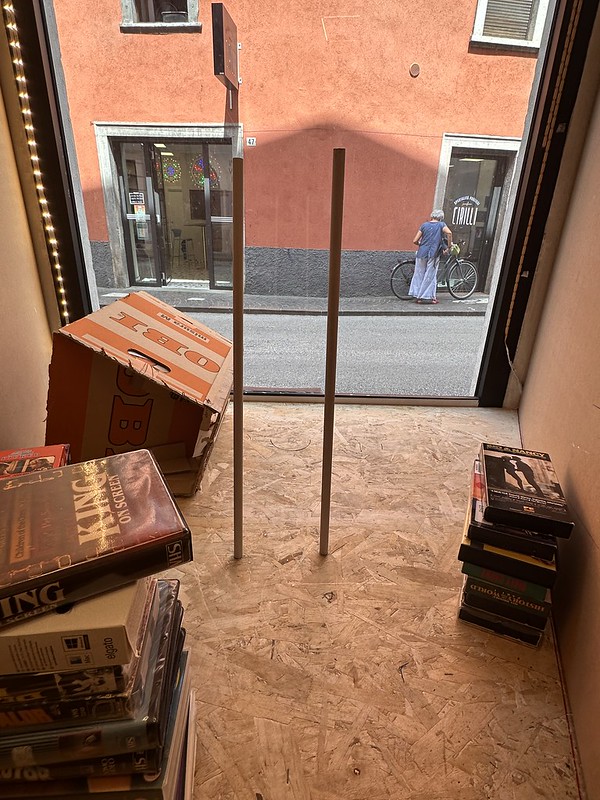
Update: Taylor Jadin let me know it is hard to get a sense of the size of this diorama, so I found an image someone took of it the other day to give a better sense of the scale of the diorama in relationship to the sidewalk. The size of the window is about 167 cm (or ~5 feet high) by about 100 cm wide (or ~3 feet). It’s fairly big as dioramas go.

_______________________________________
*That said, I do want to re-visit a video projector enriched diorama for the space in the winter. I think the less intense light and a scene that can encompass video seamlessly would be a lot of fun.

That’s incredible – thank you for taking the time to go into detail about your processes. Wish I could visit and see it in all its glory!
Thanks Sarah, the making of was crucial for me on this one because there were a lot of moving pieces that I want to remember. Another piece I didn’t really discuss is the whole thing is pretty modular by design given I need to take it apart at least to enable that special project I have planned for the Shining rug re-purposing I alluded to.
Making art is how we roll 🙂
Can I come play with you?
Thanks for sharing the full write up. I enjoyed the sneak peaks online as you made progress but to see the whole thing come together is very cool. I like the lo-fi nature of it all too. Very accessible and lots of creative hacks. As someone who has built whole bookshelves with similar precarious stacking and unorthodox stabilisation techniques in my time this is some top quality bodging.
Nobody bodges like the bava, NOBODY!
Thanks for all your support over on Mastodon, I really appreciate the encouragement along the way. It has been fun, but I have to admit to being a bit obsessed.
This is amazing. Love it ??
You are nice! Also, were you put up to this by Reclaim’s sysadmin? 🙂
He told me about it and I’ve been waiting to see the finished result. Got excited when he sent me the post.
Brilliant, it is good to have a fellow Grady sisters fan in Virginia!
I am of course in awe of the process and the inspired directed mania. And the outcome. But as a simple and sentimental barbarian, I am most touched by the cameos and contributions from family and friends you so generously detail. I particularly dig the pic of Tommaso holding up the Grady sisters, followed by the one with your reflection lurking behind them. And then later, seeing Anto prepping curtains.
Got me wondering… If only Jack Torrance had the open heart and emotional maturity to bring Wendy and Danny along for a winter-time creative adventure? Building a nice collaborative installation in the lobby of The Overlook instead of fussing so with his novel (which admittedly has a certain Dada concrete poetic charm),
Like Jack Torrance, despite all my droning on the page and flamboyant blustering, Antonella, Tommy, Wren and Kamille did all the work. Remember Wendy checking the boilers in the cellar and making sure the Overlook actually lasted through the winter? She is a stand-in for the crew that gets name-checked above. Meanwhile, I was checking tennis balls against the wall and lashing out at the least disturbance, just waiting to be swept away to the bar to re-acqaint myself with the hair of the dog that bit me. All the while the work had to get done by those I have erased.
There’s much to read between the lines in this supposed victory lap, and I’m not nearly as open hearted as my online persona suggests. I’ve always been the bava, Mr. Grady.
I need a webcam view of the street to see reactions! I so love this idea of taking over this little slice of town for something that’s so anti-commercial and made with love.
I have considered that webcam view, and part of me wants it as well, but then there are all kinds of potential Italian surveillance laws I might be running up against. In fact, I should probably investigate that and see if it’s not a problem if none of it is recorded, etc. In my Creepshow exhibit I wanted the camera facing the viewer to show them on the small black and white TV when they stayed there for X amount of time. Not only did it fail because I couldn’t figure out how to do it cleanly with an Arduino, but also because I was a bit hesitant to have folks I’m recording them.
I guess we’re all getting used to it as a society, and that might be one of the comments to be made through the piece, but at the same time I’m still a stranger in a strange land, so I am a bit concerned about pissing off the locals 😉
The bit about the space is strictly non-commercial and art-inspired is definitely my favoreite thing about the whole enterprise. I have folks regularly walking into my office asking “What is is?” and I joyfully have no good answer, but I gladly provide a 5 minute tour and attempt an explanation in my god awful tour, but little do we both know that is what it is. An experiment in physical connection not necessarily mediated by a commerical transaction. That’s the gold, if you will 🙂
Everyone already wrote the best comments. I’d glanced at your updates, but to see the entire process unfold lives and breathes that lost craft of writing how/why we make stuff. I was grabbed by the first pencil sketches, and the love of documenting ever step (the VHS tape props, the tool case support). But more as Brian noted, how this was a family and friend effort, that thing I have seen and known where your mad and beautifully driven obsessions draw people in.
As a small observation one of the niftiest parts was the photos out from the diorama space with just portions of the street and shops across the way. I was struck by the woman standing next to her bicycle in front of what I guess is maybe a bakery across the street. She and the places around are both part of the bavastudio fabric and yet also likely not too tuned in to it.
Eager to see what’s next! And keep at this blogging thing, one day it might come to something 😉
Biggest fan among your big fans!
Hi Alan,
I hope your ears were ringing, because Kate and I were talking about just how awesome you are at showing up and being there, and yet again you do not disappoint. It is hard to overestimate just how important your presence on the web is for tying together what little sense of blog community there is left. It’s god’s work.
As for the images, as usual you are very perceptive. The store across the street from me is a Pugliese bakery that is arguably the best in town. It is full of folks all day given they make amazing pizza, focaccia, bread, panzerotti, and much more. I eat there a lot.
In fact, many of the shops on the little street were I’ve landed are working stiffs like me: there’s a famous bike shop, a seafood restaurant, a vape store, and a couple of others. I’ve come to know the proprietors, and they’ve been pretty supportive about this weird space that serves no purpose, I even think a few might like it.
I also love the ritual of showing up fairly regularly, playing my music, and just getting to work. The office space is an absolute godsend for getting myself out of the CHUD basement and into the world again. There’s a whole post-COVID element to this space that I have mentioned before, and I have to say separating work and home has been a really big boon to my mental health, the diorama is just the cherry on top, or maybe the expression of a new sense of creative vitality as a result of changing things up.