
I have been looking on with wonder at the work Grant Potter and Brian Lamb have done with BC’s Open Ed Tech. In particular, their initiative designed to provide British Columbia’s post-secondary institutions the means to easily install and explore a range of open source applications using Sandstorm.io. What’s nice about Sandstorm is it provides access to a number of open source applications that don’t run on a commodity hosting LAMP stack, such as the blogging software Ghost, the collaborative text editor Etherpad, computational environments like the iPython Notebook, and Git Hosting with GitLab. And that’s just a few of the over 50 applications Sandstorm supports out of the box, and if you you have an application you want to add that’s also possible.
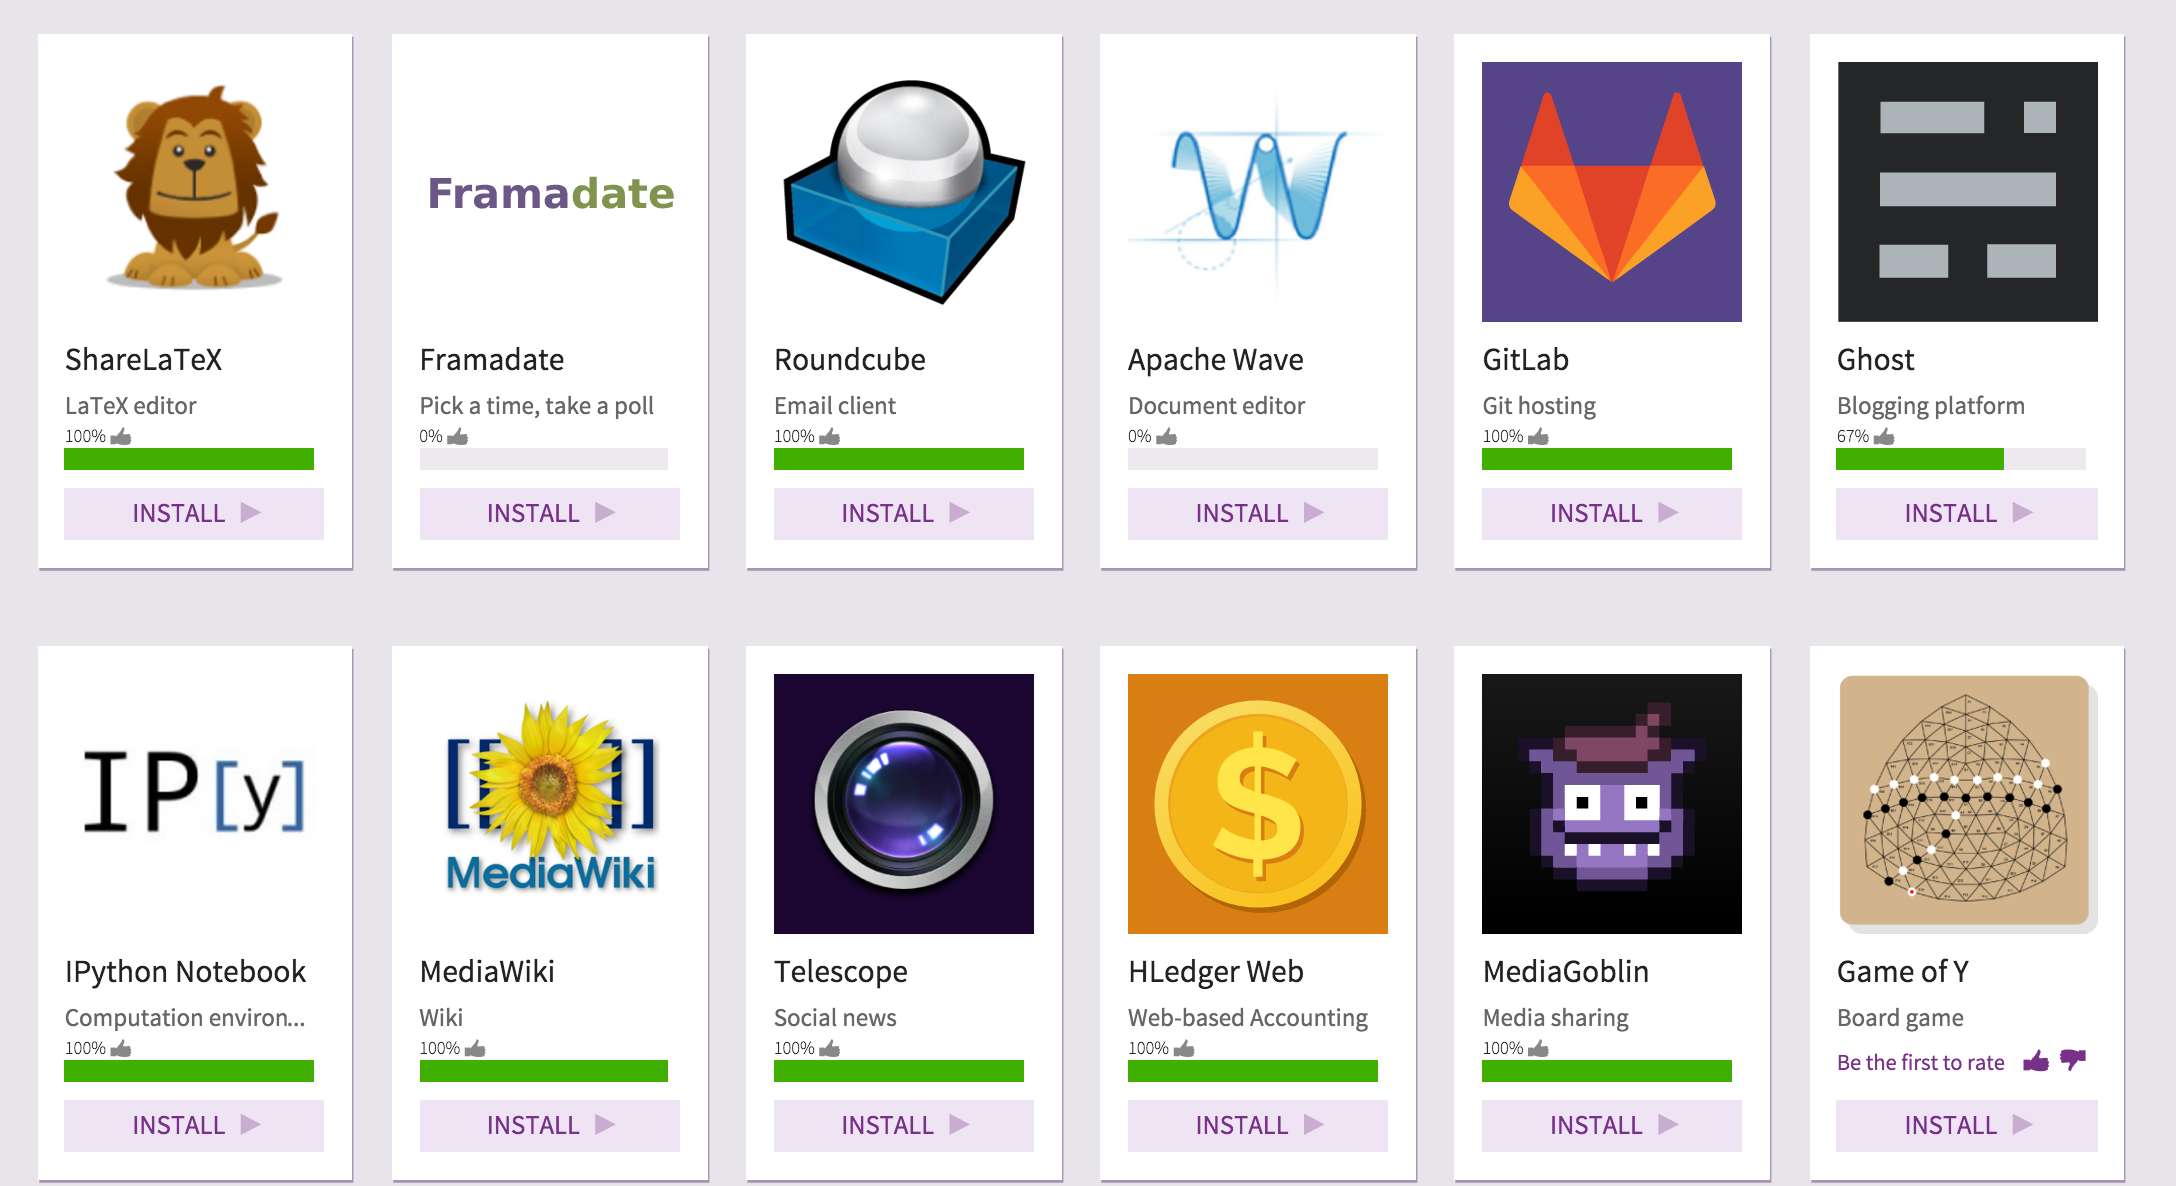
Sandtorm.io’s App Market
What struck me on this run through Sandstorm (Tim turned me onto it over a year ago) was the application market. It contains a number of applications folks have asked us about hosting through Reclaim. Georgetown University was interested in the possibility of hosting iPython Notebooks on their dedicated Reclaim server, and the great Tony Hirst as been exploring how to host them for a while now. More recently, Shawn Graham at Carleton University was asking me about the possibility of hosting GitLab, which was new to me, and lo and behold that is a featured app on Sandstorm.
hey @ReclaimHosting what would it take to set up something like Gitlab https://t.co/n4bGQmGTwr on one’s own domain?
— Shawn Graham (@electricarchaeo) January 28, 2016
So, when the outlaw Tommy Woodward asked if Reclaim Hosting could spin-up a Sandstorm server for VCU’s ALT Lab, I jumped at the chance. I have to hand it to the folks at Sandstorm, they made the process of setting up your own server dead simple. I’ll document my process below, but their documentation is pretty awesome.
Setting up your server Sandstorm Server
So I wanted to experiment with the self-hosted version of Sandstorm.io, but they do provide managed hosting as well if you don’t want to run your own server. In their Easy install instructions they give you details about what kind of server you should provision.
…you need a 64-bit Linux server connected to the Internet. (Requirements: Linux 3.13 or newer running on x86-64. 1GB+ of RAM; 2GB+ recommended.)
Knowing the details I headed over to Linode, one of our favorite cloud providers at Reclaim, and spun up an Ubuntu 14.04 64-bit virtual machine as per their recommendation. I’m telling you, spinning up servers in this brave new world of virtual hosting environments is freaking awesome. I added the smallest machine they have to start with, which is $10 a month, which just happens to meet the bare minimums for Sandstorm. Once I get a better sense of what VCU needs I can easily scale the server up.
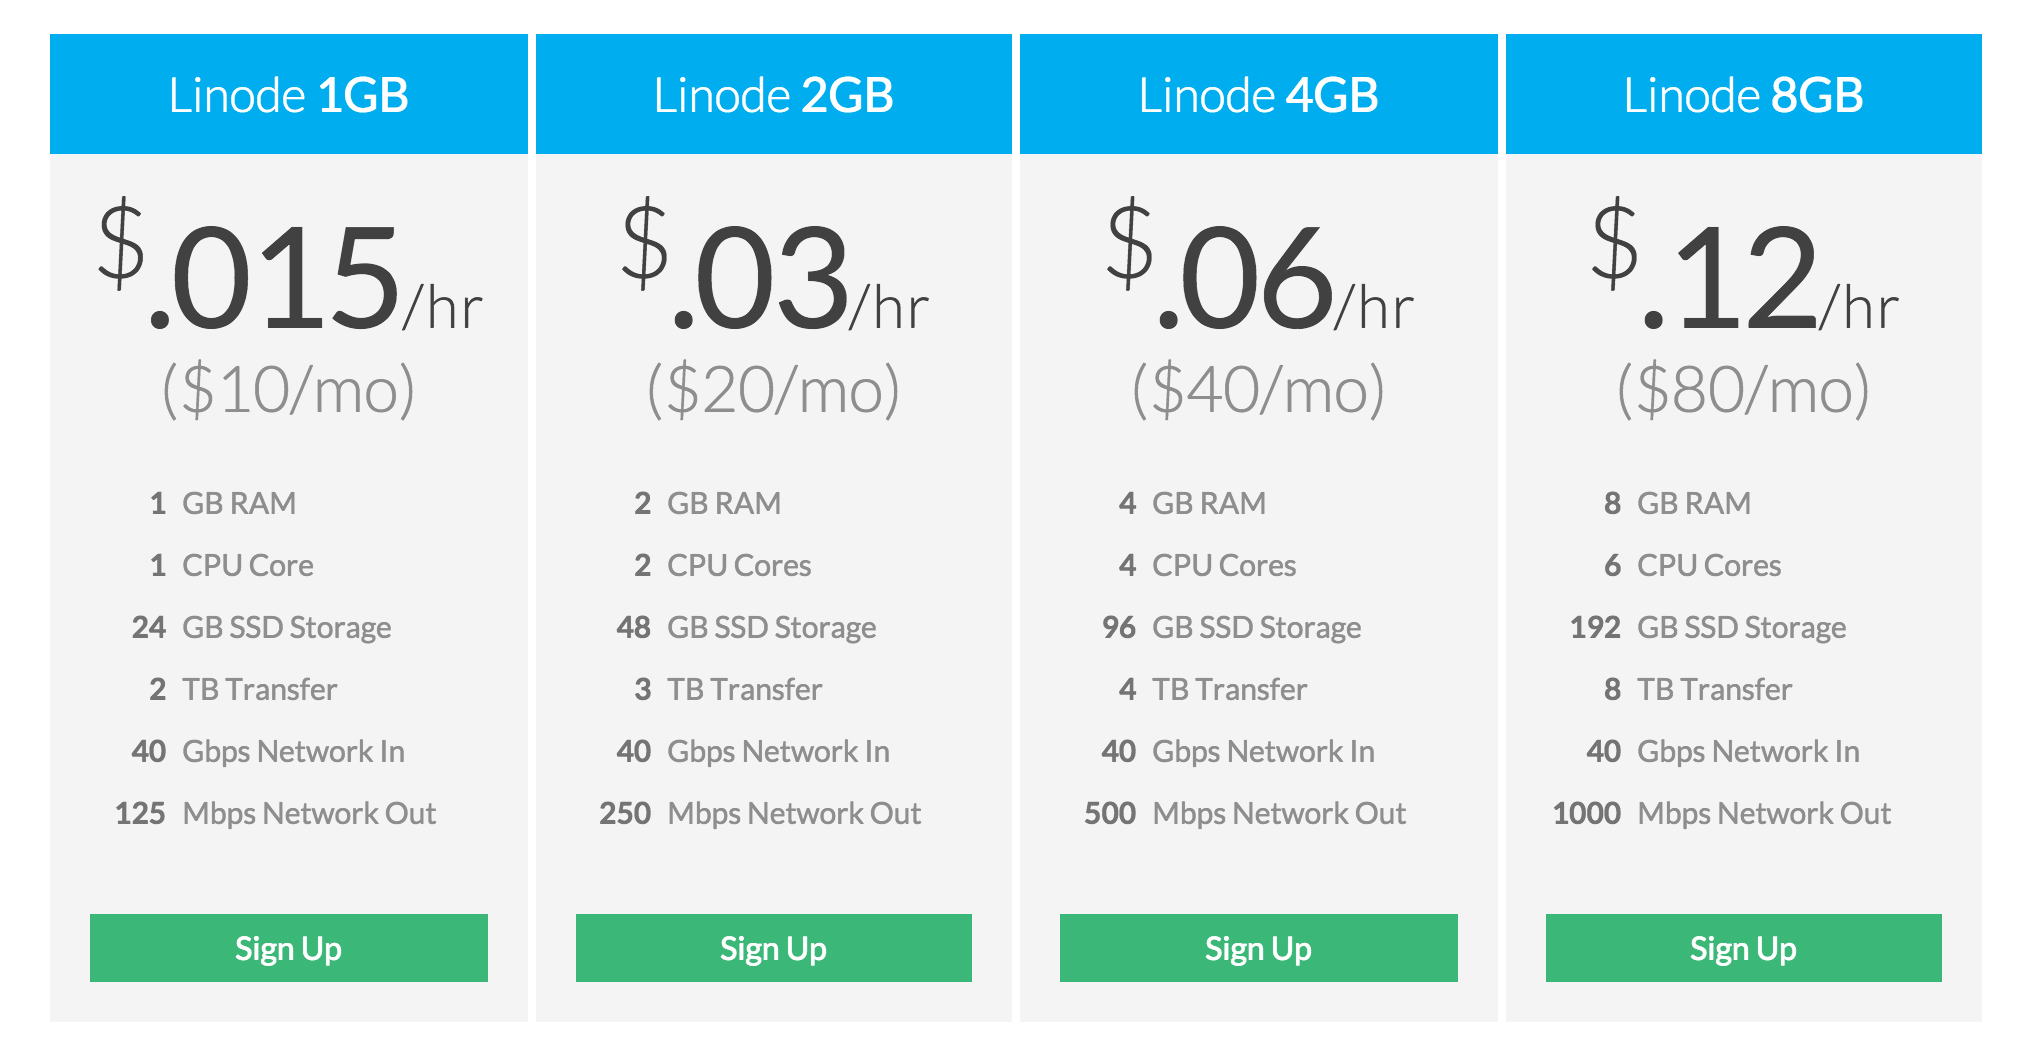
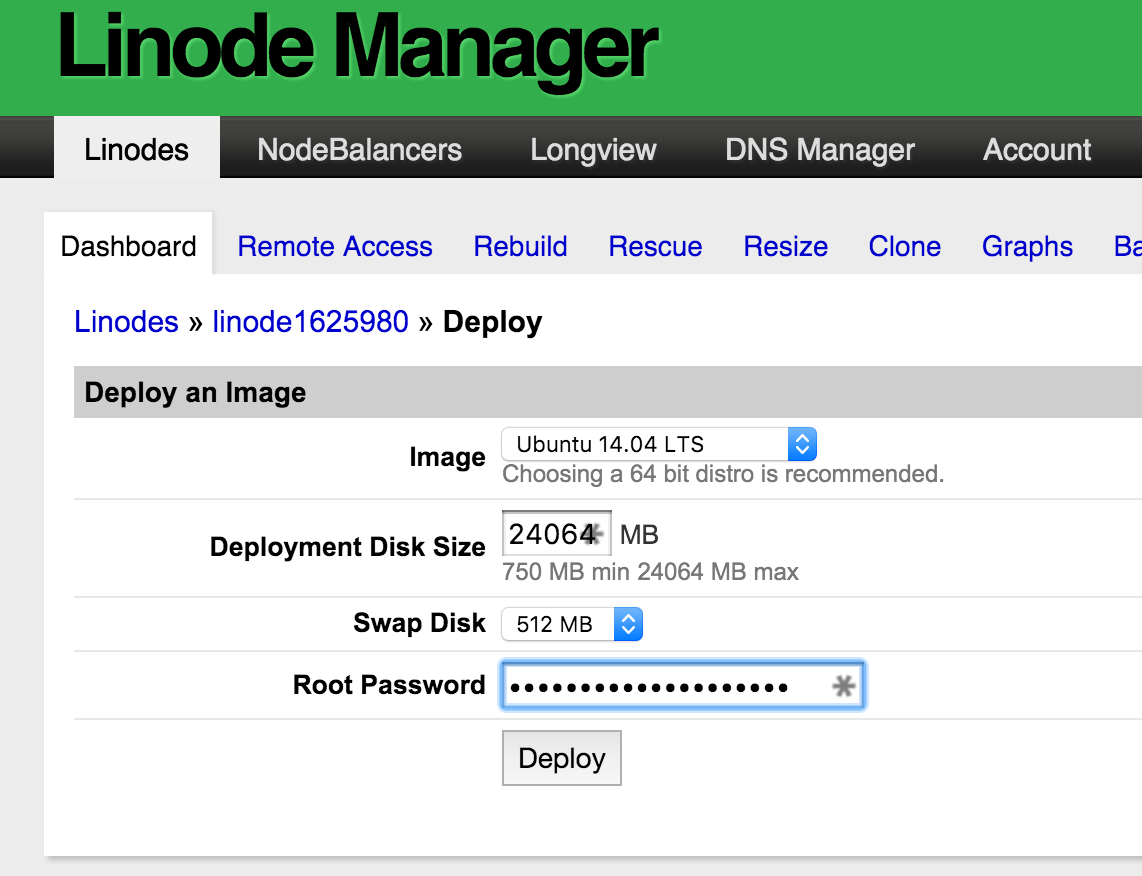
If you are using Linode, once you login and create an account you will see a link in your dashboard to Add a Linode. Once you click that it will give you the option to choose how big a server you want (I started with the $10/month option). Once Linode creates the server, you will need to click on the Deploy an Image link:

From there you chose the Ubuntu 14.04 LTS image, leave the deployment Disk space as is, and allocate 512 Mb for swap disk space. After that, create a secure root password for the server and hit the Deploy button.
Once that is deployed return to the main dashboard of the Linode server you have created and hit the Boot button to start running the server.
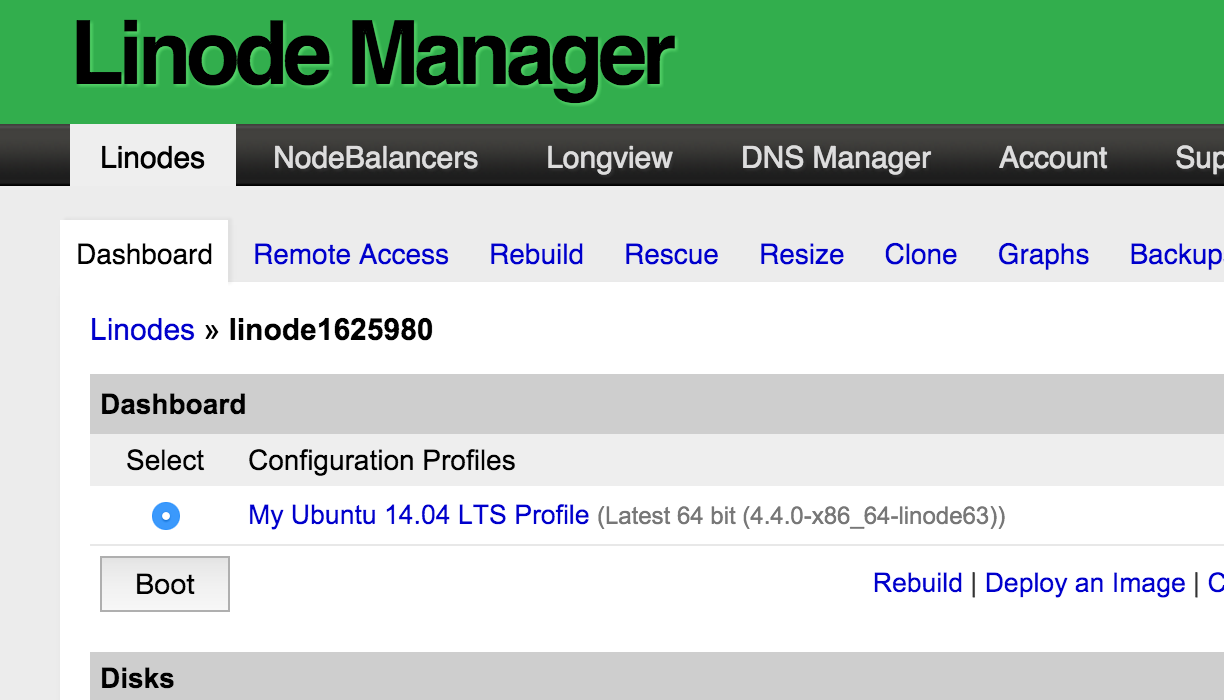
You should now have your own $10 a month Linode server with an Ubunto Ubuntu 14.04 64-bit virtual machine up and running. Crazy, right?

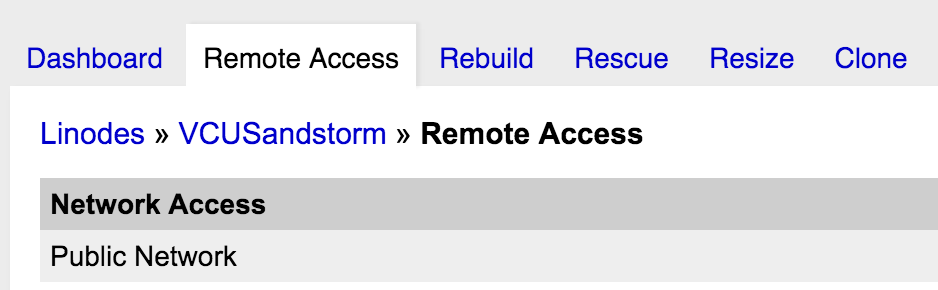
Finally, you are gonna need to find the IP address and root password (which you just created) under Remote Access so that you can log into the server via terminal and install Sandstorm. Note the tabs Resize and Clone in your server dashboard which allow you to quickly resize the server as well as clone it. I love all the cloud babies.
Installing Sandstorm.io on Your Server
Now that you have your server up and running it is time to install Sandstorm. They have made this really easy, and I will use a series of screenshots to take you through the process step-by-step.
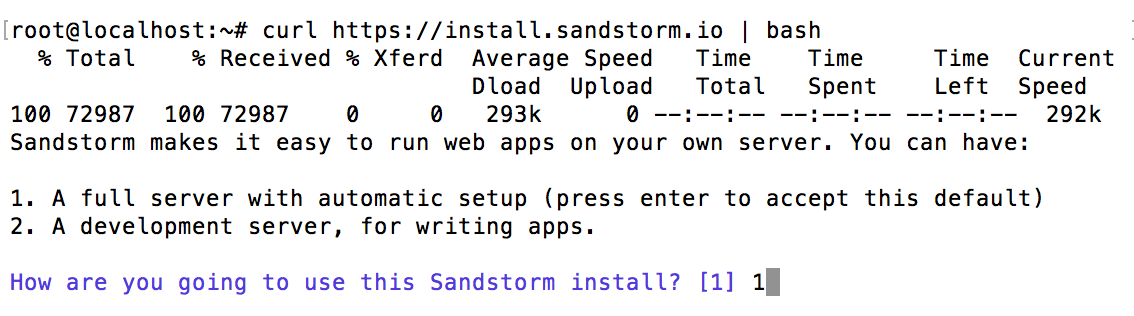
Once you login through terminal using ssh root@youripaddress and authenticate with the proper password you will then need to add the following command to start installing Sandstorm:
curl https://install.sandstorm.io | bash

Once you do this, you will be prompted which version of Sandstorm you want to install. Choose 1, full server with automatic setup.
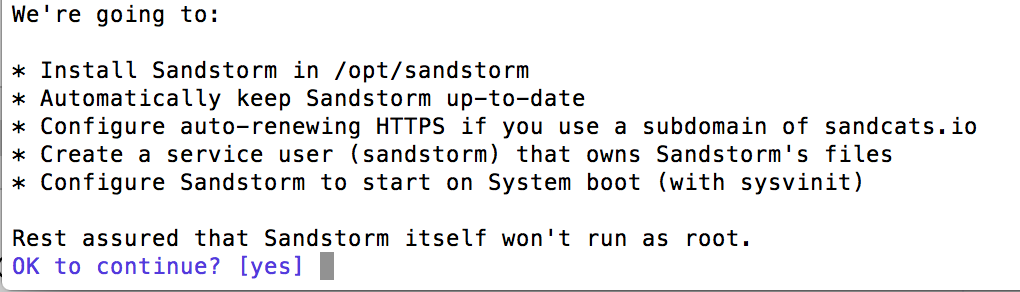
Then you are prompted with the details of what they are about to do, assuring you of good server administration along the way 🙂
Then you choose the subdomain of sandcats.io you want to run your instance on. For example, I setup VCU’s instance subdomain as altlab.sandcats.io. For the test instance I created for this documentation I used reclaim.

After that, provide an email for disaster recovery purposes.

Finally, you will be provided with a link (highlighted in blue below) that you will need to copy and paste to start setting up Sandstorm.
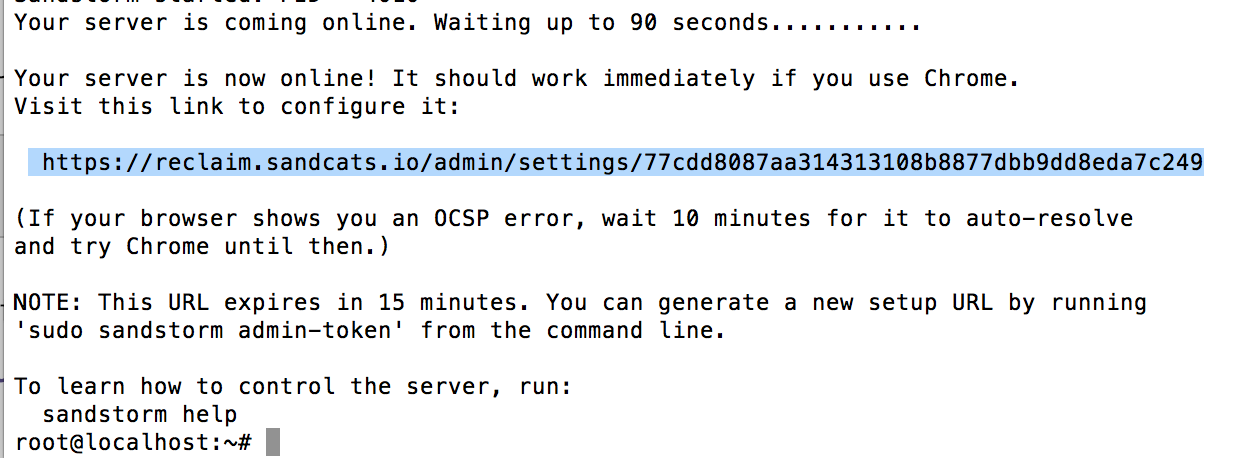 That’s it, pretty easy. They certainly walk you through it quite cleanly, even if it is command line.
Setting up Sandstorm
Now it is time to setup Sandstorm, once you copy and paste the link they give you at the end of the installation process into a browser, you should see something like this:
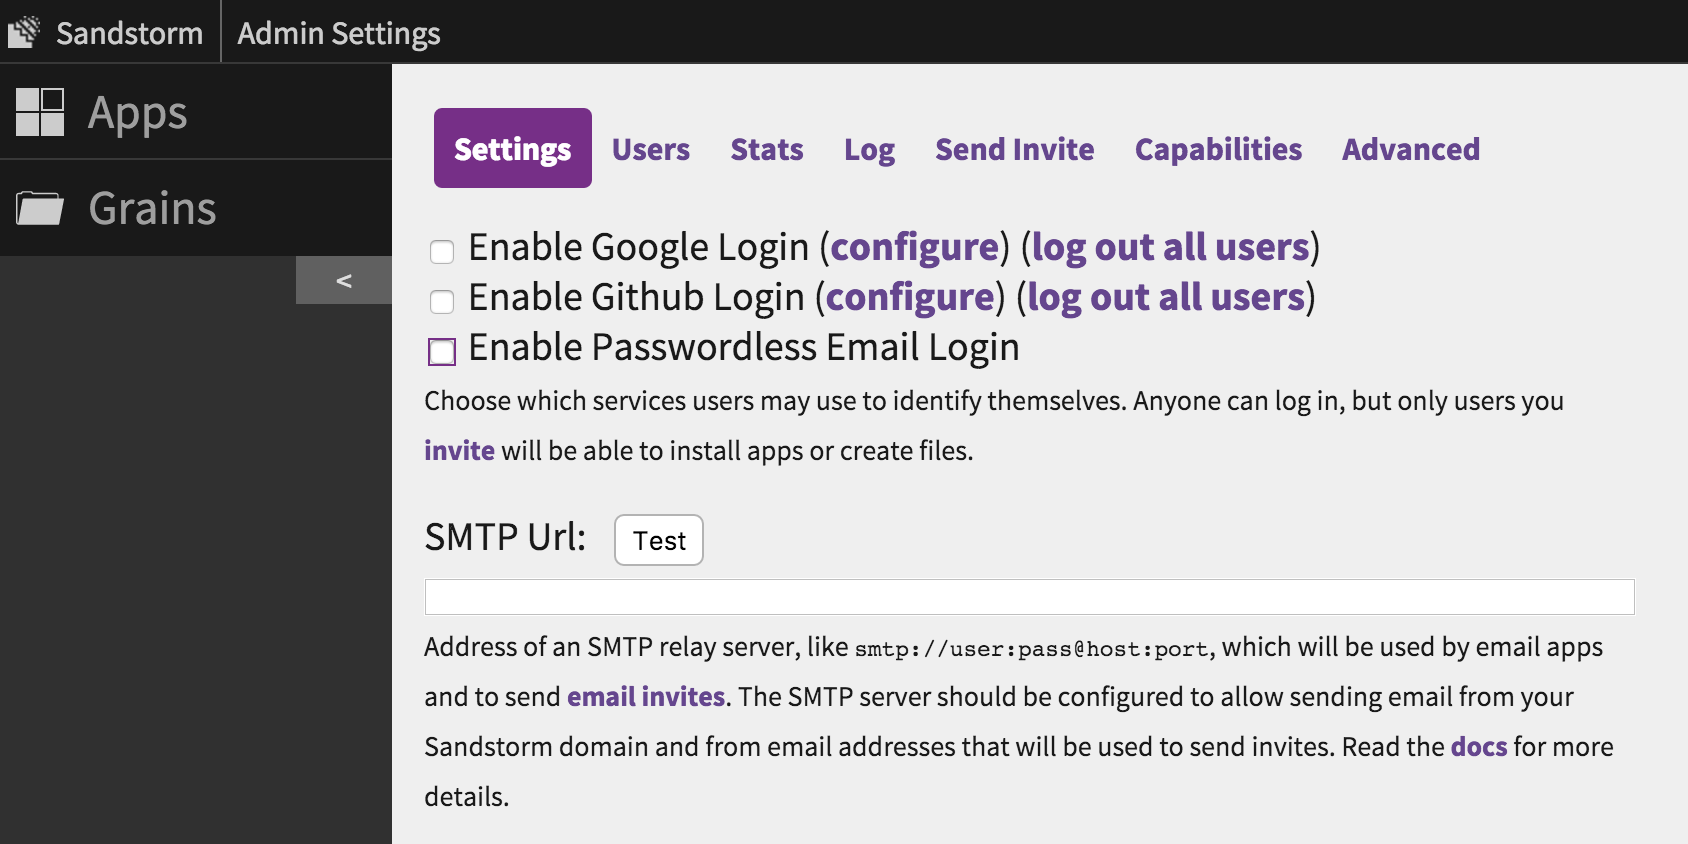
There are two main pieces to configure, the Login methods and SMTP to send folks their invites. I enabled all three login methods, i.e. Google, Github, and email. With email there isn’t much to configure, just click the box and you are set. For Google and Github there are a few more steps, but Sandstorm walks you through them seamlessly. You are basically enabling OAuth through these apps, which assumes your users have accounts on them already. If not, then the email route is the way to go. Here is a screenshot of the configuration details for Google that Sandstorm supplies, pretty straightforward:
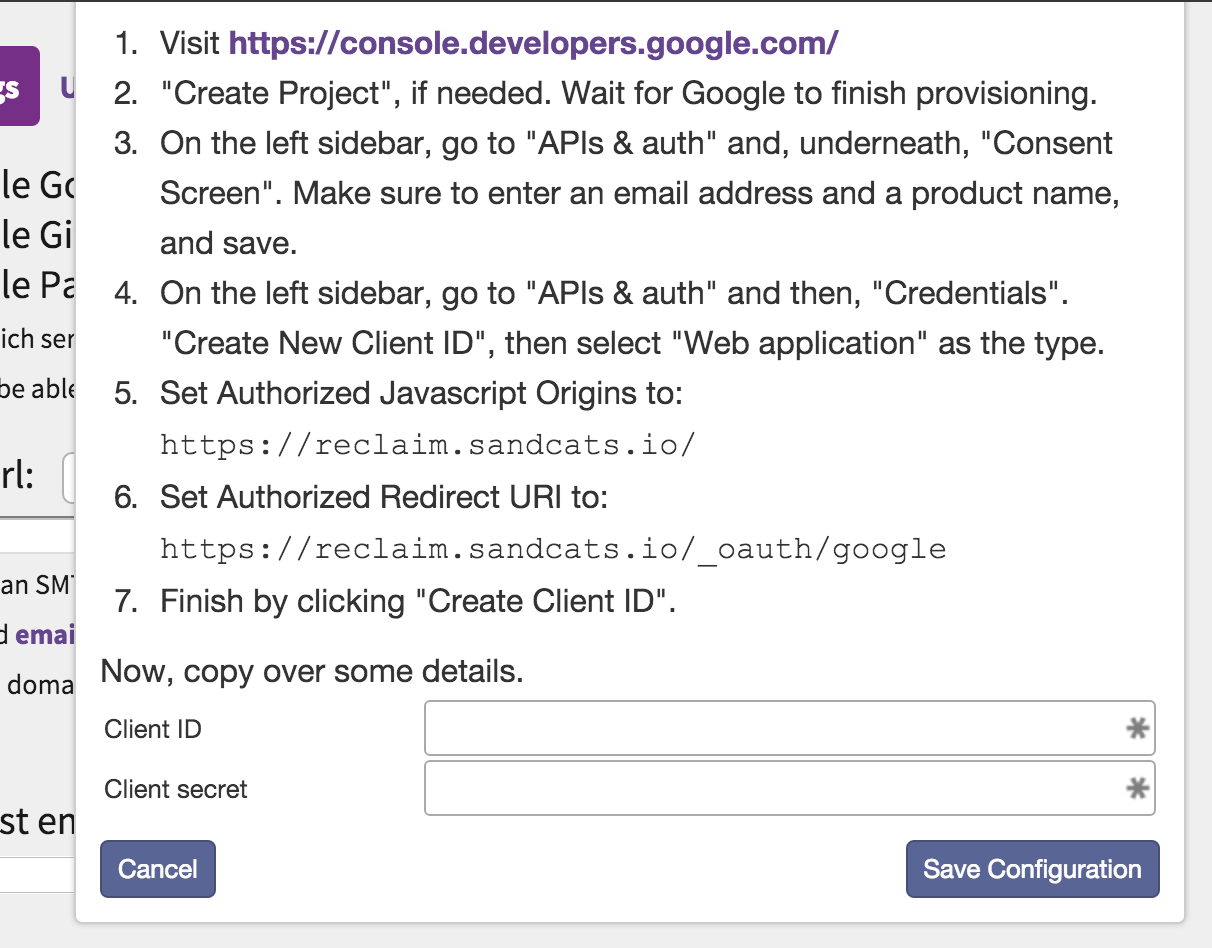
It’s roughly the same for Github, just a tab bit easier.
Now, in order for any of that to work, you have to configure a SMTP relay server. This might seem alien, but it’s not that bad. We use Mandrill at Reclaim, and I just logged in and created an API key for the Sandstorm instance and used our SMTP settings. It looks something like this:
smtp://user:pass@host:port
And if your username has an @ in it you need to convert it to %40.
After that, you should send yourself an invite, and once you accept and login using that invite you will automatically become the admin. First person registered is Admin by default.
And that’s it, with these steps you’ll have your Sandstorm instance up and running. I’ll follow-up on this post with some details about running applications, enabling application email, mapping domains, etc. But for now this post is long enough, and this covers the three steps to actually getting your Sandstorm server running.
Update: I followed up on this post with “Anatomy of an Application in Sandstorm.”

Hiya,
Kept meaning to follow up, but got distracted… so, for now, we have to go outside of reclaim, cause reclaim runs LAMP stacks, which gitlab does not run on, right? Can’t run a VM in my reclaim space?
Shawn,
That’s right, you would have to spin up a Sandstorm self-hosted instance on Linode or Digital Ocean, which is actually pretty manageable. Although if you want us to help you out with that just let me know.