
I had mentioned that I would further detail the steps of setting up a MySQL database for Lyceum for those of you that may be unfamiliar with the process. Keep in mind, however, that the following steps assume that you have a web hosting service with CPanel.
The part of the config file where you fill in your database information in Lyceum is as follows:
define('DB_NAME', 'jimgroom_lyceum');    // The name of the database

define('DB_USER', 'jimgroom_jimgroo');      // Your MySQL username

define('DB_PASSWORD', 'password);      // ...and password

define('DB_HOST', 'localhost'); // hostname or IP of database server (possibly 'localhost')
The four fields above (DB_NAME, DB_USER, DB_PASSWORD, & DB_HOST) are all settings that you have to fill in with information relevant to the particular database tables you set in your CPanel. Where does one get this information you ask? Well, let’s do a play-by-play to find out …
Using Cpanel to create a MySQL database:
The first step is to log into you Cpanel and look for the MySQL Databases icon. It should look something like the screenshot below:
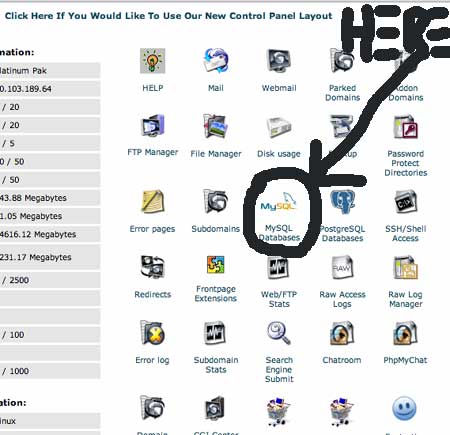
When you click on the MySQL databases icon for the first time you may be a little disorientated by the list of headings, code and other seemingly indecipherable information. Do not fret for a majority of the code is irrelevant for our purposes. In fact, once you figure out how this unnecessarily complicated page works, you’ll find it is a breeze. Let’s take a look at a screen shot and decipher the details …
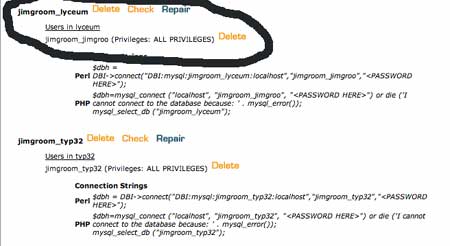
Ok, the part I circled above (quite precisely I might add) has all the information about a database that you will be interested in for our purposes. For example, this database is named jimgroom_lyceum (corresponding to the DB_NAME field for the Lyceum config file) and the user name is jimgroom_jimgroo (corresponding to the DB_USER field for the Lyceum config file). Ok, so now we have a better idea of how to read this page, but how does one create a database and user?
Actually, it is quite simple. As you scroll down the MySQL databases page you will come across the following fields shown below:
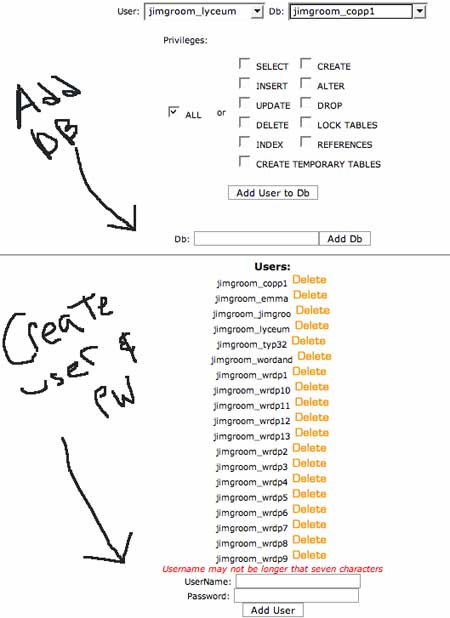
As you can see I have highlighted the spaces where you add a new database, as well as the fields wherein you can create a user and password for that database. (Keep in mind that you can have one username and password that controls several databases as well, so it is not necessary to constantly create a new user and password for each additional database you create). The example above, jimgroom_lyceum, was a database I added for my Lyceum install. When doing that I typed lyceum into the add database field. Wait! -but why, pray tell, is your database name(DB_NAME) “jimgroom_lyceum” if you only entered Lyceum here???! The “jimgroom_” is a prefix that is assigned to all of my database names and usernames because I am part of a hosting service, if you are administering your own server or have another arrangement outside the web hosting variety this may not apply to you. For example, if you type ‘jimgroo’ (no quotes) into the UserName field your username would be jimgroom_jimgroo. This is often confusing for many folks using a hosting service, so I hope this clarifies things a bit.
Now, don’t congratulate yourself just yet, for even though you have added a database and created a new username and password, you have to link the two!
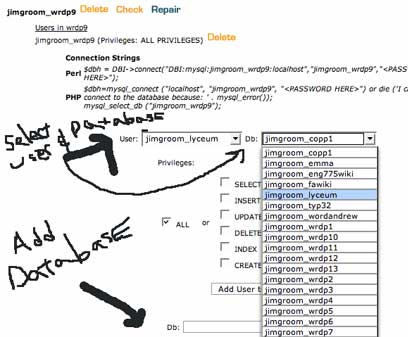
Above the add database field there are two fields next to one another that contain a drop-down menu listing all of your usernames and databases, respectively. What you have to do now is link the username you created, for example jimgroom_jimgroo, with the database you added, for example jimgroom_lyceum, and assign the privileges (check ALL). At that point you have satisfied 3 of the 4 requirements for the Lyceum config file for the databases.
The fourth and final step is the database host (or DB_HOST). Ninety-nine percent of the time if you are working with a web hosting service you will leave this as ‘localhost’. For the other 1% -sorry to say that you’re gonna have to call your hosting service and find out what you need to put here (usually an ip address or a domain without the http protocol).
Use the comments to let me know if you find this helpful, or, more importantly, if I am mistaken or missing anything here that may prove useful …

Pingback: Doing things with Lyceum at bavatuesdays
hey! you leave the breadcrumbs, too! 🙂
Pingback: The Lyceum Project » Step-by-step how-to on setting up a database on managed hosting for Lyceum
Pingback: Hacking WordPress into a Virtual Learning Space (Part 2) at bavatuesdays
Very helpful! Thanks!
where is the sql file ??
also i dont have an inastallation folder inside src folder ?