
 Upon completing part 1 of this serialized tutorial you should have the shell of your virtual learning space framed out. Now we want to start adding other open source tools that may be helpful. After WordPress, the next install for me is MediaWiki. I experimented with putting my syllabus and class notes up on a MediaWiki (premised on a similar virtual learning space to the one I am mapping here) this Summer in an effort to closely track the trajectory of a five week summer course I taught. During the summer I found the wiki installation for this intensive course useful because I was teaching this class for the first time and the wiki provided a space to constantly re-examine my approach to the material as well as a persistent resource that I can return to again and again for new ideas – like the one I am trying to frame while I write this. And unlike static content repositories like BlackBoard, you can easily trace your own process of shaping and directing the logic of a course during a semester -not to mention the possibilities for designing written assignments that can quickly become digitally dynamic narratives that are able to trace the process of writing and revising in new and exciting ways – wow – did I say revising and exciting in the same sentence? So, as you may have guessed, I am excited about the idea of playing with the possibilities of MediaWiki over the next 15 weeks (much more sustainable than five) of the Fall semester. Keeping in mind, however, that these “lab experiments” are simply scratching the surface of potential uses for these new tools in an educational setting. The tremendous excitement and energy that surrounds tools such as the wiki or the blog or the podcast or the vodcast or the CMS is fueled by the fact that they are still in the nascent stage of discovery within the world of higher education.
Step 2: Linking your MediaWiki installation through the WordPress Header
I. Downloading, creating a database and installing MediaWiki
i. Download Mediawiki
Well, first you have to download Mediawiki here. Please note that I will be using version 1.6.8 for demonstration purposes here because the latest version 1.7.1 requires PHP 5 which I have not yet got around to upgrading to – my bad!
ii. Where should I install it?
This is entirely up to you, but here is a dose of my logic. I installed my MediaWiki in a folder titled wiki within the WordPress directory. i.e., http://courses.jimgroom.net/engl101_f06/wiki
The directions on the MediaWiki site are pretty thorough – in fact, an excellent use of the wiki! -but you will need to setup a database for MediaWiki because there is no Fantastico script installation for this program – so check out this tutorial on creating MySQL databases using CPanel (it assumes you are setting up a Lyceum multi-user blog – but the meat and potatoes of the tutorial for creating a MySQl database using CPanel are easily ported to MediaWiki).
iv. Installing Mediawiki
Once you download the source files you will need to follow the directions for installation on the Mediawiki Installation Page. They assume you can upload the sources files to your web server and make the modifications from there using a line command shell (if you are old gold) or a FTP client that has text editing capabilities if you are faint hearted like myself (Transmit for the MAC does this wonderfully for me). Tip: remember your WikiSysop login and password, this will come in useful when customizing the wiki in the examples below.
OK, so I am going to make a huge assumption here, and say you followed my paltry directives above and the MediWiki installation went like a charm. You are extremely impressed with my ability to be both succinct and comprehensive simultaneously – “What prowess!” you remark, incredulously. Well, not really, but I am not sure I can re-frame the instructions for installing MediaWiki any better than their current incarnation – so wrestle with them.
II. Customizing your new MediaWiki Installation
There are a couple of basic customization tips when installing a MediaWiki that I have to go back to the MediaWiki FAQ for again and again, so writing them here is my way of -hopefully- remembering them and failing that, at least having them at my fingertips at all times (every keystroke counts!) I am taking these customization tips for the MediaWiki from the
Customization FAQ. For many of the modifications that follow you will have to be logged in as WikiSysop – which you will have come across in the installation.
i. Changing the Mainpage Title (you must be logged on as a WikiSysop to do this!)
By default, MediaWiki looks for a page with the title Main Page and serves this as the default page. This can be changed by altering the contents of MediaWiki:Mainpage to point to a different title. This will not affect any of the links of the main navigation bar, including the ‘Main Page’ link included there at install time; to change these links, edit MediaWiki:Sidebar.
To modify the main page title copy “MediaWiki:Mainpage” (without quotes) into the search field in the sidebar. After that, the mainpage will show up, click the edit tab and change the title MainPage to something more appropriate – for example “Class Wiki Homepage” – you will see these changes reflected in the navigation links in the sidebar on the left (if you are using the default Monobook wiki theme – which I will assume most are).
ii. Changing the logo
The logo that appears in the top left of each page is determined by the $wgLogo configuration setting in the LocalSettings.php file. To change this you simply need to change the value of $wgLogo to point to the URL of your own logo image. You can upload a file via the wiki and use that address (which allows it to be replaced easily, so you may want to protect the page if you use this method) or use an image uploaded to your server via other means.
Note: It is possible to simply overwrite the default logo installed with MediaWiki, but this is strongly advised against, as an upgrade may end up overwriting it or change the default location of this file.
Tip: The logo image should be 135 pixels square.
The location of the LocalSettings.php file should be in the main directory of the wiki install, if you moved it from the config file as the installation instructions prompted you to. You should find the $wgLogo on line 50
$wgLogo = "$wgStylePath/common/images/wiki.png";
Replace the value above with your url for the image you want as your Logo. If you copy the image into the images file within the root of the wiki directory your code should look like this …
$wgLogo = "$wgScriptPath/images/engl101_wiki.gif";
In the example above, I have replaced the default wiki.png with a custom image (the full URL would look like this – http://courses.jimgroom.net/engl101_f06/wiki/images/engl101_wiki.gif – notice how I have placed the MediaWiki install within the WordPress folder as a subdirectory titled wiki.)
iii. Changing the logo URL Link
By default, clicking the logo takes you to the main page. If you want to change which page is the main page, edit MediaWiki:Mainpage. Or to make the link go to any arbitrary URL, for Monobook skin, edit Monobook.php
Monbook.php is in the skins folder of the main directory where you installed the wiki: yourwikifolder/skins/Monbook.php
On lines 138 -141 of the php file you will see the following code:
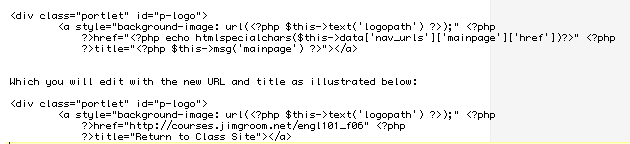
Click on image to see a larger copy of the code
iv. Editing the Sidebar Navigation Links
The contents of the navigation bar can be edited using the MediaWiki:Sidebar message page. To access this page, enter the title as shown into the “search” box and click Go.
The format of this message is as follows:
* navigation
** mainpage|mainpage
** Special:Recentchanges|Recent changes
** forums-url|Forums
** http://www.mediawiki.org|MediaWiki homeThis snippet above demonstrates the various formats available for use.
I changed my navigation bar to the following:
* navigation

** mainpage|mainpage

** http://courses.jimgroom.net/engl101_f06|Class Portal

** recentchanges-url|recentchanges

** helppage|help
Above, I preserved a link to the wiki homepage, the class portal (or class site), recent changes and a help page wherein I will include basic instructions for the students on using the wiki.
v. restrict editing to logged in users only
You can achieve this by modifying the skin. For the default MonoBook skin, in the MonoBook.php file, search for this line:
foreach($this->data['content_actions'] as $key => $tab) {
and insert this line above:
if($this->data['loggedin']==1)
To conditionally hide individual tabs, modify the code to check the value of each $key inside the foreach loop.
vi. Remove thee Creat Account/Login link:
In Monobook.php change this statement:
foreach($this->data['personal_urls'] as $key => $item) {

...

}
to:
foreach($this->data['personal_urls'] as $key => $item) {

if ($key != 'login') {

...

}

}
III. Integrating the wiki into the WordPress navigation Tabs in the Header
Finally, a little bit of integration between MediaWiki and WordPress – the payoff of this all too long post. One thing I immediately dreamed of while doing this was that maybe some kind soul designed a K2 theme for MediaWiki – and while they have done it for Drupal – there is not a K2 theme for MediaWiki – damn! (Maybe that’s another project for another day.)
As you have seen in the customization above, I have made the logo and a link in the navigation bar return to the WordPress installation, now we need to but a link in the navigation tabs in the WordPress header to the Wiki and we have finally made them as seamless as possible. Well, here it is, short and sweet.
i. Editing header.php to integrate the MediaWiki into your WordPress installation
Using the Presentation tab in the backend of you WordPress installation, go to the theme editor subtab:
Find the following code (highlighted in blue) at the bottom of the header.php file:

Click on image to see a larger copy of the code
Add a link to your wiki and name that link, being sure to wrap them in list tags as illustrated in the line highlighted in blue in the final code:
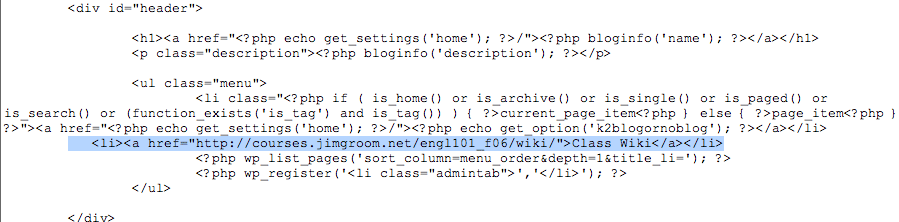
Click on image to see a larger copy of the code
All things being equal, you should have a WordPress Wiki, care of media Wiki and a simple hack – pretty cool!

Click on image to see a larger version of the image

This serial is like Superman. I’m waiting on the edge of my seat for the next episode 😉
Seriously Jim, this is great stuff!!!
Nice work.
Some time ago we installed MediaWiki and WordPress on a community site for IT students at Swinburne University. It’s not quite the same as what you’re doing, but you’ve given me some ideas (and, presumably, my fellow admin since he sent me the link to this page).
Check out http://www.byteclub.net if you’re interested. We have been particularly interested in the use of MediaWiki in an educational setting for managing course related content (and yes, we do have Blackboard available to us, but prefer to use a wiki).
Lucien,
Wow, thanks for stopping by from the other side of the world! Very cool. I saw the byteclub site and its a perfect blend of mediawiki and WordPress -its really exciting to think that many of us are thinking through the integration of these tools simultaneosuly and will be able to share our own discoveries throguh the very tools we are recombining for teaching and learning. I will be following your development closely now that I know where your blog is:) How are you installing the blogs – are you doing individual installations or working with a multi-user solution. If you are interested in Multi-User WordPress blogs check out Lyceum. My next piece of the this puzzle will be on Lyceum, but it may be a little while yet, for I used wordpress.com blogs for the students this term given my own time constraints. I am kinda kicking myself a little, not because WordPress.com isn’t excellent -for it is -but because I really wanted to work through the bugs of a Multi-user installation locally. Soon enough, I hope.
For some really cool uses of the wiki in an academic setting check out wikifish maintained by Auburn University’s School of Achitecture.
Be seeing you!
Pingback: DigiZen: Un blogfesor aprendiendo » El bliki: un híbrido de la web 2.0
Just wanted to let everyone know that I’m in the process of porting K2 over to a real mediawiki skin: http://github.com/auzigog/k2mediawiki/tree/master
If anyone is interested in helping me develop this, please contact me: http://auzigog.com