Greetings from Reclaim Hosting

Turns out a few days ago was Reclaim Hosting‘s 11th anniversary, crazy how time flies when you are providing a range of infrastructure options for higher ed and beyond. Recently Meredith Huffman and I sat down with Bryan Mathers to try and map all the different products and services we offer. The beauty of these sessions is that they often lead to new ways of framing Reclaim Hosting, and this meeting did not disappoint. We came up with the overarching theme of visiting various products as if they were places, and the postcards become the key element for visually capturing their essence: Continue reading

Posted in art, reclaim | Tagged , | 4 Comments

DS106Radio Summer Camp

Bryan Mathers is at it again with his Remixer

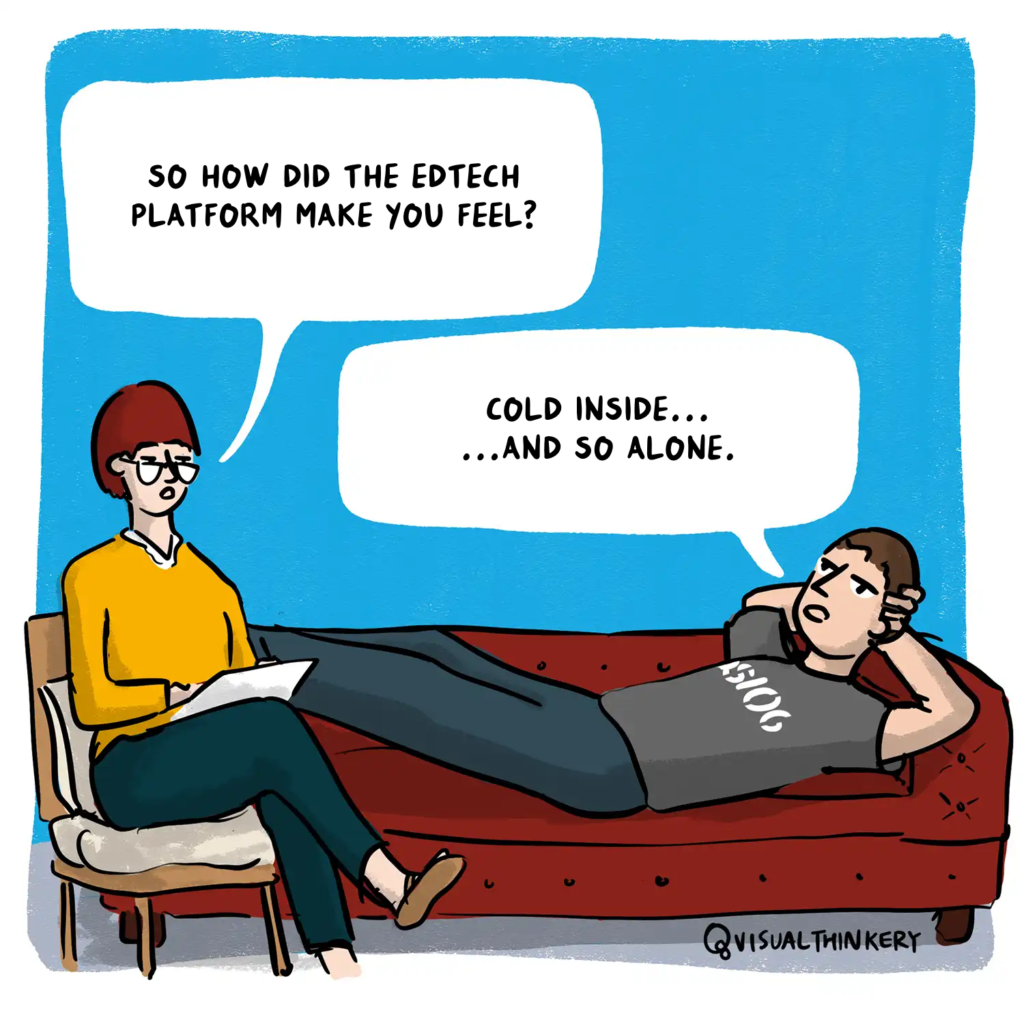
While the Learning Management System may not be dead, I certainly feel better when it’s not around. In fact, the ds106radio Summer Camp from August 12th through the 16th is embedded in the idea that doing edtech is anything but isolating and depressing. The schedule highlights just that fact, with sessions about everything from the Austerity Blues to Dream Teams and Apollo 13s. And the platform? The open and free airwaves of the mighty ds106radio. I’ll get things going each morning with some impromptu radio with musings about such topics as “What is art?” and “Why you can’t kill what’s already dead.” This format allows for folks to tune in as they like and enjoy a frictionless experience all the while. Major kudos to Maren Deepwell for organizing the summer camp so seamlessly, and creating a free and accessible event that is open and available to anyone interested—my favorite kind of open! If you’re interested in playing along you can register here for reminders and updates or just listen in when the time comes.

Posted in ds106radio, reclaim, Reclaim Radio | Tagged , , | 3 Comments

Exploring Arduino Uno Motion Detector Options

As part of the Creepshow bav-o-rama installation for the bavastudio, I’m trying to get a motion detector hooked up to an HDMI switcher that will change inputs based on motion on the other side of the diorama window. It’s what Michael Branson Smith has termed an “aspirational goal” for this installation, and he may be right, but hope springs eternal in the bava’s breast. If nothing else, it’s given me an excuse to play with the Arduino Uno Rev3, which is a pretty amazing little gadget.

So, for the last week much of my free time has been dedicated to testing out a variety of scripts folks have shared to create a simple motion detector using the Arduino. My favorite so far is  “How to Setup an Arduino Motion Sensor” from PiMyLifeUp. I like this one because it has the motion detector connected to both an LED light and a tiny piezo speaker, so whenever motion is detected the light and speaker are activated. I used the above video and linked guide to create it, but left the resistors out of the circuit because I knew this was just a test and wouldn’t be running for any significant amount of time.

The above video is my test of the motion detector, and it’s amazing how something seemingly so complex as a motion detector can be made so simple and entertaining. That’s the magic of the Arduino.

Some notes on were I’m so far on my quest. The above build is using a PIR motion sensor, or a passive infrared motion detector, which picks up on change of radiation levels based on a person’s movement. These sensors are quite cheap; I was able to get a 5 pack for 10 euros. The tiny piezo speaker and LED light were taken from the Sparkfun Inventor’s Kit George Meadows so generously donated to Reclaim many years ago. I bought a breadboard separately because the one that came with the Inventor’s Kit was long gone. I now understand just how useful a breadboard is for experimenting with all these circuits, it allows for quick connections without ever having to solder a thing.

I figured out almost immediately that the PIR motion sensor will not work for my project because they are activated by energy displacement. Given my diorama will be trying to detect motion on the other side of an insulated window, this means energy/heat detection will be difficult, if not impossible, to pickup. In other words, this is a no-go for my use case.

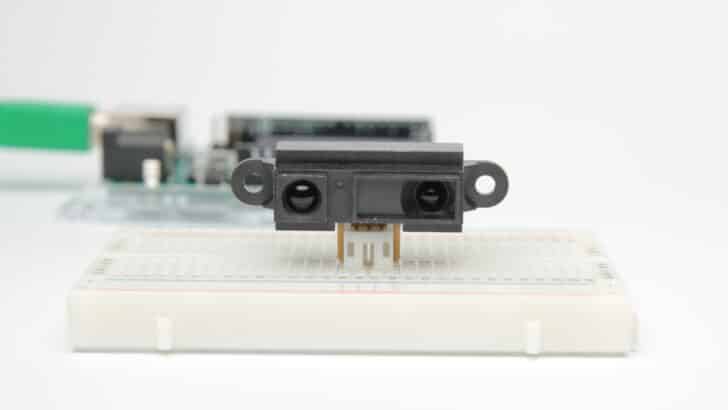
The SHARP GP2Y0A21YK0F is an easy to use IR distance sensor with a range of 10 – 80 cm

But this led me down a rabbit hole of other options for motion activation using the Arduino. Another sensor I had hanging around that might work is the SHARP GP2Y0A21 proximity sensor. This sensor has a range of 10-80 cm, and according to this thread might work at a distance of 30 cm from the window and angled at greater than 30 degrees from the glass surface:

I have had good luck using sharp gp2 series proximity sensors behind glass in museum display cases for triggering exhibits.  Typically incline them at greater then thirty degrees to the glass surface to avoid measuring the reflection.   Range from 30 cm in.

The proximity sensor measures distance, and when an object breaks the pre-defined distance it creates a reading that can then become an input that triggers an action, so if an object gets closer than X do Y. For example, if someone approaches beyond the distance X the diorama window the action Y can be triggered, such as the TV they’re looking at switches to a shot of them looking at the exhibit. Once again, aspirational, but it could work.

“Laser.”

The other kind of sensor that might work is a laser. Laser’s should be able to pass more easily through an insulated window, so when someone walks by and breaks the path of the laser the switch can be triggered. That’s Mission Impossible shit right there, but I’m a little hesitant to have a laser shooting out of the window across the street given the red dot might seem like a European hitman is stationed in the diorama—creating a bit more attention than necessary. What’s more, not sure if you look directly into the laser there could be any undesirable side effects, but this is where I am probably showing my ignorance—so more research needs to be done on this option.

Yet another option I have read about is video-based motion detection that depends on a establishing shot of the window environs without anyone in the frame. At the point someone passes by the window, or stands in front of it, the difference is detected which then triggers an action. I tried something like this with OBS when I started researching motion detection, and some folks have got this working. But I’d prefer an option that doesn’t depend on something as CPU-dependent as OBS, so I would need to explore what other options are out there for video-based motion detection.

Anyway, the quest continues, and at least now I know there are several options. What’s more, they’re all pretty cost effective, which brings me back to how amazing the Arduino is for such projects.

Posted in Arduino, bavastudio | Tagged , , , | 2 Comments

Archiving Content and a Long View of the Web

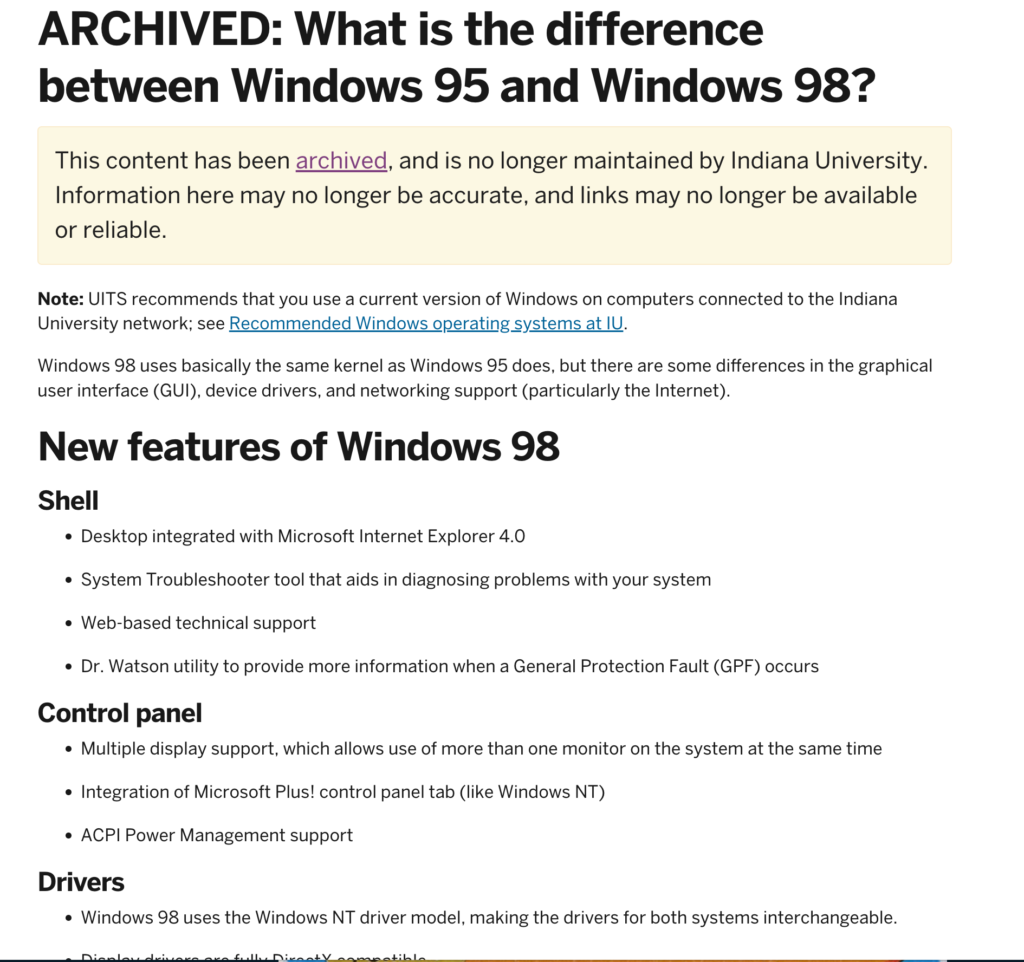
While preparing for one of my retrocomputing streams for Reclaim TV I was searching for some of the major differences between Windows 95 and Windows 98. One of the first hits I got in Google was an archived help document from Indiana University:

Archived Indiana University Website discussing the difference between Windows 95 and Windows 98

It was a quite useful document for providing a point-by-point breakdown of the difference during my stream. It also had the added advantage of being in the moment, so it was addressing an audience that was preparing for the various changes in 1998 or 1999, helping to capture the ways in which Windows 98 was designed to make it easier for tens of millions more people to get online. Between 1996 and 1999 the amount of people online went from 45 to 150 million, and by 2000 it was 400 million.* Most of those folks would be using the Windows 98 Second Edition—which packaged so many of the necessary drivers for plug and play peripherals like ethernet cards right into the OS, making it that much easier for folks to get online. At the same time, this also meant packaging Internet Explorer 4 and 5 as the default browser for this OS which led to an antitrust lawsuit against Microsoft.

Anyway, I digress. The point I’m trying to make is how refreshing it is to see Indiana University take the time and resources to preserve something as ostensibly disposable as IT documentation. The archaeology of knowledge on the web over the last 25 years is dominated by the gravitational darkness of broken link errors created by individuals and organizations that fail to understand, or care about, the cultural importance a link might represent. I understand it is easy to go Catholic here and argue every sperm is sacred, which can be dangerous ground for all kinds of reasons.

So let’s look at it from another perspective, the way so many organizations deal with their own web history and archive is akin to clear cutting forests, leaving nothing behind for folks to understand the ecosystem that once was—not to mention the damage to the health of the existing environment over all. Beyond the AI pollution, without the Internet Archive† we would have such an immense web amnesia that we would arguably be living in a present devoid of huge swaths of the cultural content that has helped define our world view for more than two decades. Collectively we owe an enormous debt to the Internet Archive for all the great work they’ve done to preserve our pasts, but depending on endless good will after their coming under continual attack for simply trying to carry out their mission seems dicey at best. It’s high time every organization, and dare I say individual, take ownership of their online presence and make deliberate and responsible decisions about what stays and goes. But even writing that last sentence I am not sure it would solve the issue or be nearly enough, so maybe a third party crawler like the Wayback Machine is the best solution, but what happens if and when that is undermined by those who would have us forget?

____________________________

*Stats taken from this Elon University History of the Internet article “Imagining the Internet’s Quick Look at the Early History of the Internet.”

†It is telling that the easiest and most reliable place to get a copy of Windows 98 Second Edition to do this kind of research is the Internet Archive, they are truly amazing, but it does beg the question if they can continue to do it all alone.

Posted in Archiving | Tagged , , , | 3 Comments

Retrocomputing on Reclaim TV

Reclaim Hosting has been streaming every Friday at 10 AM for a while now. We use Reclaim TV as the channel, and Taylor Jadin and Pilot Irwin did a recent stream breaking down the details of that process. A stream about streams…

One of the fun Reclaim TV developments has been the retrocomputing episodes I’ve been part of over the last month or two. It started with Taylor and I doing a stream about Protoweb, a proxy web service that’s designed to let you browse the web of yesteryear. Taylor demonstrated this brilliantly in that episode using his MiSTer running Windows 95.

That stream inspired me to fill some empty Friday streaming slots with some of my trials and tribulations of re-visiting Windows 98. I have at least two machines running this operating system, and it’s been quite eye-opening just how difficult relatively simple elements of computing were twenty-five years ago. So, I followed-up the Protoweb stream with another about the “Pain and Pleasure of Retrocomputing with Windows 98.” This one dives into running virtual ISO images using Daemon Tools to create a virtual CD-ROM drive. This allows you access to an unlimited treasure trove of old programs and games via the Internet Archive, which harbors a vast collection of software from this era. I demoed games that you can easily run off ISO images from the archive, such as Moto Racer (1997) and NHL 97, two of my favorites back in the day.

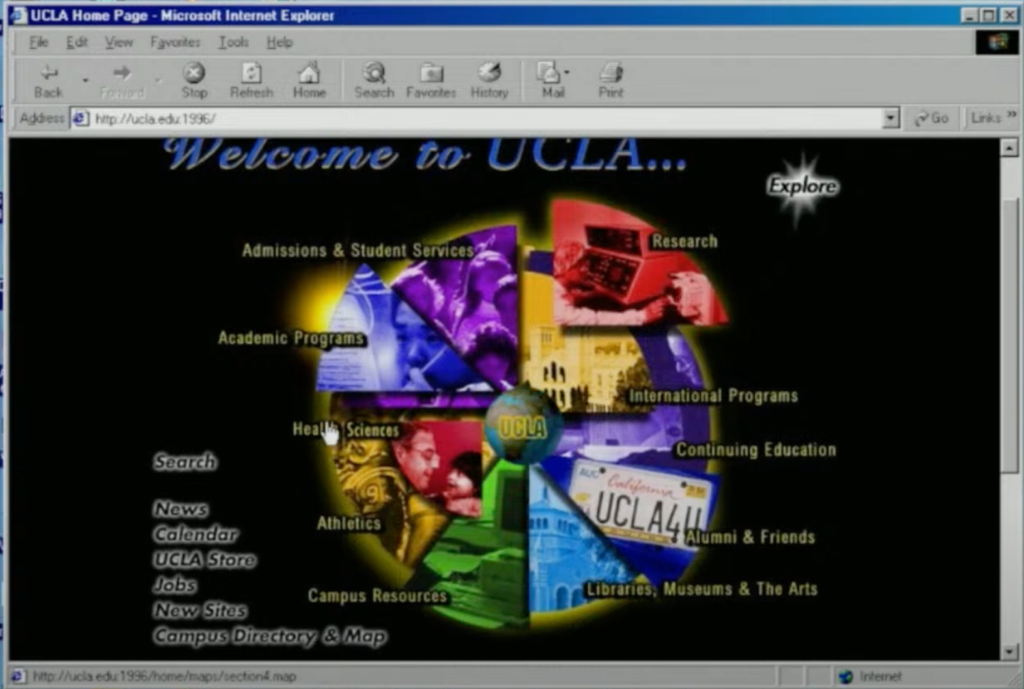
And just last Friday I did yet another retro computing episode, this time focusing on getting a 3COM Etherlink PCI ethernet card installed in my Windows 98 desktop machine so that I could get online and access Protoweb. I was able to get the card installed ahead of time and talked through the process, but the real gold was using Protoweb to surf old websites archived on the Wayback Machine. I visited UCLA’s website from 1996, and it was truly amazing. The main page was a very 90s image map, that had a pizza pie-like effect highlighting all the different “slices” of the university.

UCLA’s website in 1996 was an image map

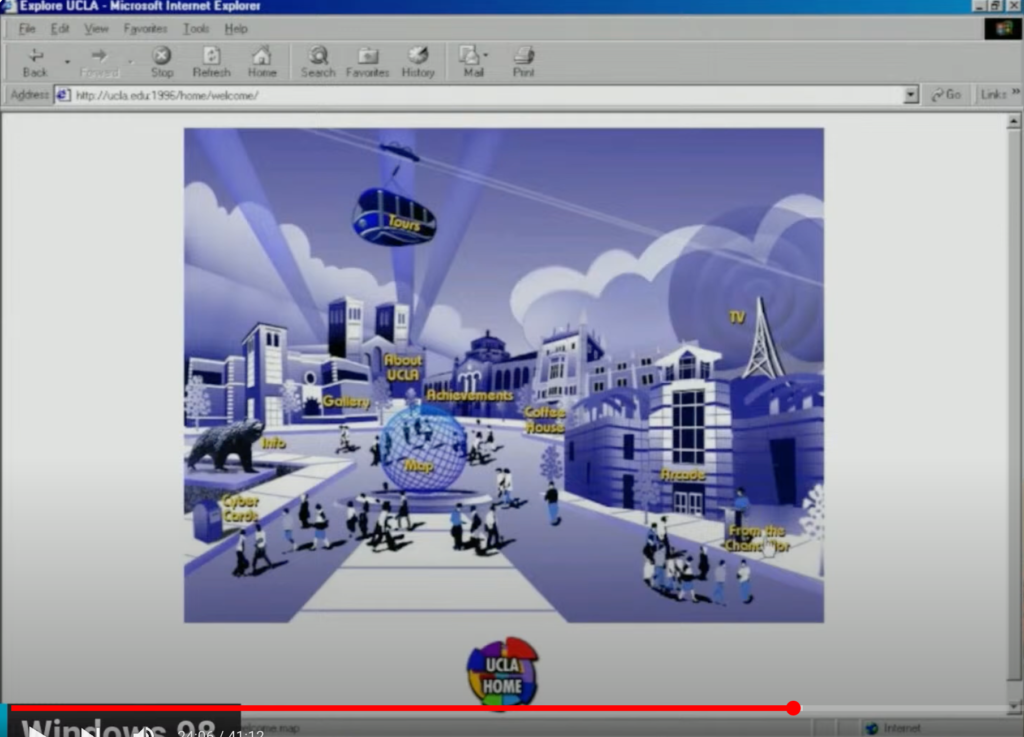
The Explore button in the top-right corner leads you to another image map of the campus, this time with everything from an Arcade to a Coffee House.

Image map of UCLA campus from 1996 “Explore” website add-on

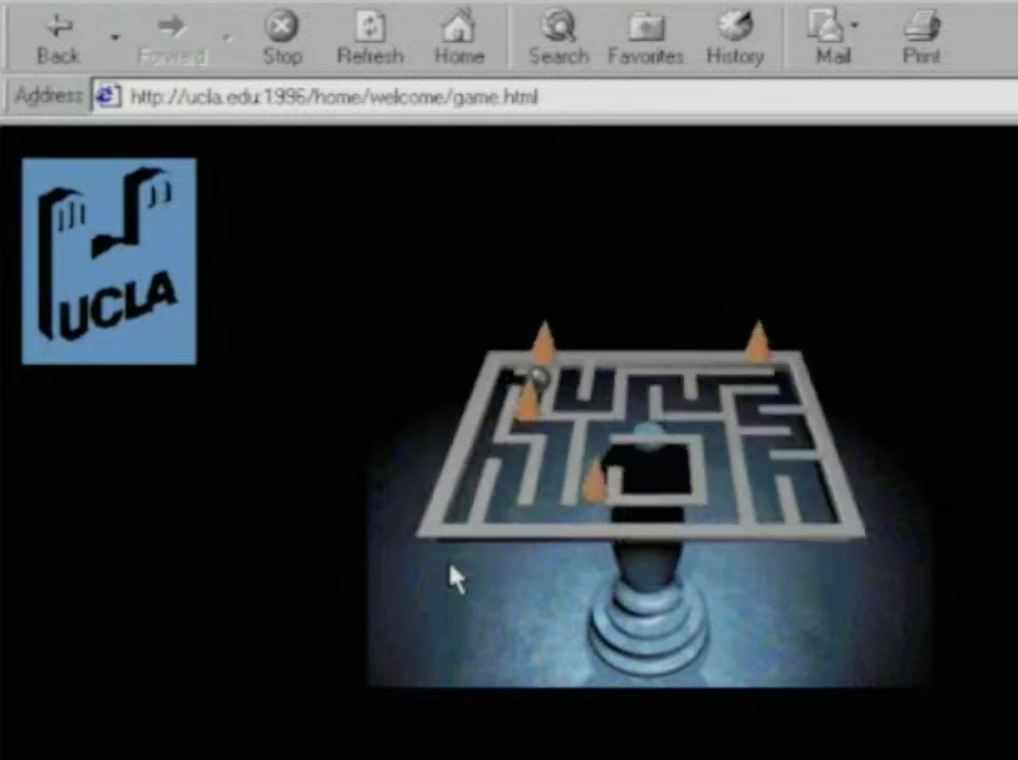
The arcade leads you to a Shockwave game that actually loaded for me in the video, and I could play it cleanly on the stream, which was amazing!

The Arcade has an interactive Shockwave video game called Labryinth wherein you control the marble in a maze with the number lock arrow keys

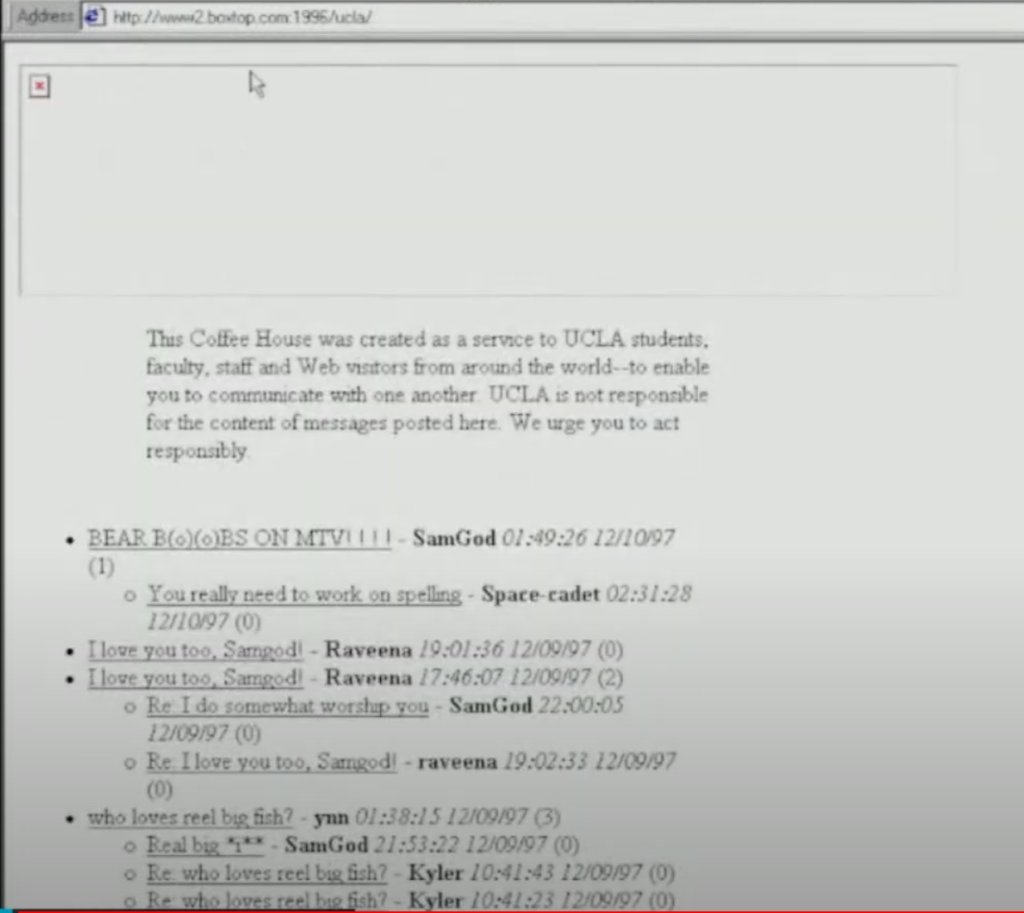
After that I went to the Coffee House which had a wide open public chatroom—can you imagine?

The Coffee House on UCLA’s 1996 website had a public chat room

Anyway, I fell down a rabbit hole of the 90s web using Protoweb, and it was really fun, and that marks the third video in what might be considered a retrocomputing strain of Reclaim TV, and I have a feeling there will be more to come.

https://www.youtube.com/live/THO9LeAX-A0?si=BlZzw6CIr7jv_S4s

Posted in ReclaimTV, retrocomputing | Tagged , , , , , | 1 Comment

bav-o-rama: Of Windows and Walls

The build-out of the bav-o-rama exhibit space is finished, and I’m thrilled with how it turned out. The plan was to have a window space to recreate movie scenes: think of it like NYC’s Museum of Natural History, just with dioramas of select 80s films. To realize this Antonella and I have been working with Riccardo and Alberto of Domus to figure out a plan that works. The space is about 4′ deep by 4′ wide.

The sides and back walls are made of movable pressboard that can be re-fashioned depending on the scene being created. The subfloor is made of 3/4″ OBS board, useful base for handling the various floors/terrain each scene will require.

One of the things that we also created around this window was a wood paneled wall with a nearly invisible door. This encloses the window diorama so that it’s neatly hidden when you enter the space, making sure the man behind the curtain is never exposed. The walls came out amazing, I’ll have to take care of the final step of staining them appropriately here soon:

Now that the window space is complete, I’ve been working further on the first exhibit. I’m hopeful to have it ready in the next week or two. You can get a sense of what Harry Wentworth’s head in the sand facing the TV in the window might look like:

Prototyping Harry Wentworth’s Head Watching Television

Also, I got the Creepshow episode “Something to Tide You Over” looping on the Zero Pi, which has me excited.

Finally, my friend Andrea and I started assessing the best placement of the head and TV while trying to account for the contours we will be created using a malleable wire base and various sized boxes to reproduce a sense of the undulating terrain of the beach.

Finishing the beach contours and adding sand is my project for next week, as well as digging in on the Arduino motion detector for switching to live camera (OBS seems a dead end). Beyond that, I have to get the background panels from the MBS Design studio and have them printed for the 3 wall panels and the ceiling panel  (more on that in the next few days); reproducing the old school CCTV camera using cardboard, while leaving room to house both a motion sensor and a Sony ZV-E10 camera; and , finally, trimming the hair of the mannequin head to more closely align with Harry Wentworth’s cut in the episode.

Outside of that, I want to talk to Bryan Mathers about creating  cartoon comments section using his Remixer Machine that folks can access via QR code when experiencing the installation. That same code will also allow them to read the comics on each wall in Italian, ensuring that the Trentini do not feel linguistically shunned—it is Italy after all!

Posted in bav-o-rama, bavastudio | Tagged , , | 1 Comment

Raspberry Pi Video Looper on Zero Pi W

After some frustration with the motion detection bit of the Creepshow diorama, I took solace in getting a $10 Zero Pi W (version 1.1) up and running with Raspberry Pi Video Looper. Essentially this project turns the Pi into a machine that loops images or video—playing a single file (or a playlist) over and over gain. This can be useful for digital signage, art projects, trade shows, etc. We’ve used it previously at OER19 to show off our art and videos, as well as Domains19 to get Ryan Seslow’s art streaming on a tower of CRT televisions.*
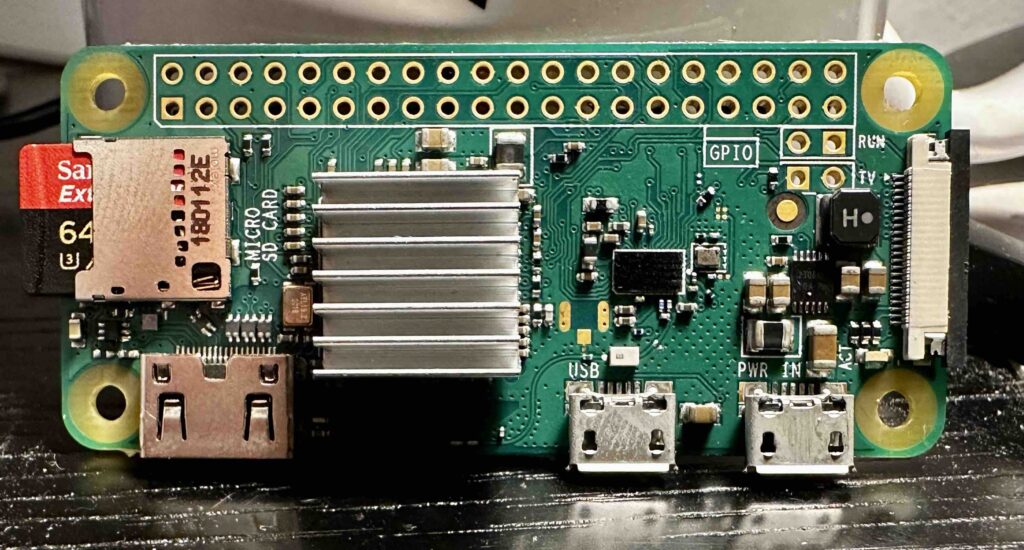
A look at the $10 Zero Pi W model, with two micro USB ports and a HDMI mini port

This time around the project is being used to loop a video of edited clips of Becky Vickers drowning from the “Something to Tide You Over” episode of Creepshow. The Zero Pi will be feeding this video into a 50 year old black and white TV (with some cable/signal conversion magic). I like the Zero Pi for this because it’s cheap, non-intrusive, and more energy efficient than a laptop—which is important given it will be running almost non-stop. †
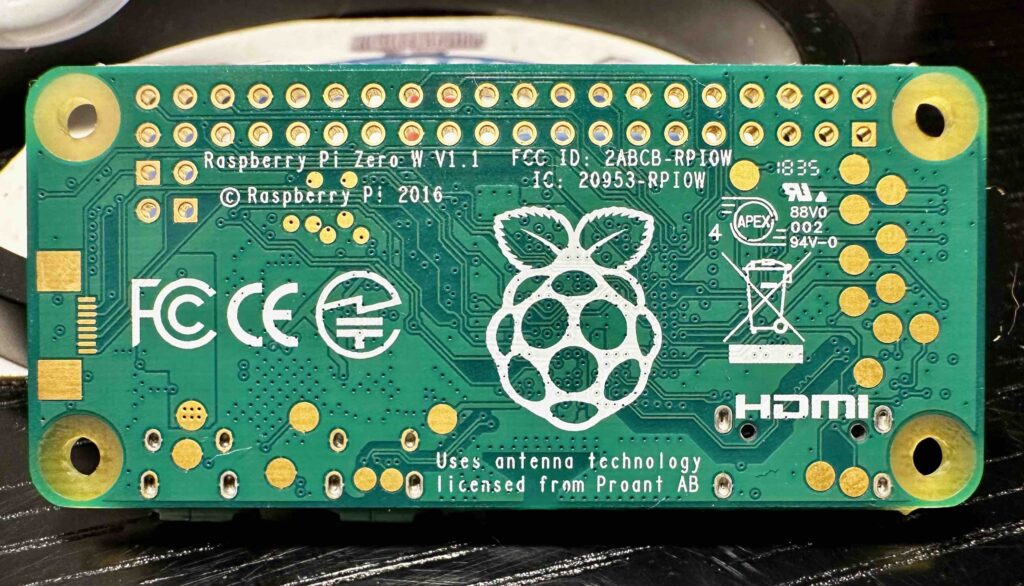
Underside of the Zero Pi W model, this is a 2016 version 1.1

In terms of getting this setup, this guide from Suzanne Borders reinforced that the Video Looper can be run on a Zero Pi. And to be honest, her post might be all you need to get things up and running—so check it out. She keeps things simple, and I believe the guide is geared towards folks getting the Raspberry Pi OS setup using Windows. Given I’m using a Mac I changed the OS customization so that I could easily access the Zero Pi via ssh. So, let’s get going, and I will quote the first four steps of Suzanne Borders post below—no reason to re-invent the wheel:

Preparing the SD Card

  1. Download and install the Raspberry Pi Imager
  2. Download the pre-built custom video looper OS image from videolooper.de which is still being actively maintained
  3. Run the Raspberry Pi Imager, click “Choose OS”, select “Use custom”, and pick the video_looper_v2.8.zip or whatever version you downloaded. You do not need to unzip this file.
  4. Click “Choose Storage” and select the MicroSD card you are going to use

At the point where you finish selecting all the options in the Raspberry Pi Imager it should looks like this (though your Raspberry Pi Device may be different), but the custom OS should be VIDEO_LOOPER_2.8.ZIP (latest version as of the writing of this) and the storage will be whatever Micro SD card is being used:
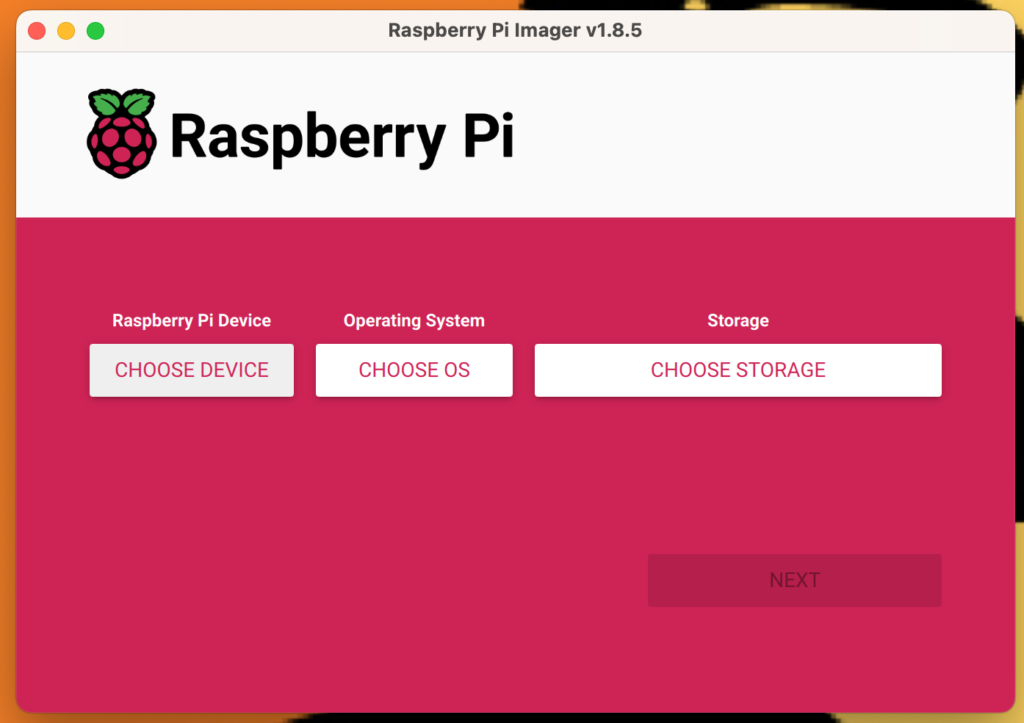
Clean Raspberry Pi OS Imager
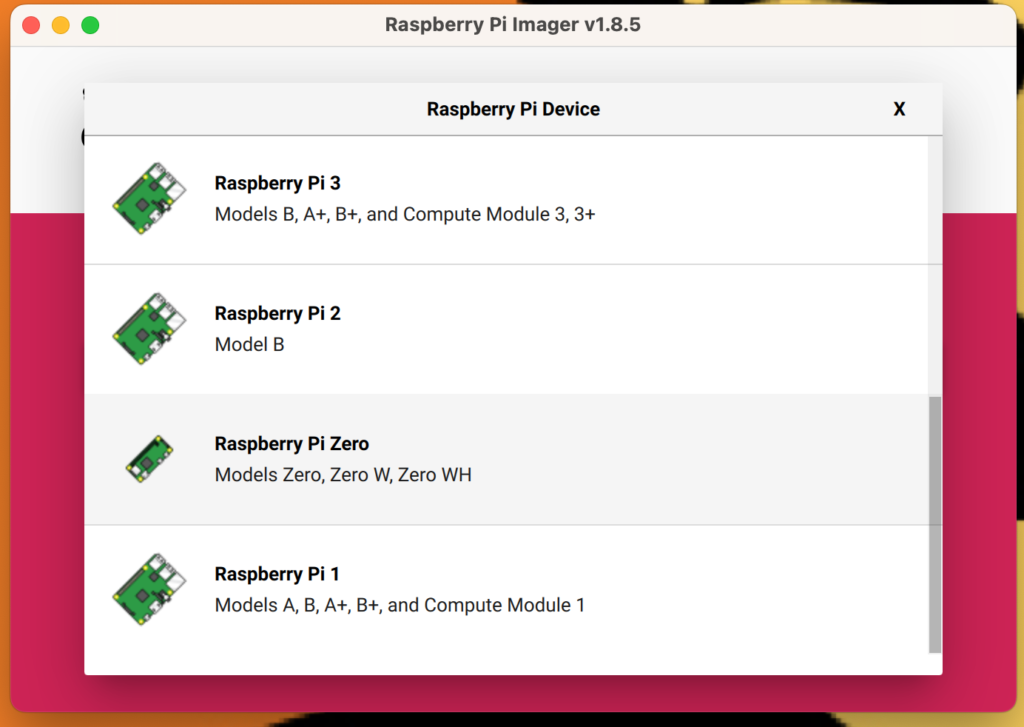
Click on the Raspberry Pi Device being used, mine was the Pi Zero
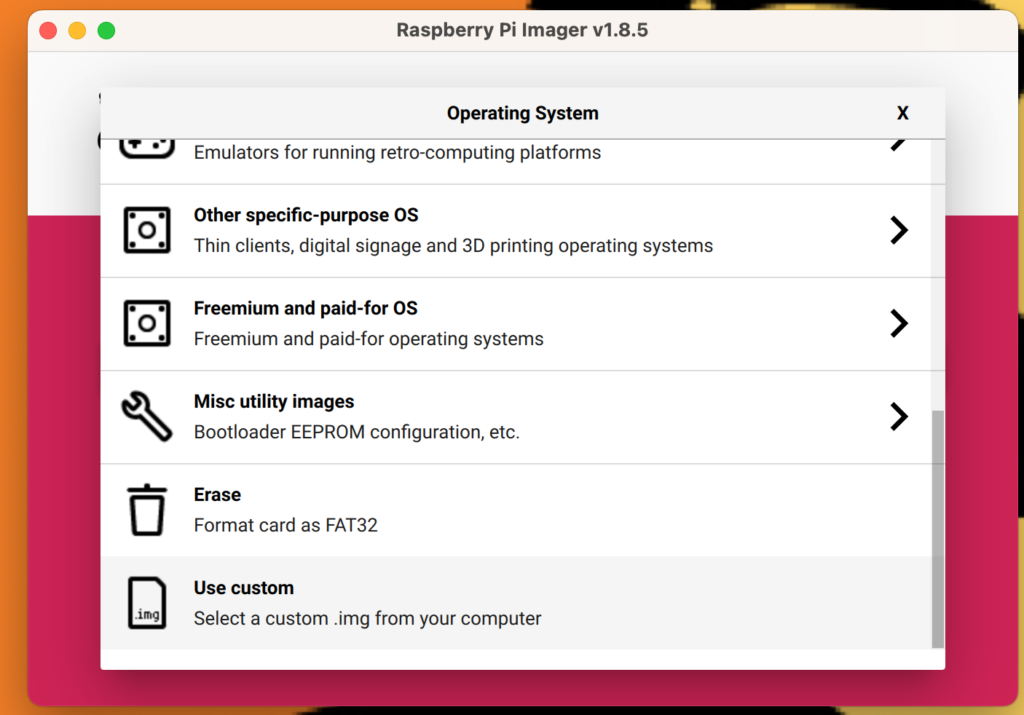
For operating system click on “Use Custom” and select the VIDEO_LOOPER_2.X.ZIP download
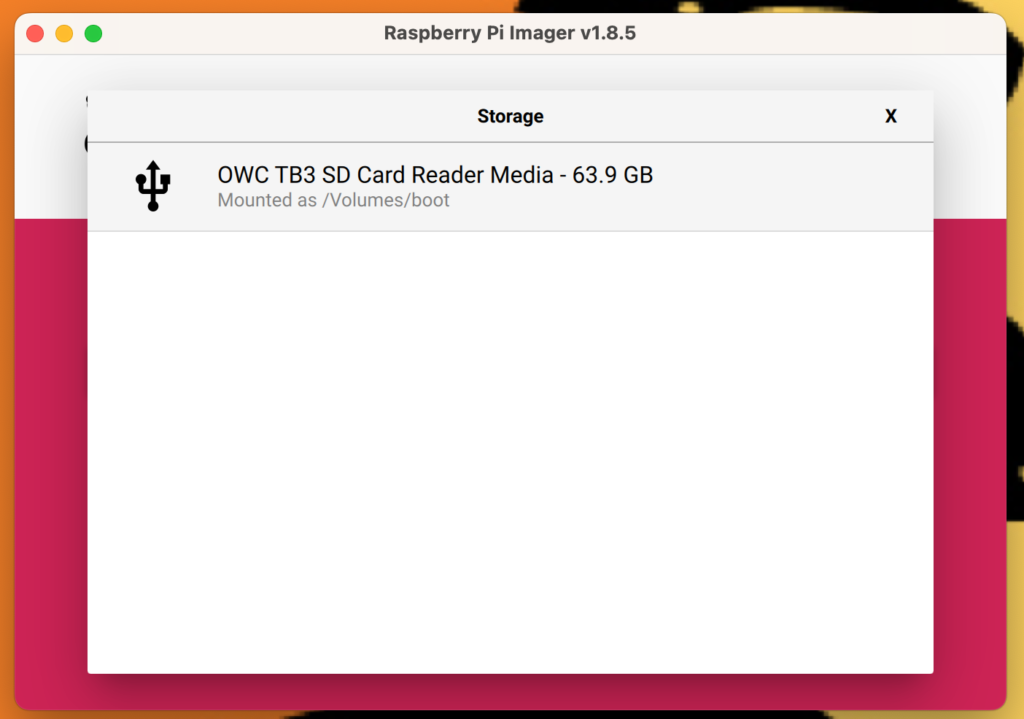
The micro SD storage device should be listed here
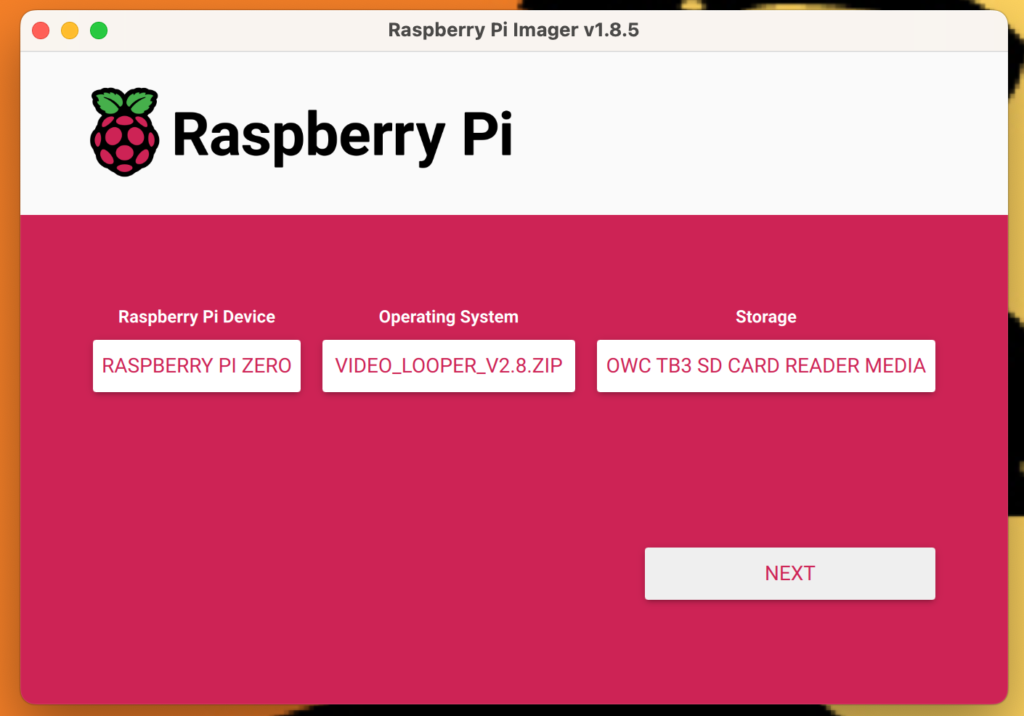
A screenshot of my selections before clicking “Next”

Once you click “Next” you will be given the option to customize the OS, click “Yes”:
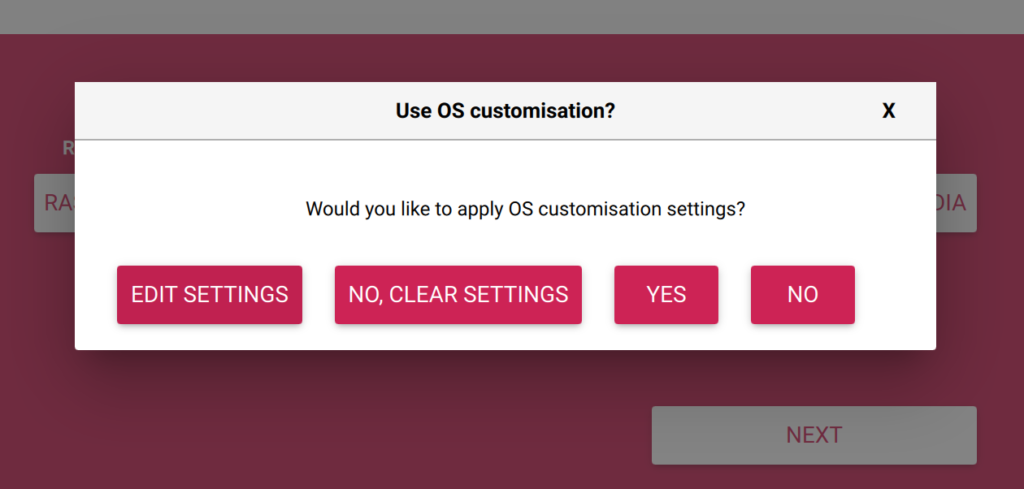
Image of a dialog box in which you need to click "Yes" to customize your OS configuration

Click “Yes” to customize your OS configuration

This will give you the options  to set your Raspberry Pi’s local hostname, which will make it easier to SFTP or SSH in if you don’t know the IP address. That said, at boot up my Zero Pi does give me the local IP address. You can also change the default OS username (pi) and password (raspberry) to something you can remember and is a bit safer. You also have the option to have the wireless connect to the network automatically at boot up.
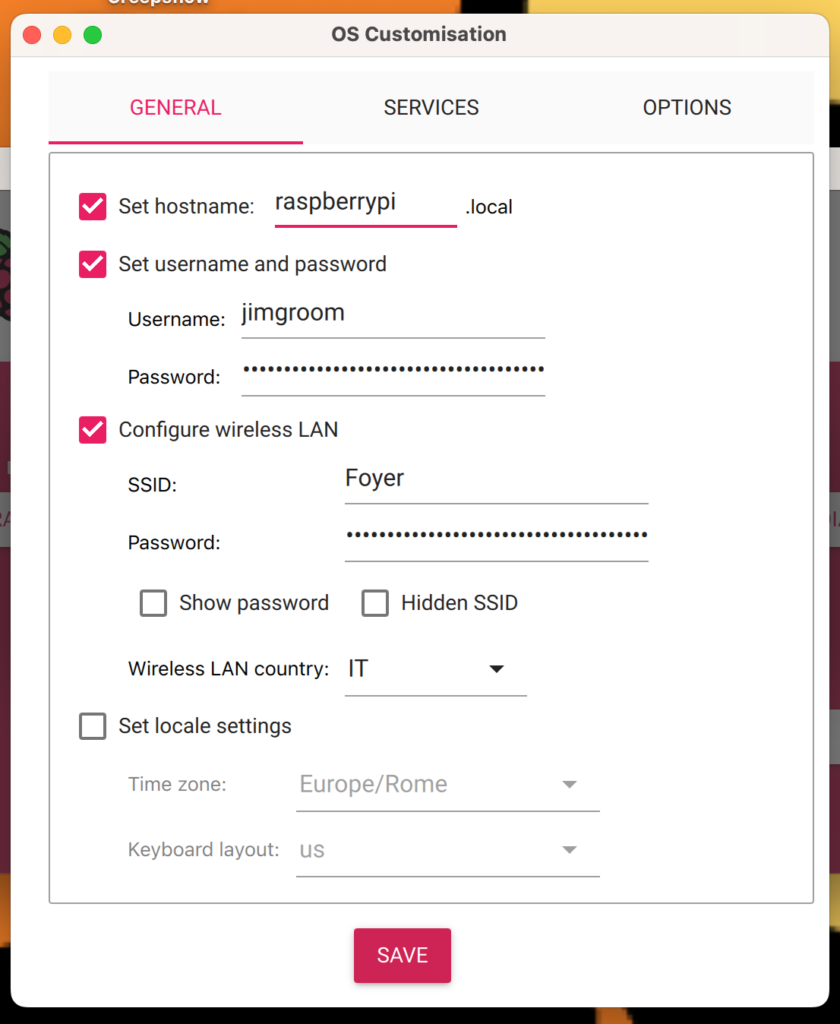
The other piece, and arguably most important, is making sure that you have SSH enabled under the Services tab of OS Customisation. This will allow you to remote into the Pi using terminal (or your SSH/SFTP app of choice). I opted for password authentication because password keys still trip me up:

After that I apply the customizations by answering “Yes”:
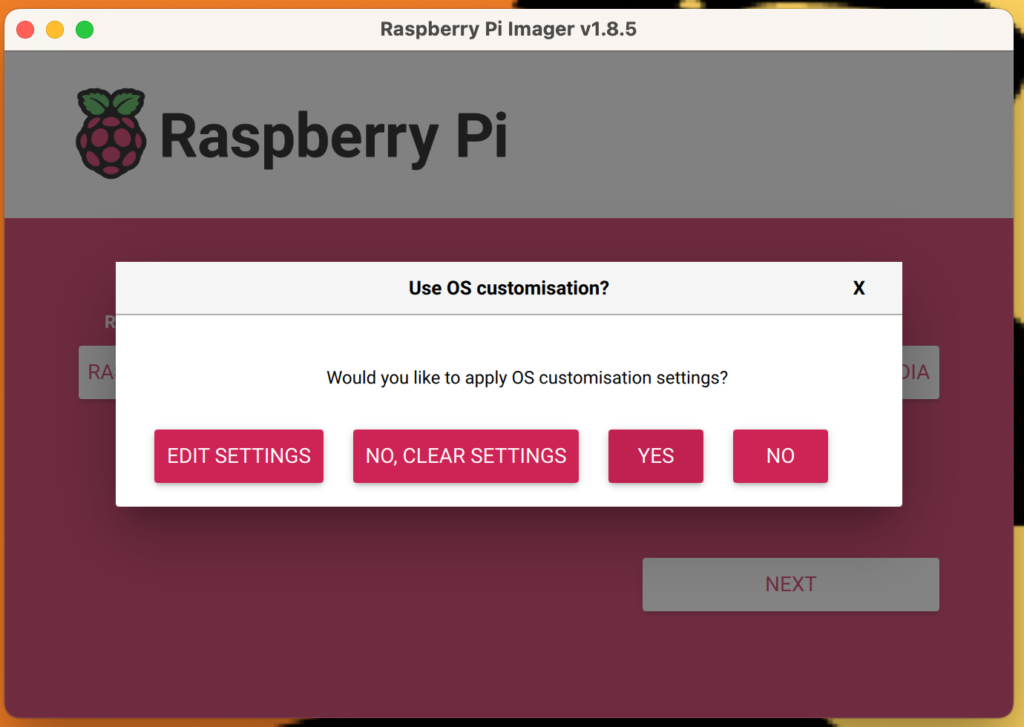
Click “Yes” to apply customizations

The next dialogue box will warn you about losing all existing data on Micro SD disk,‡ which you can answer yes given it’s assumed the disk is empty. If you have data on the disk you will need to back it up because everything will be erased when the OS is installed.

SD Card to be erased warning that can be ignored

After that the disk will both be written and verified:
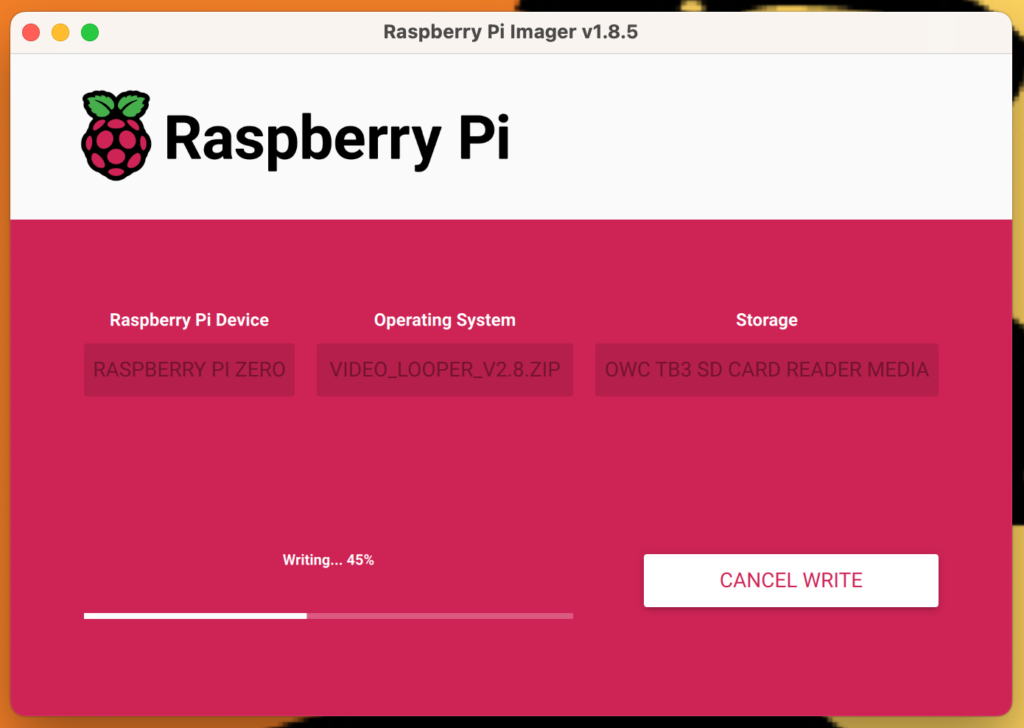
Raspberry Pi Imager writing disk
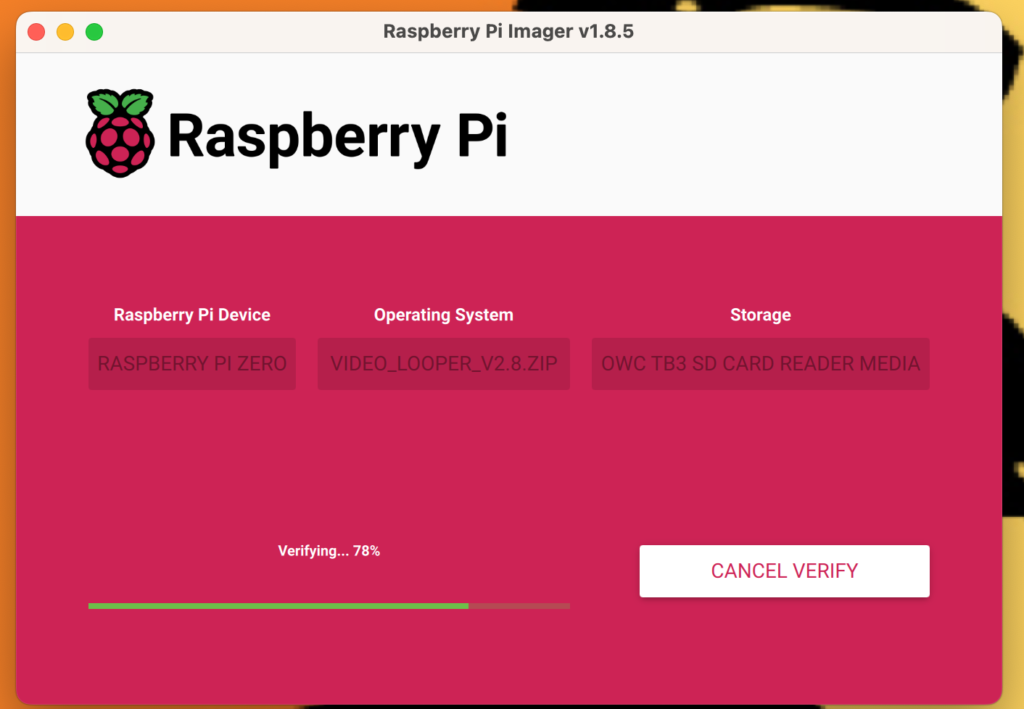
Raspberry Pi Imager verifying disk

Once finished, you will be prompted to remove the SD card from your computer and insert it in the Raspberry Pi.

You can now remove SD Card from your computer and insert it in the Pi

After booting§ the Raspberry Pi you should see a screen like this after boot, which suggests the setup went swimmingly:
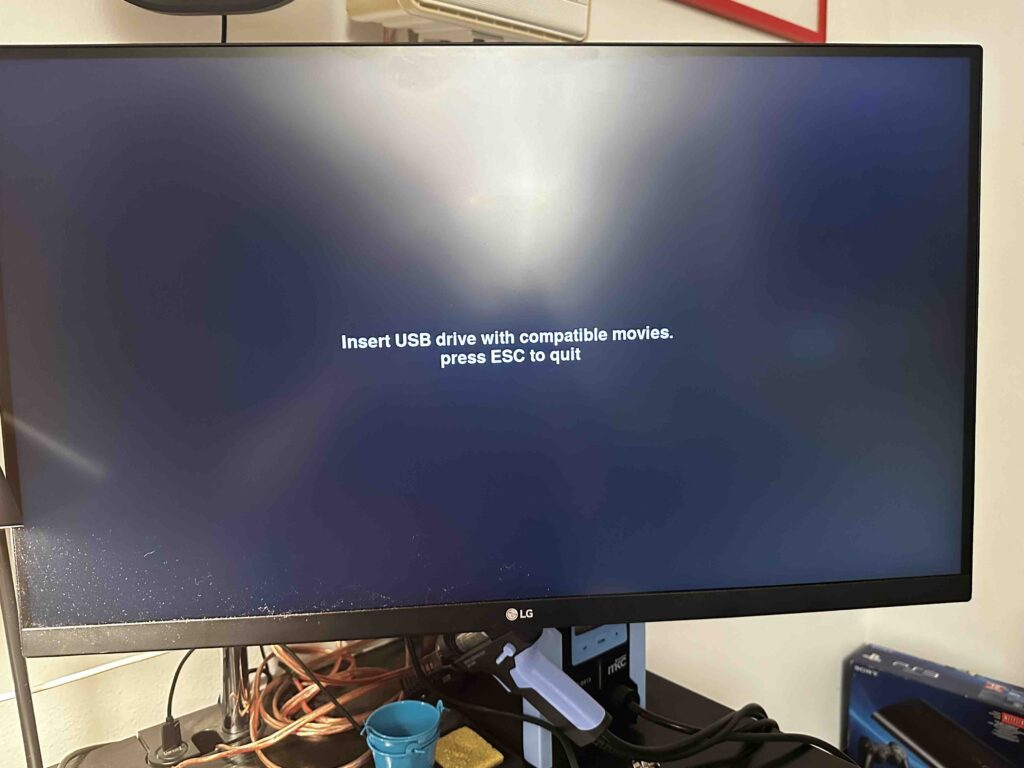
“Insert USB with compatible movies” means the Pi Video Looper was setup correctly, and you are now ready to edit the video_looper.ini file

At this point you are ready to either SSH or SFTP in using the details setup when customizing the OS. For example, the above specified localhost, username and password will allow me to access my Pi Zero via SSH as follows:

ssh [email protected]

After which a password prompt appears, and once you enter it the screen should look something like the following:
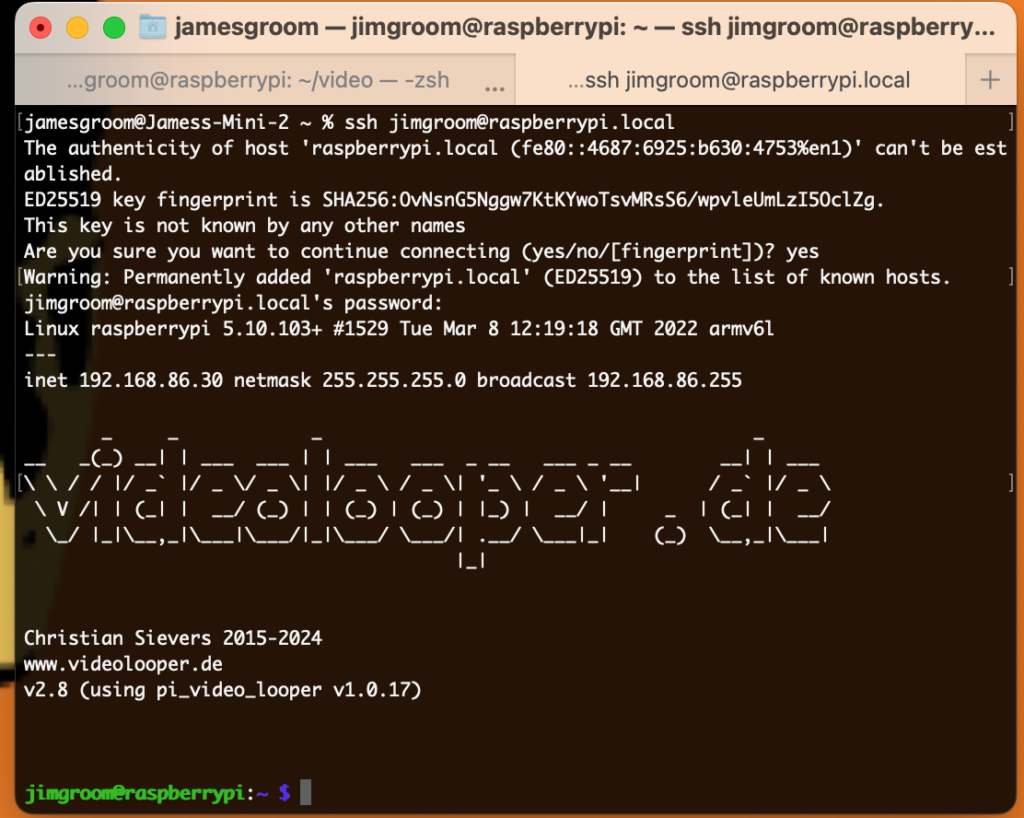
SSH access to raspberry pi using raspberrypi.local hostname

If you changed none of the settings save enabling SSH, the default username is pi and the hostname would be an IP address—with the caveat that the IP address will probably not be what’s shown below (the IP appears at boot up of the program, so be sure to note it):

ssh [email protected]

The default password is raspberry —that should get you command line access. After that you would need to update the permissions of the /home/pi/video folder if you did not change the username, and /home/jimgroom/video if you changed it to a unique name like jimgroom. The jimgroom directory would be reflective of whatever you named your raspberry pi user in the customization settings—so this will vary. You can navigate into the user directory and then run the following command to update ownership of the video directory, replacing jimgroom with whatever your new username is:

sudo chown -R jimgroom:jimgroom video

Changing ownership of video directory if you changed the pi’s username, and remember to use sudo

Once the video directory ownership is changed you should be able to upload files to the video directory. Now that that’s done,  edit the video_looper.ini file in the boot directory:

sudo nano /boot/video_looper.ini

Here you need to change two things:

  1. Assuming you are loading video and image files directly from the pi, rather than a USB drive, comment out the file_reader = usb_drive and then remove the hashtag in front of file_reader = directory
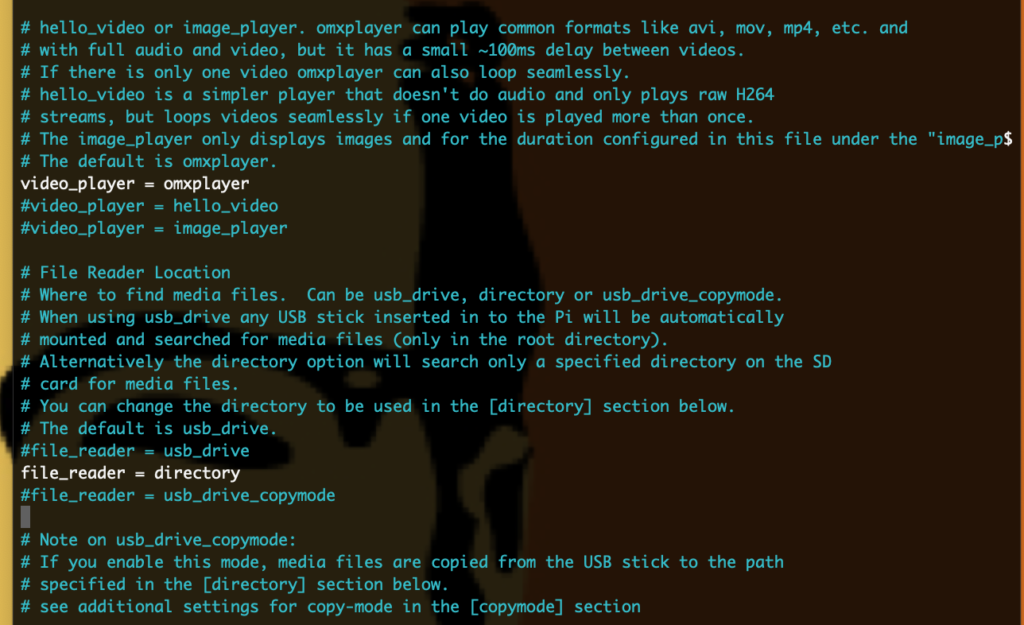
    Editing video_looper.ini to default to video directory rather than USB drive

  2. If you changed your username, change the directory videos are stored from /home/pi/video to /home/[username]/video using the username you created:

    Update directory path of where videos are stored locally on pi

After that, you can copy files to the directory from your computer by accessing the terminal on your non-Pi computer and running a scp command like the following:

scp /path/to/video/file.mp4 [email protected]:/home/jimgroom/video

Command to copy local files to your video directory on the Raspberry Pi

Now if command line is not your game, then you can do most of the above via your FTP client using the following details:

  • hostname: IP address or hostname you specified in customization options
  • username: pi (default) or whatever you specified, in my case jimgroom
  • password: raspberry (default) or whatever you specified in customization options
  • port: 22

SFTP gives you a more familiar file structure to work with, and will log you into the /home/[username] directory. If you changed your username in the customizations options you will still need to change ownership of the  video directory via command line before you can start uploading files. Also, accessing the /boot directory to edit the video_looper.ini file should be pretty straightforward via FTP—the boot directory is at the same level as the home directory, for reference.

That should at least get you started with accessing the file system of the Raspberry Pi via a Mac, just keep in mind that Raspberry Pi’s OS is a Linux operating system, so directory and file structures of a more robust Linux machine—along with the commands—will directly apply. This also means that some of my slow, but fairly steady, understanding of Linux servers is finally paying off on these side projects, which makes me very happy.

_______________________________

*As it so happens, we learned about this cool use of a Raspberry Pi back in 2015 from Michael Branson Smith (MBS). He used this software and setup it to create his awesome day of 1980s programming for the UMW Console Living Room project. All hail MBS!

†That said, I’ve been playing with the possibility of having a motion detector switch the video on the TV, but that might be a “stretch goal,” as MBS has told me 🙂

‡The recommended Micro SD card is 8GB-32GB for the Zero Pi, but a 64GB card I had hanging around worked fine, so larger is not an issue, but it might be a waste.

§One of the quirks of the Zero Pi is that there is no power indication led until the SD card is inserted—this confused me given after plugging just the micro USB into a power source there was no indicator so I thought it was dead, but turns out it just needed a bootable micro SD card, who knew?

Posted in bavastudio, video | Tagged , , , , | 2 Comments

Creepshow Diorama: Lights, Camera, Sand!

As the window area of the bav-o-rama is being finished, I’m trying to get the final pieces of the diorama figured out. If all goes according to plan, the inaugural Creepshow (1982) installation should be ready to go by mid-July. Very exciting! Here’s a look at what the space will look like, it’s pretty cool.

Alberto has once again worked his magic: the two side walls for the background are hinged to the wall and on wheels so it will be dead simple to adjust the angle they meet the back wall as needed.

All three are made of pressboard, and I have to figure out the best way to apply the comic strip background to these walls without creating a long term mess. Maybe I apply the background scenery to lauan first, so that it remains rigid while at the same time is easily attached and removed from the pressboard walls—any advice there is greatly appreciated, dear reader.

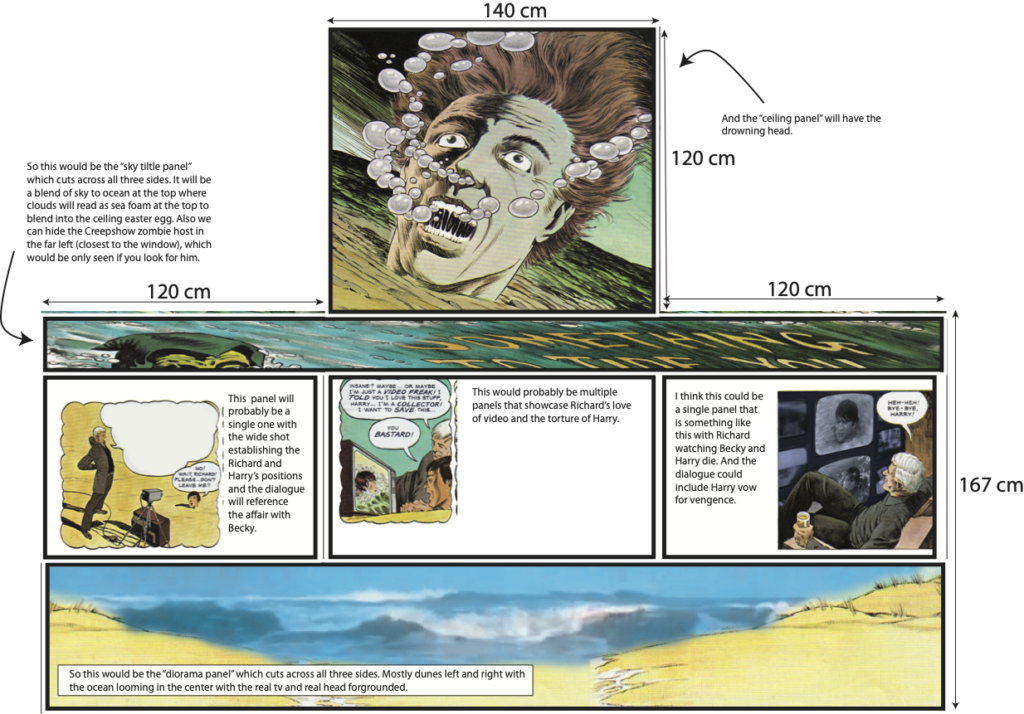
All three walls are 120 cm wide by 167 cm high, although the two side walls can change angles effectively changing the back wall width as needed.

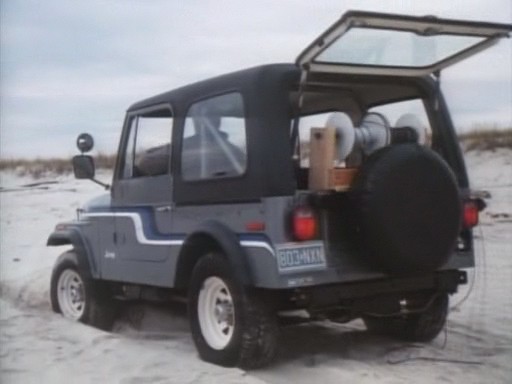
Earlier this week I had a conversation with Michael Branson Smith (MBS) to get some advice on the looping video of Becky Vickers drowning, as well as the best way to handle the background. At first I was imagining breaking up the beach scene into three parts, ocean and shoreline creeping in on Harry Vickers’ head as the centerpiece, and the two bookends of that triptych creating a sense of space and dimension by adding in sand dunes you might find in the Hamptons or Montauk. That said, if the license plate on the Jeep driven by Richard Vickers is any indicator, the scene is set in New Jersey which has a very similar shoreline to those I grew up with on Long Island.

Creepshow Jeep with Jersey Plates

Anyway, MBS suggested we take scenes from the original graphic novel that accompanied the release of the film in 1982 in order to make a custom series of panels to give the viewer some context—just the first of MBS’s many brilliant ideas. So he and his wunderkind illustrator daughter are working up some possibilities, and I’m very excited about that, you can get a rough idea of what they’re thinking here:

Something to Tide You Over Design

Something to Tide You Over Design background design concept

I have a meeting with that elite NYC design team tomorrow, so there’s definitely more to come on the background front–so good!

Another thing we got to discussing is how to contour the sand so it doesn’t look flat and relatively fake. MBS suggested chicken wire and paper mache to create an uneven surface that I can then glue the sand too, while at the same time affixing the head. He also suggested having the diorama floor of sand slope down a bit to reinforce a sense of scale and the normal incline of any beach at the shoreline. This seemed like an excellent idea, and after some youtube scouring I have a few ideas. I also realized it’s going to be important to mark-up the sand with various debris like dried seaweed, wood pieces, etc. to make it look somewhat convincing. Also, once again, I’m wide open to the experience and knowledge of anyone reading this given it’s all quite new to me. I’ve not done paper mache since third grade art class when we were tasked with wrapping and then painting a wine bottle to look like an bottom-heavy humanoid—a memorable project for sure.

Moving on, we got to talking about what might prove to be the most challenging piece of the diorama, a real-time switching of the video input from the looping video of Becky drowning to a live feed from a camera trained on anyone who stops and looks at the exhibit for more than a 5-10 seconds. MBS suggested that a proximity sensor attached to an Arduino might do the trick, so I’ve been looking for resources on this and have found at least a similar project someone has articulated using PIR motion detectors to switch  between different videos. I don’t want to switch between videos as much as switch between video inputs, but it might be the same thing. This is yet another area I could use some help with if anyone has some expertise in this area, or even knows someone who knows someone else I can reach out to 🙂 Getting this bit to work would be pretty rad, but we will see—world enough and time and all that.

Finally, another topic we touched upon was lighting, and the idea of two stand-up LED strips hidden on either side of the window. They should provide more than enough light and be easy to manage, while remaining outside the viewer’s field of vision—unlike my original idea for hanging lights. Then MBS floated the idea of the strips subtly changing color depending on the time of day so that the diorama reflects the actual time of day, so a brighter, sun-baked yellow during the day, much like the beach.At night the diorama has a bluish tinge, and I wonder if we can even have a redish/orange glow at sunrise and sunset. Luckily LED strips are pretty easy to find, but programming them to change color with the time of day might be another project for the Arduino, our Twang experiment many years ago might offer some insight there.

Anyway, that’s an update as to how the diorama is moving from a bizarre idea to an honest to god reality! There’s nothing better than watching a plan come together.

Posted in bav-o-rama, bavastudio | Tagged , , , , , , | 6 Comments

Team Reclaim

As Reclaim continues to morph, I ‘ve been thinking a bit about working teams. One of the real joys—and possibly under appreciated privileges—I’ve had professionally is being part of really amazing teams, which often translates to working with great people. I was living in New York City in the late 90s, just in time to witness (many times first-hand) the NY Yankees 3-peat World Series championships in 1998, 1999, and 2000. Now it might be easy to dismiss this team given they were chock-full of money and talent (they’re the Yankees, after all), but turns out the Orioles had an even higher payroll with arguably as much talent in 1998.* And also, remember the Mets!!! 🙂

Beyond the money and individual stars there was something more at play—a sense of joyful commitment to the work married with talent made them something else all together. Even the leagues of folks who hate the Yankees would crack a little with that particular team—they were hard not to respect because they played as a team and the greatness transcended any one player. What’s not to love about an impossible infield play by hall of famer Derek Jeter to rob the opposition of a hit followed by an equally impressive stop from everyman utility player Scott Brosius. It was greatness all around; they made each other better and as a result were unstoppable for 3 straight years—a herculean feat in any sport. To boot, they seemed to be having fun all the while.

Now edtech is not Major League Baseball, and this comparison is flimsy at best, but the NY Yankees of that era were emblematic of a great team, and one I witnessed first hand.† And for me the key seemed to be joy, having both a shared purpose as well as a lot of fun with your teammates. I think that translates very well for me with the work I did as an instructional technologist at University of Mary Washington alongside many amazing folks, but in particular Martha Burtis, Andy Rush, Shannon Hauser, and Jerry Slezak. They’re folks I miss being around regularly, but when we were together in the bullpen (maybe the baseball metaphor does work) exploring the magic of the mid-2000s web for higher ed was undergirded by a lot of laughter, and thankfully not spoiled by the years of million dollar state salaries. I’ve talked about the magic of working at the Division of Teaching and Learning Technologies (DTLT) on this blog extensively, so I will try and keep things moving along.

DTLT Reunion at Reclaim Open

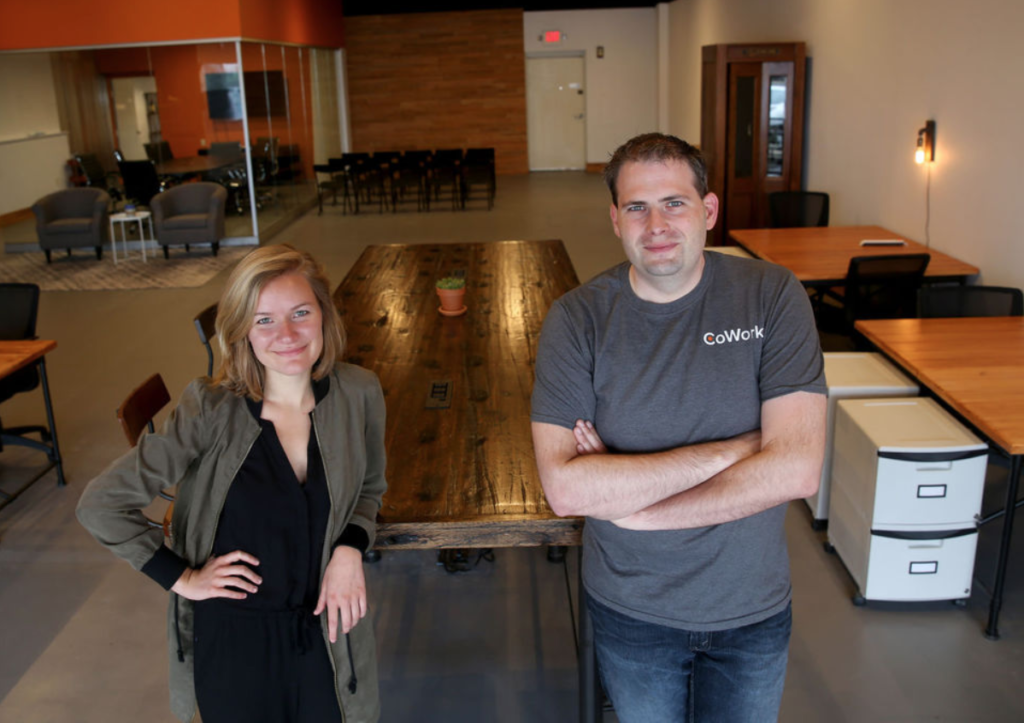
My next team was in many ways taken from DTLT, as Tim Owens and I started Reclaim while working together there. We both eventually left the university, taking the newly minted graduate Lauren Hanks (Brumfield at that time) with us as we ventured into the unknown territory of Reclaim Hosting. We were a super small team for many years, it wasn’t until 2017 that we brought on Meredith Huffman (another fresh UMW alum). And with the addition of Chris Blankenship a couple of years after that (yet another UMW faithful!), we had the core of a team that would define the first 10 years of Reclaim Hosting.

Tim and Lauren in a recently Completed CoWork

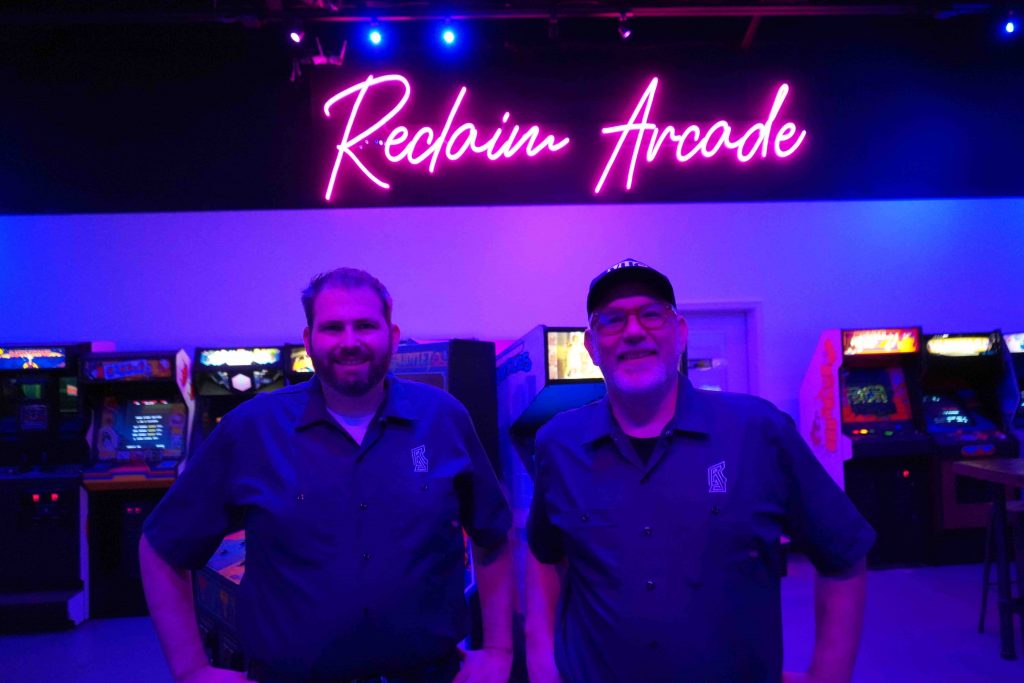
This was quite an intense period as we stayed lean and grew quick, but at the same time it carried over a lot of the fun and experimentation of our time at UMW, only with a fraction of the meetings. On top of growing our shared hosting, Domain of One’s Own, and managed hosting significantly, we also had time to open up a CoWork space, a VHS store, and eventually Tim took over the arcade we built and spun it off into his own career—leaving the now civilized terrain of Reclaim. And not too long after Tim became the pinball wizard, Lauren left just this past September after realizing the previous eight years Reclaim was all she had known professionally. It was time for both to strike out for new territory, leaving old man bava to his devices. The contributions both Tim and Lauren made are too immense to list here, and in many ways I’ve not written either a proper goodbye on this blog for fear of letting either go—but I’ll save that discussion for my next appointment with Dr. Freud.‡

I’m not going to lie, I was a bit concerned this past fall and winter as I was saying goodbye to Lauren and buying out Tim’s remaining share of Reclaim Hosting, and my mental stated reflected that transition. At the same time, one of the things I underestimated was just how resilient and awesome the team we’ve been building over the last several years has become. Meredith and Chris are the pillars of both support and infrastructure this new city on the hill is built upon, and in addition to that, bringing on Goutam Vijay Narang, Pilot Irwin, and Taylor Jadin almost three years ago ensured a solid base from which we could continue to provide the service our community is accustomed to, while at the same to building community through avenues like Reclaim TV, Discord, the Roundup Newsletter, and Reclaim the Blog—all of which we’ve never done to the same extent previously. In many ways we’re getting the word out better than ever before, and it’s still retains the tone and humor Reclaim always represented. Just 18 months ago we brought on Noah Dorsett who has done a phenomenal job shoring up security, which helps us all sleep that much better at night. But when Tim and Lauren were coming to the end of their reign, Meredith stepped up to play and all around manager; Pilot stepped up to manage support like a star; and Chris remained Chris keeping everything online.

Team Reclaim at Reclaim Open

It’s also worth noting, eight months after Noah came, we hired on Amanda Schmidt to buttress our growing Edtech group, which Taylor and Pilot were already helping us define. It has been truly rewarding to watch Edtech find its legs, part of which has been the push for community building, and we’ve been able to support Reclaim Cloud that much more effectively, as well as introduce new offerings such as ReclaimEDU and ReclaimPress, we’ve done anything but sit on our hands.

But when Lauren left there was a serious HR and operations gap that we got ridiculously lucky to be able to fill with Maren Deepwell, her impact was immediate and she was able to keep the team focused, while generously sharing her vast expertise—the mentoring has been invaluable. When I had to take more extensive time off during the winter of my discontent, she worked with Meredith and the entire Reclaim team to make sure everything remained on track, and we scarce missed a beat—that fact alone speaks volumes to how much we have grown with our current incarnation of Reclaim.

I think part of my musings here might be that I just finished up annual reviews, and it was both a relief and rewarding to see how happy folks are at Reclaim—that for me is the number one indicator of success. By that metric, we are by and large killing it. And our team is still growing, with a brilliant hire of superstar Jason Teitelman, whose has been an remarkably good fit to further reinforce out focus on all things support. And just this month we’ve added Cass le Fay into a hybrid support/infrastructure role to provide Chris some relief with all things sysadmin—long overdue.

I would be remiss if I did not end with one of the most impactful changes that has happened in just the last two months, bringing on Justin Webb as managing partner, to manage finances and bring some of his long-honed expertise in all matters IT to bear on Reclaim’s future. We’ve worked with Justin for more than 7 years as a consultant, after being colleagues at UMW for almost 7 more—so the ability to partner with a know entity who has seen the inner-workings of Reclaim for so many years was a true relief. As the reality of not being entirely alone takes hold, I can feel the pressure and dread turn once again to joy and possibility.

As Tim stepped away the infrastructure team felt that hit, just as Lauren’s departure had us scrambling organizationally, so bringing on both Maren and, six months later, Justin marks the beginning of yet another era of Reclaim that has me excited all over again. Managing growth and valuing our services appropriately has it’s real challenges, and given Reclaim was never the work of one person, the fact that we’ve built a team that’s as good, and arguably deeper, than the one we had out first ten years really has me excited for what’s to come. It’s all about the people, and Reclaim has made all the right moves!

_____________________________________

*If you look at MLB payrolls since 1998, the Yankees have consistently been amongst the biggest spenders, but that has led to only 1 championship in 23 years—although arguably 2 given the Astros cheated. So while money always matters, there was also something else at play with this group.

†It was also hard not to be drawn in by the Chicago Bulls of the mid-90s and the god-like talent of Jordan even if you were not a basketball fan. But that team seemed to struggle with the cult of Jordan—whereas the Yankees championships were not as predicated on the one superstar (in fact, the one superstar often is an albatross in baseball, A-Rod anyone?). Now this could be a difference of sports, granted, but Jordan’s persona and talent were so ridiculously great that it was hard for any other player on that team to get much of the glory, which is unfortunately still playing out between Pippen and Jordan. What’s more, Jordan and the Bulls made Basketball a global phenomenon, which no team or player has been able to do for baseball. In fact, I’m seeing the impact of Jordan’s footprint 30 years later with basketball’s immense popularity here in Italy.

‡I think the same was true of Shannon Hauser when she graduated and “left” UMW

Posted in dtlt, reclaim, Reclaim Edtech | Tagged , , , | 6 Comments

Something to Tide You Over

I’ve been making some progress collecting the various elements needed for the Creepshow (1982)  episode “Something to Tide You Over” diorama. This will be the first diorama in the bavastudio space, and I’m pretty excited. I guess the first thing to note is that the window proscenium is being built out presently, and it’s coming along nicely:

Bav-o-rama walls

It’ll be hemmed in by an angled perimeter of three walls (eventually with paneling finish) to enclose the window diorama cleanly. I like this design because there’s both enough storage and enough space to work within. The last two pieces will be adding the third wall with a door for easy access.

Bav-o-rama

After that, we’ll need to figure out whether to design the background panels with something like 1/2? to 3/4? plywood that provides thicker, more stable material (but also heavier and harder to work with) versus a cardboard-like material so the panels are easier to handle. I guess the question will be whether or not we’ll eventually be hanging things off the background walls for various effects—something I imagine happening very easily in the near future. Perhaps we can move between both materials depending on the scene’s specific needs. We’ll see, all the same we will have to figure out a way to secure them cleanly.

In terms of the outside enclosure, the cocktail-style video game Rally-X will fit nicely up against the angled wall, giving ample space for stools for game players to sit and enjoy the play—always a challenge with cocktail machines. Beyond that, we are rethinking where the coach and chairs for the living room area go based on space, but I’m thinking the diorama will be finished well before the rest of the space (perhaps in just a few short weeks), which means I had to start collecting items for our first scene.

To give some context, the scene will be taken from the third episode of Creepshow (1982), namely “Something to Tide You Over.” In this scene Harry Wentworth (Ted Danson) is buried up to his neck in the sand on the shoreline by Richard Vickers (Leslie Nielsen) to torture him for having an affair with his wife Becky Vickers. As part of this elaborate and twisted revenge love triangle, Richard has placed a black and white television in front of Harry so that he is forced to watch his lover drown live, while at the same time preparing to meet a similar fate as the tide comes in. It’s a psychotic scenario straight from the mind of the master of horror himself, Stephen King, and adapted to screen brilliantly by the great George Romero.

My idea is to capture the scene from behind, where you see the back of Harry’s head, but can watch the wife drowning on the TV in some kind of loop. What’s more that image will switch to a camera above the TV that captures anyone who comes by the diorama on the street and stops to look. The switching between inputs for the TV is something I’m working on now, but it would be amazing if it were automatic versus manual. So, to build this out there were a few things I needed, noting I already have the black and white TV and camera. In fact, I did get the Sony ZV-E10 to push a live image to the 52 year old Motorola TV just yesterday, which was a blast!

Apart from that, I went shopping yesterday and got the other pieces I’ll need for the diorama, which are listed below, alongside the price.

  • A table top, low-quality aluminum camera tripod for the live camera: $30
  • Blue Metal Beach Pail (scaled at 2? to make the 9? TV seem bigger): $10
  • Mannequin head with real human hair that will need to be styled: $30
  • Life-size blue crab to reinforce accurate scale of mannequin head: $11
  • RF convertor for RCA signal for the old 1972 Motorola black and white TV: $10
  • 10 foot Micro HDMi cable to get live video out of Sony ZV-E10 camera: $11
  • A multi-HDMI Selector to seamlessly choose between live camera footage and looping video of Becky drowning: $12
  • 50-100 pounds of beach sand for the base of the diorama: $10

So, as of now I spent a grand total of $124.00 on this specific diorama. I’m hoping to keep the costs for each new diorama relatively low given I want this to be fast, cheap, and out of control rather than an obsessive struggle with verisimilitude. What’s more, I’ve been accumulating a lot of stuff over the years, and that should finally pay some dividends with this kind of project.

A couple of other pieces to figure out are how to get the footage of Becky Vickers drowning cleanly into a watchable, believable sequence with a GIF or short, looping movie. I know we worked with the video pi looper for OER19, and I can play with that and see if it still works. But I also have an extra mac mini hanging around that I can just run HDMI out and convert for the Motorola TV. On the mini we can use either a GIF in a browser window or looping video in something like quicktime without much overhead. So that piece is absolutely doable, I just have to study the various moments of Becky drowning and get some advice from the GIF/video king Michael Branson Smith on the best way to capture and edit them. I must say, the window diorama is really pulling the bavastudio together.

Update: I forgot to include a sketch I made of the diorama while traveling to Berlin a few weeks back. It think it captures the essence pretty well…

https://flickr.com/photos/jimgroom/53812510095/in/datetaken/

Posted in bav-o-rama, bavastudio | Tagged , , , , , , , , | 1 Comment